5th part of the Blackberry on vellum story.

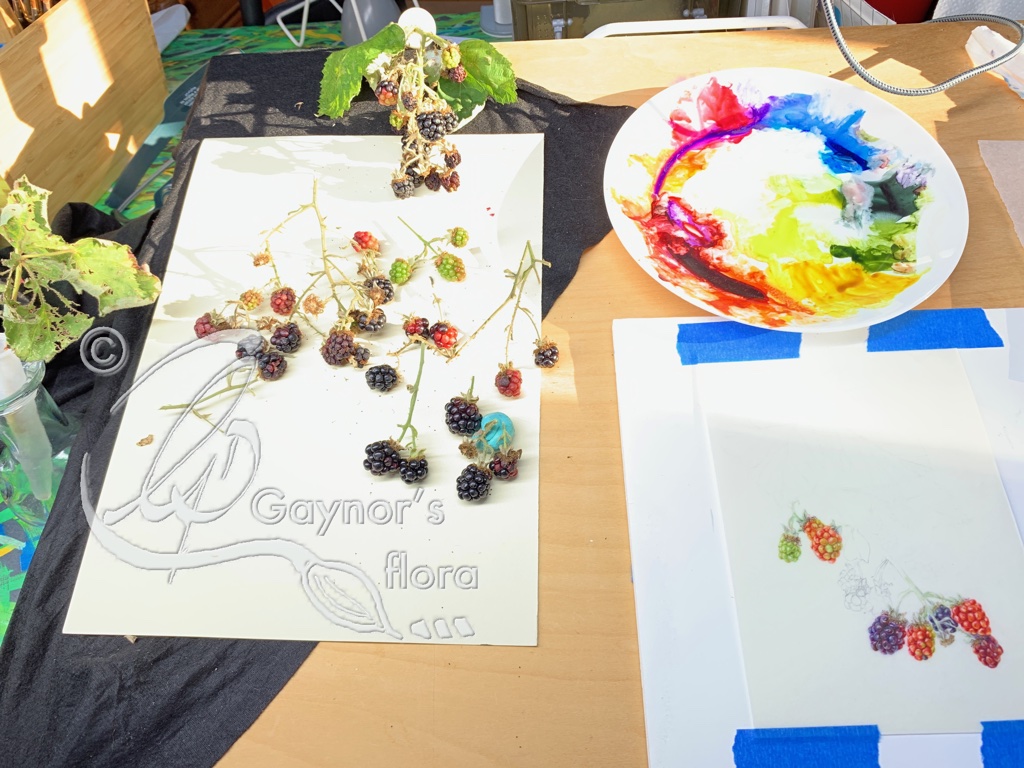
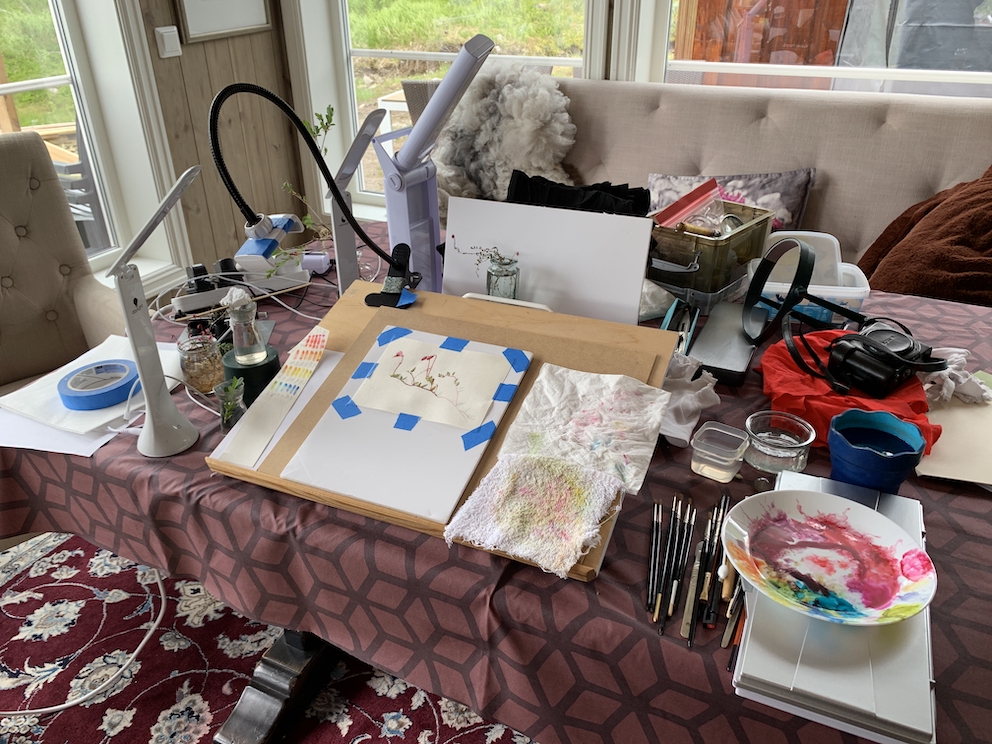
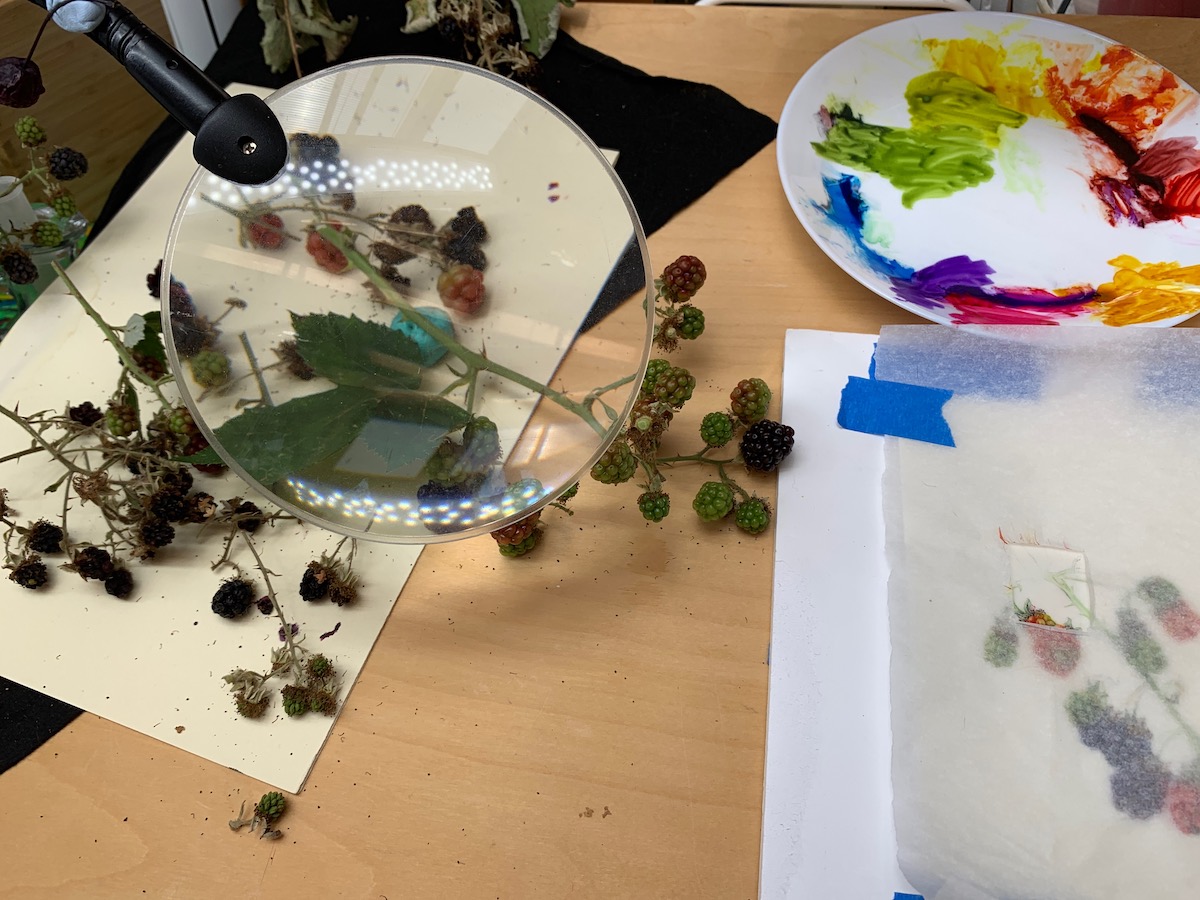
This is not a pretty sight; It is my desk easel at this stage of the painting.

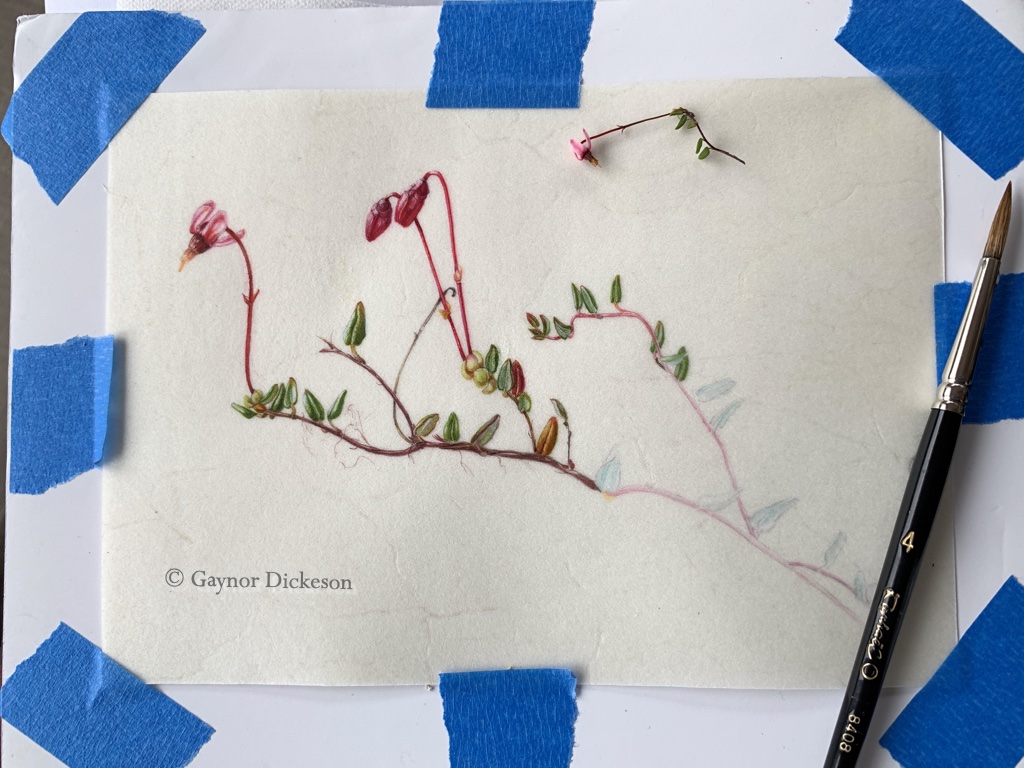
I haven’t disposed of the original stem or leaves, nor the the additional berries used underway. As I said before, once part of the subject is past caring, I replace it with a fresh sample. There have been many fresh samples so far, therefore, although the set-up looks similar, the details are not. You will see even more when I get to the leaves!

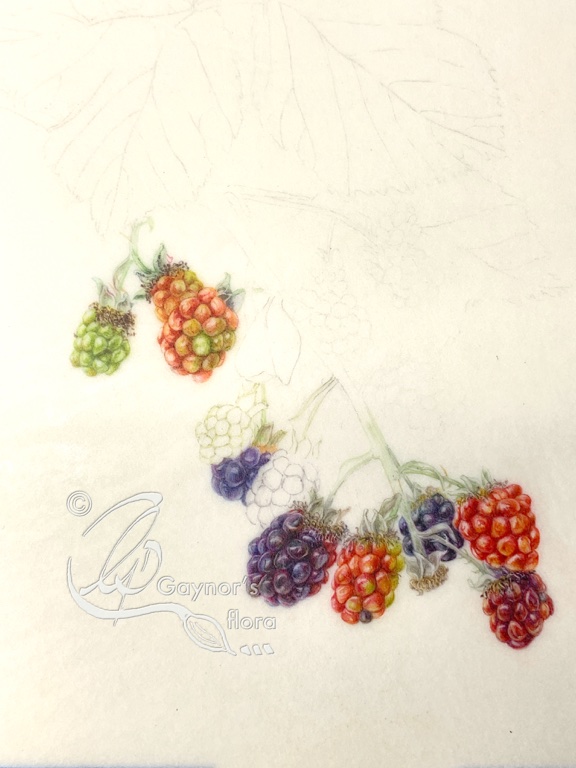
But why have I kept onto the old berries? Because, every one is different. The arrangement of the drupelets is different even though they follow the Fibonacci pattern. They also contain different numbers in each berry. I might want that information at a later stage, even though the berries have dried out.

The picture also shows how I check the connections on my plant. Under the magnifying glass is the connection between a branch, a new stem and the adjoining leaf. The sample is in the opposite direction to my drawing, so I need to transpose the information as I paint. It’s no good me turning the stem over as the information is different on the other side.

You can see the developing painting on the right and my refreshed colour palette as well.

This time I will finish the blackberries and make a start on the leaves.

If I had been doing this on paper, I would have used graphite for the leaf right in the background, but it doesn’t look so good on vellum. Its a useful exercise as I will be using something similar when I do my Norwegian plant pictures for my RHS exhibit.

I have been trialling different methods and different pigments. For once I realised that graphite was not good enough for what I needed, I knew I would have find a pigment I felt I could use in a controlled manner. So which pigment should I use? I tried Daniel Smith’s ‘Graphite Grey’ and several natural earth pigments by several manufacturers, but each time the pigment felt too sticky for what I wanted to do with it. I needed to get a consistent fine line and be able to do delicate monotone shading. In the end I reverted to my own neutral grey that I often make using Perylene Violet and Maimeri’s Cyan; the latter is the same pigment as W&N Blue, green shade and works well for me. I can vary the grey from cold to warm and very pale to dark. By the way, the earth colours didn’t look quite right and didn’t recede enough in the background for my liking.

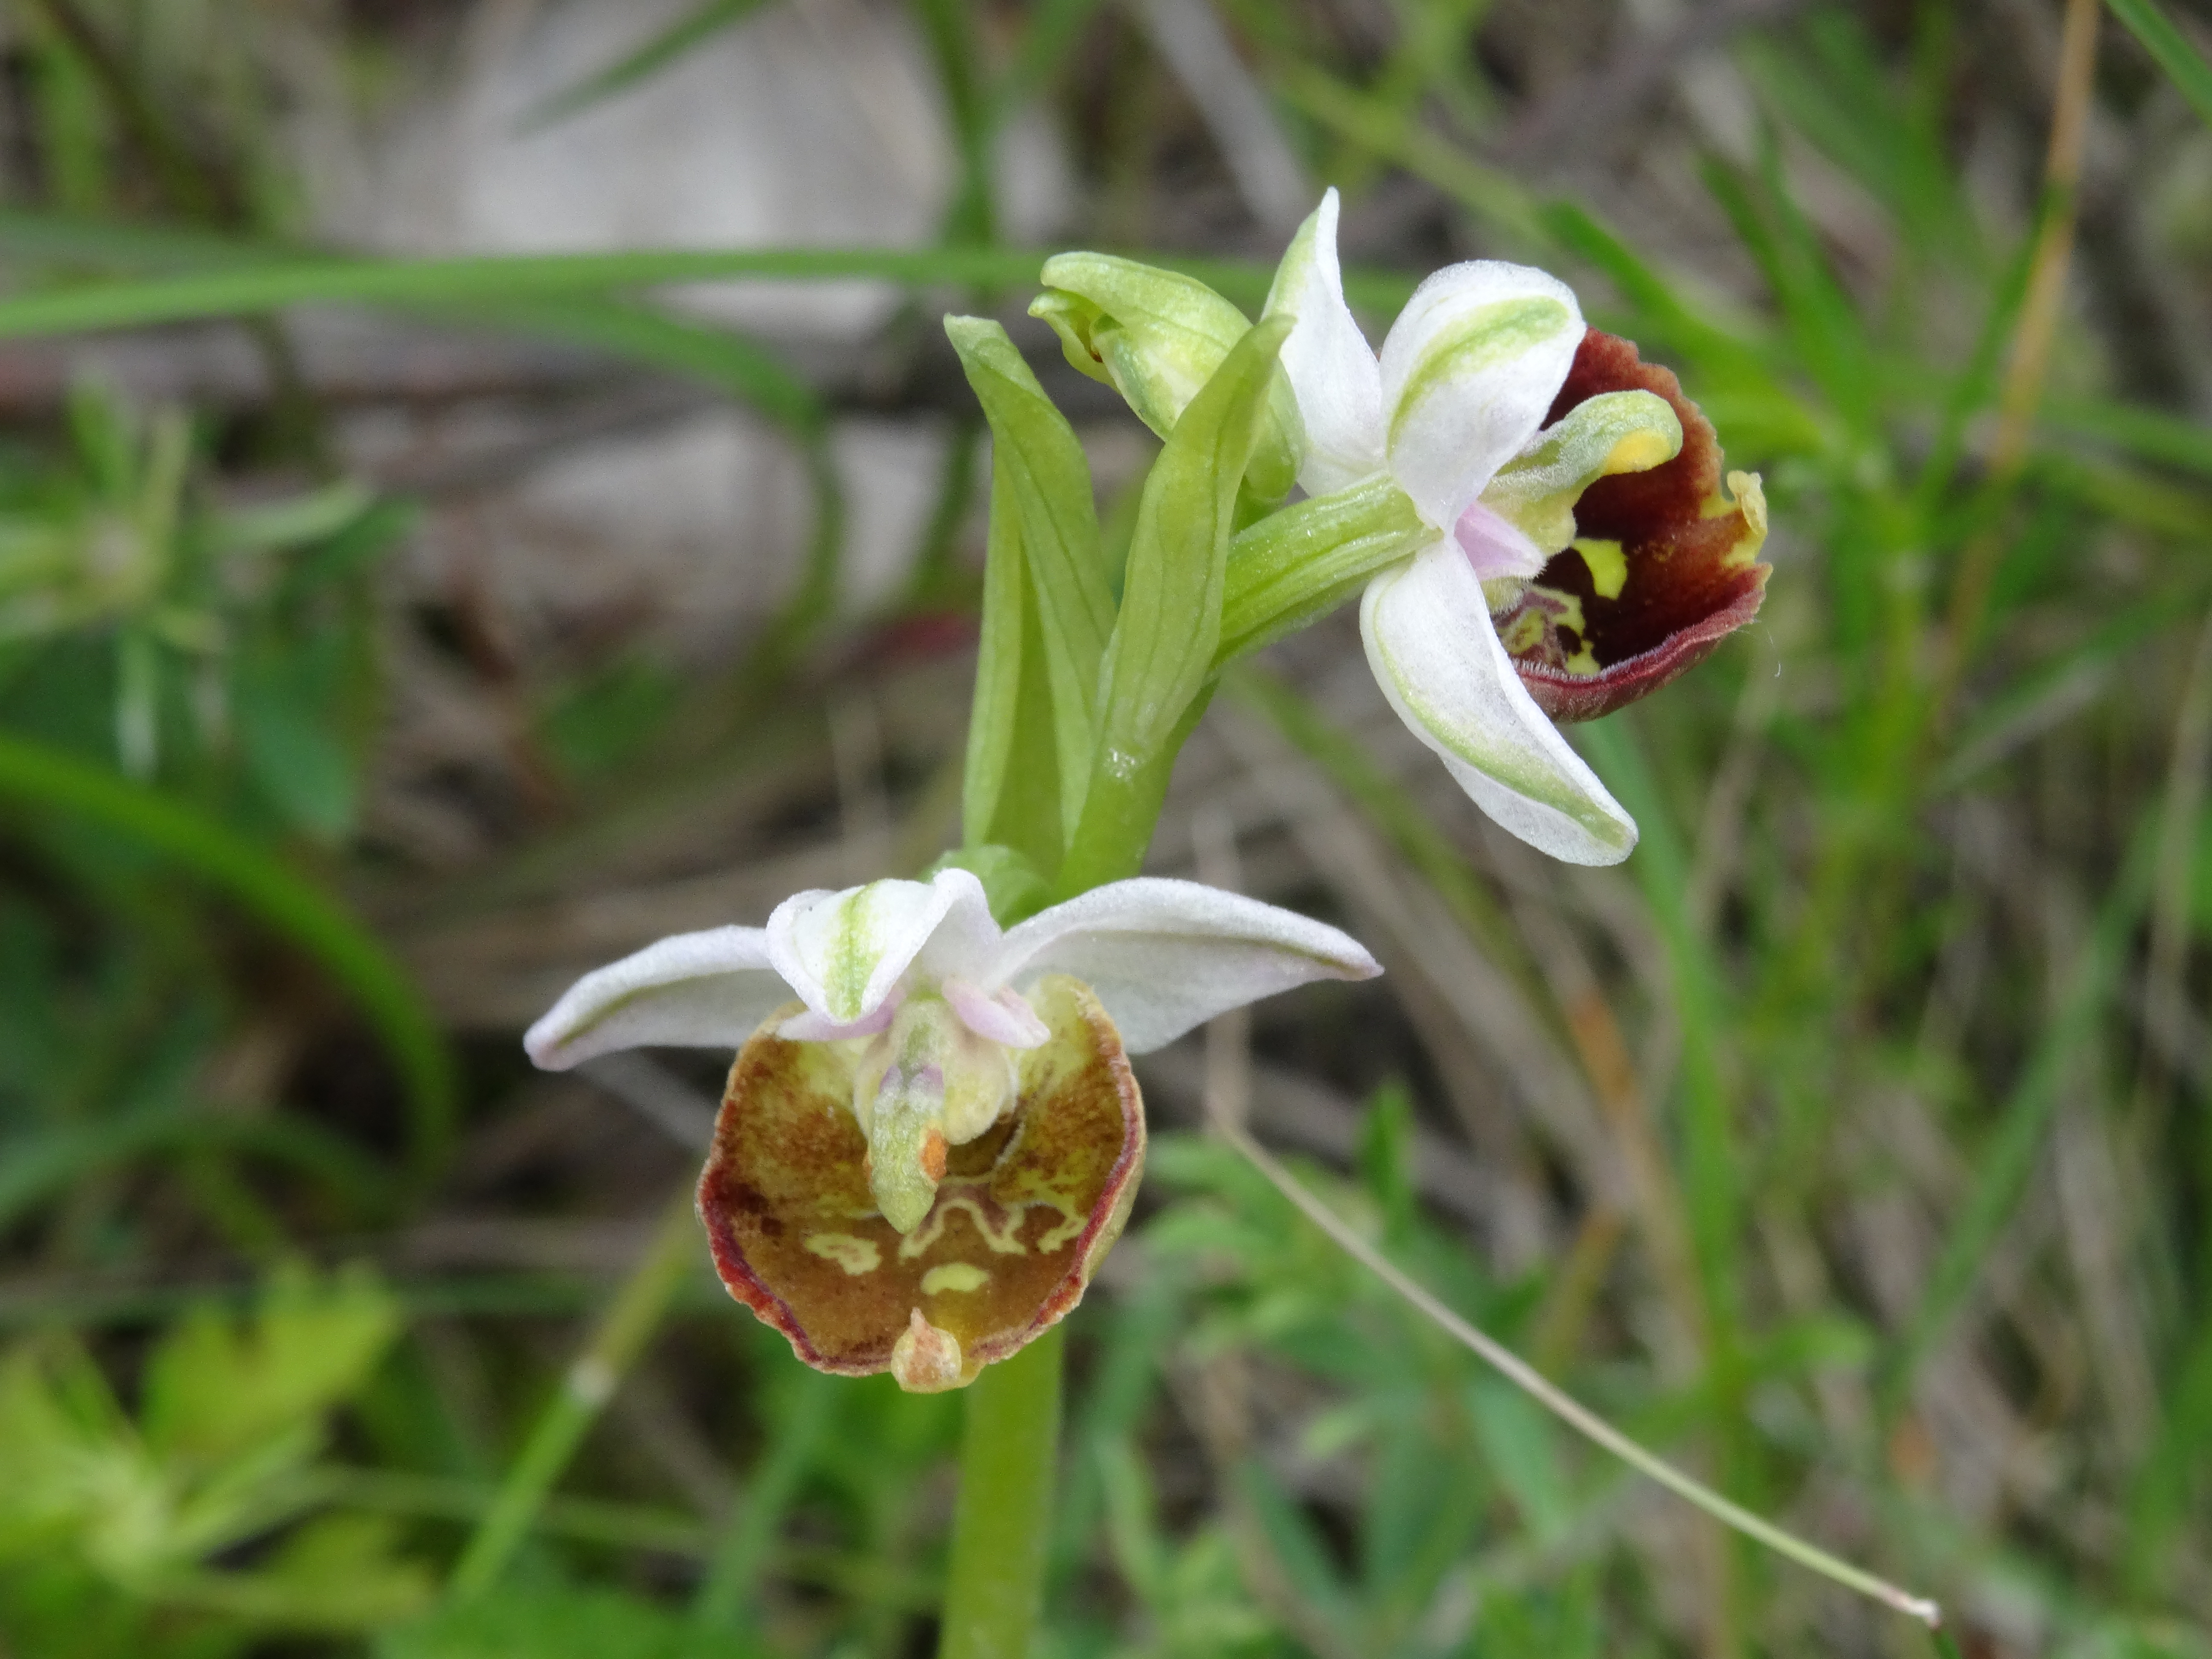
Now the berries. These are the remaining berries that are gradually ripening through red. I love the variation in colours here, but this is one of the areas in which I experienced problems. I will write an additional blog about my mishaps! Suffice it to say that each drupelet is a different colour. I always started off fine, keeping the colour fairly pure to begin with. But then I invariably overworked it to show the different colours. You won’t (I hope) see that on the final version of what you see here, but it is certainly something to bear in mind.

This slideshow requires JavaScript.


4th part of Blackberry on Vellum story.

I am so enjoying painting this picture. To me, there are some parts that have been less than perfect and it might mean that talking about these will be an additional separate blog. I will see! But, as I have a deadline, I have a good excuse to work on it almost every and all day!

This blog is all about finishing off the black blackberries on the left hand side and some new green ones on the right.

Although I know that many of you are watching the sections as they change so that you know roughly what colours I am using, it is worth mentioning the difference in the colours used with the black, blackberries. Of the three on the left, the nearest is the freshest ripe one and therefore has more remnants of the unripe red in it. The other two are even more ripe and additionally are affected in colour by how far back they are in the picture.

Of course the latter is called atmospheric perspective and affects tone and colour. Typically more distant objects show less detail, colour and contrast. In relation to colour, they are clearer, brighter and warmer when seen close to. As objects get farther away the colours become duller, get colder, paler and eventually turn blue grey.

So what on earth do you do when the ‘native’ colour of your subject is warm, but it is further away? You need to dull the colour as it moves away and hopefully you will see this occur in my light greens and reds. If not, you can smack me over the fingers when you see me!

This is an example of what I am talking about, except, that I don’t think you will actually see it fully until you see the finished painting. As I finish off a painting I will generally check over this sort of thing.

In a couple of weeks I have my next workshop in Bosham; Hedgerow colour. I think that this picture is a good example of the general subject

. I still have one or two spaces on it and it will be the last one before coming back from teaching at the ASBA (American Society of Botanical Artists) conference in Pittsburgh. But the dates for the Hedgerow colour workshop are 27-28 September. Do get in touch if you want one of those spaces. Workshops in 2019

This slideshow requires JavaScript.

Go back

Your message has been sent

Warning
Warning
Warning
Warning

Warning.

3rd part of Blackberry on vellum story – and more.

Last Friday and Saturday I had a workshop called Fruit and Veg ; or Strawberries and cream. It is a very popular workshop has happened for several years running. I don’t know if it is the Strawberries and cream that tempts, or the painting. Unfortunately, I didn’t take into account that it was a bank holiday weekend this year, but those who signed up were pleased to have more of my attention..

One student was working on vellum and decided to paint a short branch from our Malus ‘Royal Beauty’ crab apple tree. It has very dark berries and I thought the best way to demonstrate was by doing one of the berries myself. Of course doing it properly also takes time, so as soon as the workshop was finished the first day I went down into the shed and started the berry so that I could demonstrate on it the following day. That was one long day!

But it was a useful exercise and the student got a clearer understanding of how to get depth and darker colours on vellum without laying it in thick layers.

The other students unusually all worked with watercolour this time.

I finished off my Royal Beauty crab apple later on.

My 5 x 7 inch picture of a Blackberry branch on Kelmscott vellum is progressing in-between teaching and demos.

My last blog finished off when I had completed the bottom-most berries on my branch; you could see a ripe blackberry under the stem. In this blog I will show you the layers needed for the berries on the left of the stem. The nearest one is almost fully ripe as you can see by the residual redness of the drupelets. Then there are two more fully ripe ones behind this; I therefore have to take this into consideration when choosing my colours. The slideshow of photos taken at regular intervals is at the bottom of this page.

I promised a picture of my art table as it was in my last blog, but bear in mind that since the very hot weather my subject is deteriorating quite fast.

In this picture the sprig is still fairly OK giving me an idea of the colours of the berries, although I have to get fresh samples to paint from; as you can see, these are scattered on the surface beside me.

Finally and unusually, I have two vacancies in my weekly botanical art class in Bosham. It is Wednesday mornings between 10:00-12:00, starting up again Wednesday 4th September. Get in touch using the contact form below if you want to know more about it or sign up. Before you ask, it is for watercolour and colour pencil artists, including those who want to learn. The class is kept even smaller than the workshops so everyone can develop at their own speed.


This slideshow requires JavaScript.


Go back

Your message has been sent

Warning
Warning
Warning
Warning

Warning.


2nd part of Blackberry on Vellum story

You might wonder what this picture on the right is all about! A single blackberry stuck on a piece of  Blue-tac!

Botanical art takes time – at least when I do it. I always have to research my subject before I start and then take time. doing each element. But because one leaf might look similar to another, they are not and therefore you cannot use exactly the same method on each of them. The leaf might be facing in a different direction, be in light or shade, have a curl, a hole or different colour. The same is true of the blackberries on my branch.

Each blackberry is in a different stage of development from tight and green to soft and black. Additionally, each drupelet on a berry seems also to be in different stages of development and too can vary through green, yellow, pink, red and black-ish.

As you know our plants live, so how do you cope with the fact that they change constantly? Even what seems to be a dead leaf, changes as soon as you begin to paint it. I take loads of pictures of my plant in the original set-up.

I also take lots of of detailed photos from each element of that set-up. But I do not paint from photographs. I use these pictures to find and replace an element when it changes and dies. But to replace it with the right fruit to fit in my composition, I need a lot of photos depicting the original one.

The berry on the right is a replacement berry, laid on my desk in the same direction to the light source as the original specimen. Sometimes I use the original drawing of that element and just use the colourations and form from my new specimen, at other times I re-draw my new specimen and paint directly from that.

Once, when practicing for the Crab apple series in colour pencil, I drew the same arrangement three different times to put them in slightly different compositions. From afar one thought it was the same picture section, but when looking at them in detail, you could see that on every single one, all the apples and leaves were different.

Below I will create a slide-show of all the pictures taken up to the next blog. It would be helpful if you could let me know if you don’t want the pictures taken so frequently, but I know that it helps some people to see the gradual change in the picture and how I get there.

Next time, apart from showing the different stages, I will also show you the state of my art table!

This slideshow requires JavaScript.


Go back

Your message has been sent

Warning
Warning
Warning
Warning

Warning.


I got an email the other day…

We have a local village magazine which covers the villages between Chichester to Emsworth and a little up into the Downs. I was really surprised to get an email from them the other day telling me that if I hadn’t looked in the recent issue, there is an art competition. The winner’s artwork will go on the cover in the October issue and the subject is Autumn.

There are a lot of artists in this area and I expect many got the same email. But I need to practice as much as I can on vellum  in preparation for when I start my final pictures for the RHS exhibit, so I thought I would see if I could get a small picture finished. Unfortunately the deadline is pretty soon – 10 September, and I have a workshop this weekend, but I have started something.

The blackberries in the garden are coming towards their end for this year, but apparently in the hedgerows they are only just beginning to ripen. The wind and the rain hasn’t helped much, but we have a few days of warmer weather due.

I’m painting Blackberries on Kelmscott vellum. There are two problems: It might not be finished in time and it might not be good enough to put in. There is a third thing – if i finish it and its OK, they might not choose it! But then I will have  5 x 7″ picture.


The berries are gorgeous aren’t they?

I found the actual painting on Kelmscott rather different to painting on natural calfskin vellum. If you make a mistake (which I often do at this stage), it is easier to take out on the Kelmscott. But, as it is easier to take out, it also means that i have to be even more careful with the dry-brush technique, or I lift off what I have already done.

This blog shows my preparation from first sketch before tracing it onto the vellum to the first group of berries.

This slideshow requires JavaScript.

Go back

Your message has been sent

Warning
Warning
Warning
Warning

Warning.

Summer snow in the Norwegian mountains

Whilst everyone else is suffering extremely high temperatures in Europe, we are experiencing +4 high in the mountains of southern Norway! I believe it is warmer at the North Cape.

However, as there is now no longer a direct ferry from the UK to Norway, we drive here over several days, with our cargo of painting equipment. A necessity for the job I am going to do whilst here.

On the way we stopped off in Amsterdam to visit my son and partner and had a cycle ride to the coast in 37 degrees. It was almost a relief to eventually get to a cooler climate, although the day we arrived it was in the high twenties lower down in the valley.

Today’s view from our rented cottage.

Since then, the temperature has gradually sunk even lower. Today we are awaiting my daughter who lives on the Norwegian coast, advising her to bring  winter woollies. I didn’t dare tell her that it has been snowing today – although it hasn’t settled.

So why am I subjecting my sun loving and warmth seeking husband to todays chill in the Norwegian mountains? It’s the plants of course. I am now back to getting all the plant information to paint my pictures for my next RHS exhibit. I know I have spoken about this for a couple of years or so, but my involvement in the Worldwide Botanical art exhibition last year and continuance with setting up the Association of British Botanical Artists (ABBA), rather delayed things.

Because of the delay, I also lost my right to exhibit at the RHS – this year being five years since I last exhibited. I therefore had to apply again. Luckily, my work in general was again accepted as potentially worthy of a medal place, so now I am going to work through my subjects properly and, rather than rushing it, plan to exhibit in 2021.

Små Tranebær is Small Cranberry in Norwegian. The practice piece is twice natural size (the actual flower top right) is on vellum – as the final work will be.

This year I am focusing on three of the plants I have chosen and plan to get information I feel is lacking to complete a picture. My first is Vaccinium microcarpum – or Small cranberry. Last year I was able to find ripe fruit and was able to get all the information from that. Previously I had only drawn one flower, so I am concentrating on these now.

I thought you might be interested in my already messy workplace setup at 910 metres over sea level!

If Denise Walser-Kolar sees this blog, I hope she will notice I have taken on board her teaching. As long as I practice what she taught in Vienna, painting on vellum is going much better – even with the tiny leaves! Thank you Denise.

The other two plants I hope to get some more information on is the Vaccinium uliginosum (Bog Blueberry) and a little from the Rubus chamaemorus (Cloudberry). In both instances, it is only small details I need. I have already noticed that the leaf colour of the Bog blueberry seems to change in the sun. New leaves have a red tinge to the edge of the leaves, older leaves don’t, but in the sun they become red to almost a Perylene Violet (for watercolour artists) colour. I didn’t realise that before.

The Cloudberry fruit is only to be found on female plants. Each plant can be quite huge and spread many metres. Around the cottage I have only seen the male flowers of the Cloudberry – no female ones at all. it might be because it hasn’t warmed up very much yet where we are. The temperatures are set to improve, but I doubt we will be here long enough to benefit from it.

Please don’t get the wrong impression of Norway. The summers can be hot and the winters cold. It is a fantastically beautiful country and every area has its own attraction. I like it in the area we are staying as I lived in the valley for several years. Lastly, a picture of the sun rise a couple of days ago. It doesn’t get totally black at night at this time of year, but this was taken at 03:30.

Spindle tree moth -again.

Today is exactly a year since we had the Worldwide Botanical Art exhibition where twenty five countries participated on the same day. The UK exhibition ‘In Ruskin’s Footsteps was held in Lancaster.

On the 19th May several artists demonstrated their skills in botanical art. They were the late Mally Francis painting Gorse, Jackie Copeman on vellum and Sandra Doyle painting  Spindle Tree Moth caterpillars.

Sandra’s painting of the Euonymus (Spindle tree) was in the exhibition and for her demonstration she painted the caterpillars showing their strange behaviour on their host plant.

Today I am lucky enough to be in Vienna, participating in the first ‘Get Together’ conference, where botanical artists from around the world are congregating to learn from and teach each other. This is being held at the Vienna School of botanical Illustration. Unfortunately I was not able to be here the whole week, but today we have been on a Field trip to the Donau-Auen National Park.

Apart from seeing at least ten different orchids including my first live Bee orchid.

I also saw the effects of the Spindle tree moth. It was hanging right over the path we were walking and I think if I had reached it first all the wild animals in the forest would have deserted. I do have an almighty scream when I get going!

As it happens I was completely amazed by what I saw. It also helped to remind me about the first ABBA event exactly one year ago.

Tomorrow I am going to a workshop by Denise Walser Kolar. She is teaching painting on vellum. A workshop I have always wanted to do with her as she has encouraged me to paint on vellum for many years. I am so looking forward to being a student and getting to paint all day,

Haven’t had time to update my own website – so here goes!

I have been really bad at keeping on top of my own website because of all the work in relation to ABBA (Association of British Botanical Artists). Therefore this information about my participation in the RHS exhibition next week is not on the right page! Sorry about that, but I am telling you a little more about it now and hope that you will be able to make it.

Following on from the exhibition ‘In Ruskin’s Footsteps’ at Lancaster University, we (ABBA) have a stand this coming week at the RHS Plant and Art Fair, which for Botanical artists is a very important event. It is on 11th & 12th July at the RHS Halls in London. ABBA have a stand with the majority of Botanical artists, in the Lindley Hall. As I said in my last blog, Follow the Banner!

We are exhibiting five of the original pictures from the juried exhibition in Lancaster, giving everyone a further opportunity to study them. One of them is mine – Sea Thrift, painted on vellum. I mentioned that I would be demonstrating at the exhibition and now it is clear which medium I will be using, also which plant I will be painting.

I had intended getting my own exhibit finished for the RHS exhibition next year, but because of the amount of work that has gone into ABBA, I have decided to put this off until 2020.  My topic is ‘Foraging plants of the Norwegian Mountains’.

It became very clear whilst going through the various phases of the Worldwide exhibition preparation, that although the UK is a distinct island it is still part of the European Continent. At one point in our history we were connected without needing to use a tunnel, boat or plane. Our plants bear witness to this in that many of the plants that are native in Northern Europe, are also native in the UK. However, some may not be so common these days.

Image being drawn on vellum

One of my series of plants is the Arctostaphylos  uva—ursi, Common bearberry in English and Melbær in Norwegian. It looks similar to a Crowberry, but is white inside (floury), giving its Norwegian name. When picking Crowberries it is not popular to mix Bearberries in by mistake as they don’t taste quite as nice, although edible. Also it is a stone-fruit and not a berry!

ABBA wants to encourage botanical art in relation to our native flora. As I intend to paint the series on vellum, I will be using this medium on the ABBA stand at the RHS. I have a nice little plant of the Bearberry with the beginnings of small flowers. The image is already transferred to a small piece of vellum which will be ideal to practice on and make decisions about which colours to use.

From my sketchbook.

You might be just able to see that in my sketchbook I have quickly done a rough tonal drawing, indicating where the light is coming from. I have also put in a little blue to indicate where the light of the sky has reflected on the leaves and started indicating the difference between the colour on the front and back of the leaves: but that is in my sketchbook. Which colours I will actually choose to use on the vellum, remembering that colours appear far more intense on vellum as it reflects the colour of the pigment better than on paper, will be the result of this trial piece.

In addition to my demonstrations we will be talking with people to find out what they want from ABBA in the future and whether they – you, want to be part of it. Our focus will be to help anyone, anywhere, interested in botanical art to learn more.

But there is a little icing on the cake: The RHS have agreed to show the Botanical Art Worldwide exhibition slideshow from 25 countries. This will happen in the talks area of the Lindley Hall, between and after the talks. But just in case you want to see it otherwise, we will be showing it on the ABBA stand.

This is the last opportunity to see the Worldwide Slideshow!

General Data Protection (GDPR)

If you want to follow my blog then please do sign up for it on this page. However, if you would like to get the occasional email from me about workshop availability or general information about my botanical art news, then you will need to sign up for this separately.

Below is a link to subscribe to either or both email lists. You can easily unsubscribe at any time.

Subscribe to emails

Thank you. 

Botanical art, workshops and vellum

What a mix!

The week after next I have my first workshop in 2017. There are no places available for that workshop, but there are places still available for the one after that.

The following workshop will be Thursday 16th to Saturday 18th February and the topic will be White flowers against dark ones. I decided against being too specific about which plants, allowing students to think about what they have in the garden. The intention is to show how easy it is to paint pale against dark, thus reducing the amount of shading necessary. People often have problems with white and yellow flowers in particular, but the method I will show you eases this problem hugely.

Do get in touch soon to book your place on the workshop:  https://gaynorsflora.com/tuition-2/workshops/

When I am running these workshops and showing what people have accomplished, I often get comments that they wish they lived nearer. Well, as I am now running my online botanical art course, you have the opportunity to learn from me whether you live nearer or far away. Presently I have students who live fairly near and occasionally come to one of the workshops in addition, but I also have students on the other side of the globe. Not only are they able to get detailed feedback from me throughout the course (watercolour or coloured pencil), but they also communicate with each other.

I don’t take on many students each month, but will be taking on new ones 1 February. This is the link to the online course: https://gaynorsflora.com/tuition-2/online-botanical-art-course/

But of course, this autumn we are having the exclusive botanical art holiday at Le Manoir in the Dordogne. Places are limited for this workshop holiday, so do book early to avoid disappointment. https://gaynorsflora.com/tuition-2/exclusive-botanical-art-painting-holiday-at-le-manoir-in-france/

Lastly, what’s all this about vellum? A tutor is no good if they too aren’t constantly learning. I feel so privileged that I learn so much from my students, but also now and again I have the opportunity to go on a course myself. When I was in Pittsburgh, USA, for the annual American SBA conference, I not only taught but I was able to go on a workshop with Jean Emmons. For those of you who know her name, she does the most exquisite work on vellum. I have at last finished the piece that I started on her workshop. If you read this, thank you Jean.


A Maple leaf
A Maple leaf on Kelmscott vellum