Third part of Andromeda polifolia – Bog Rosemary picture

Echinopsis mammillosa ??

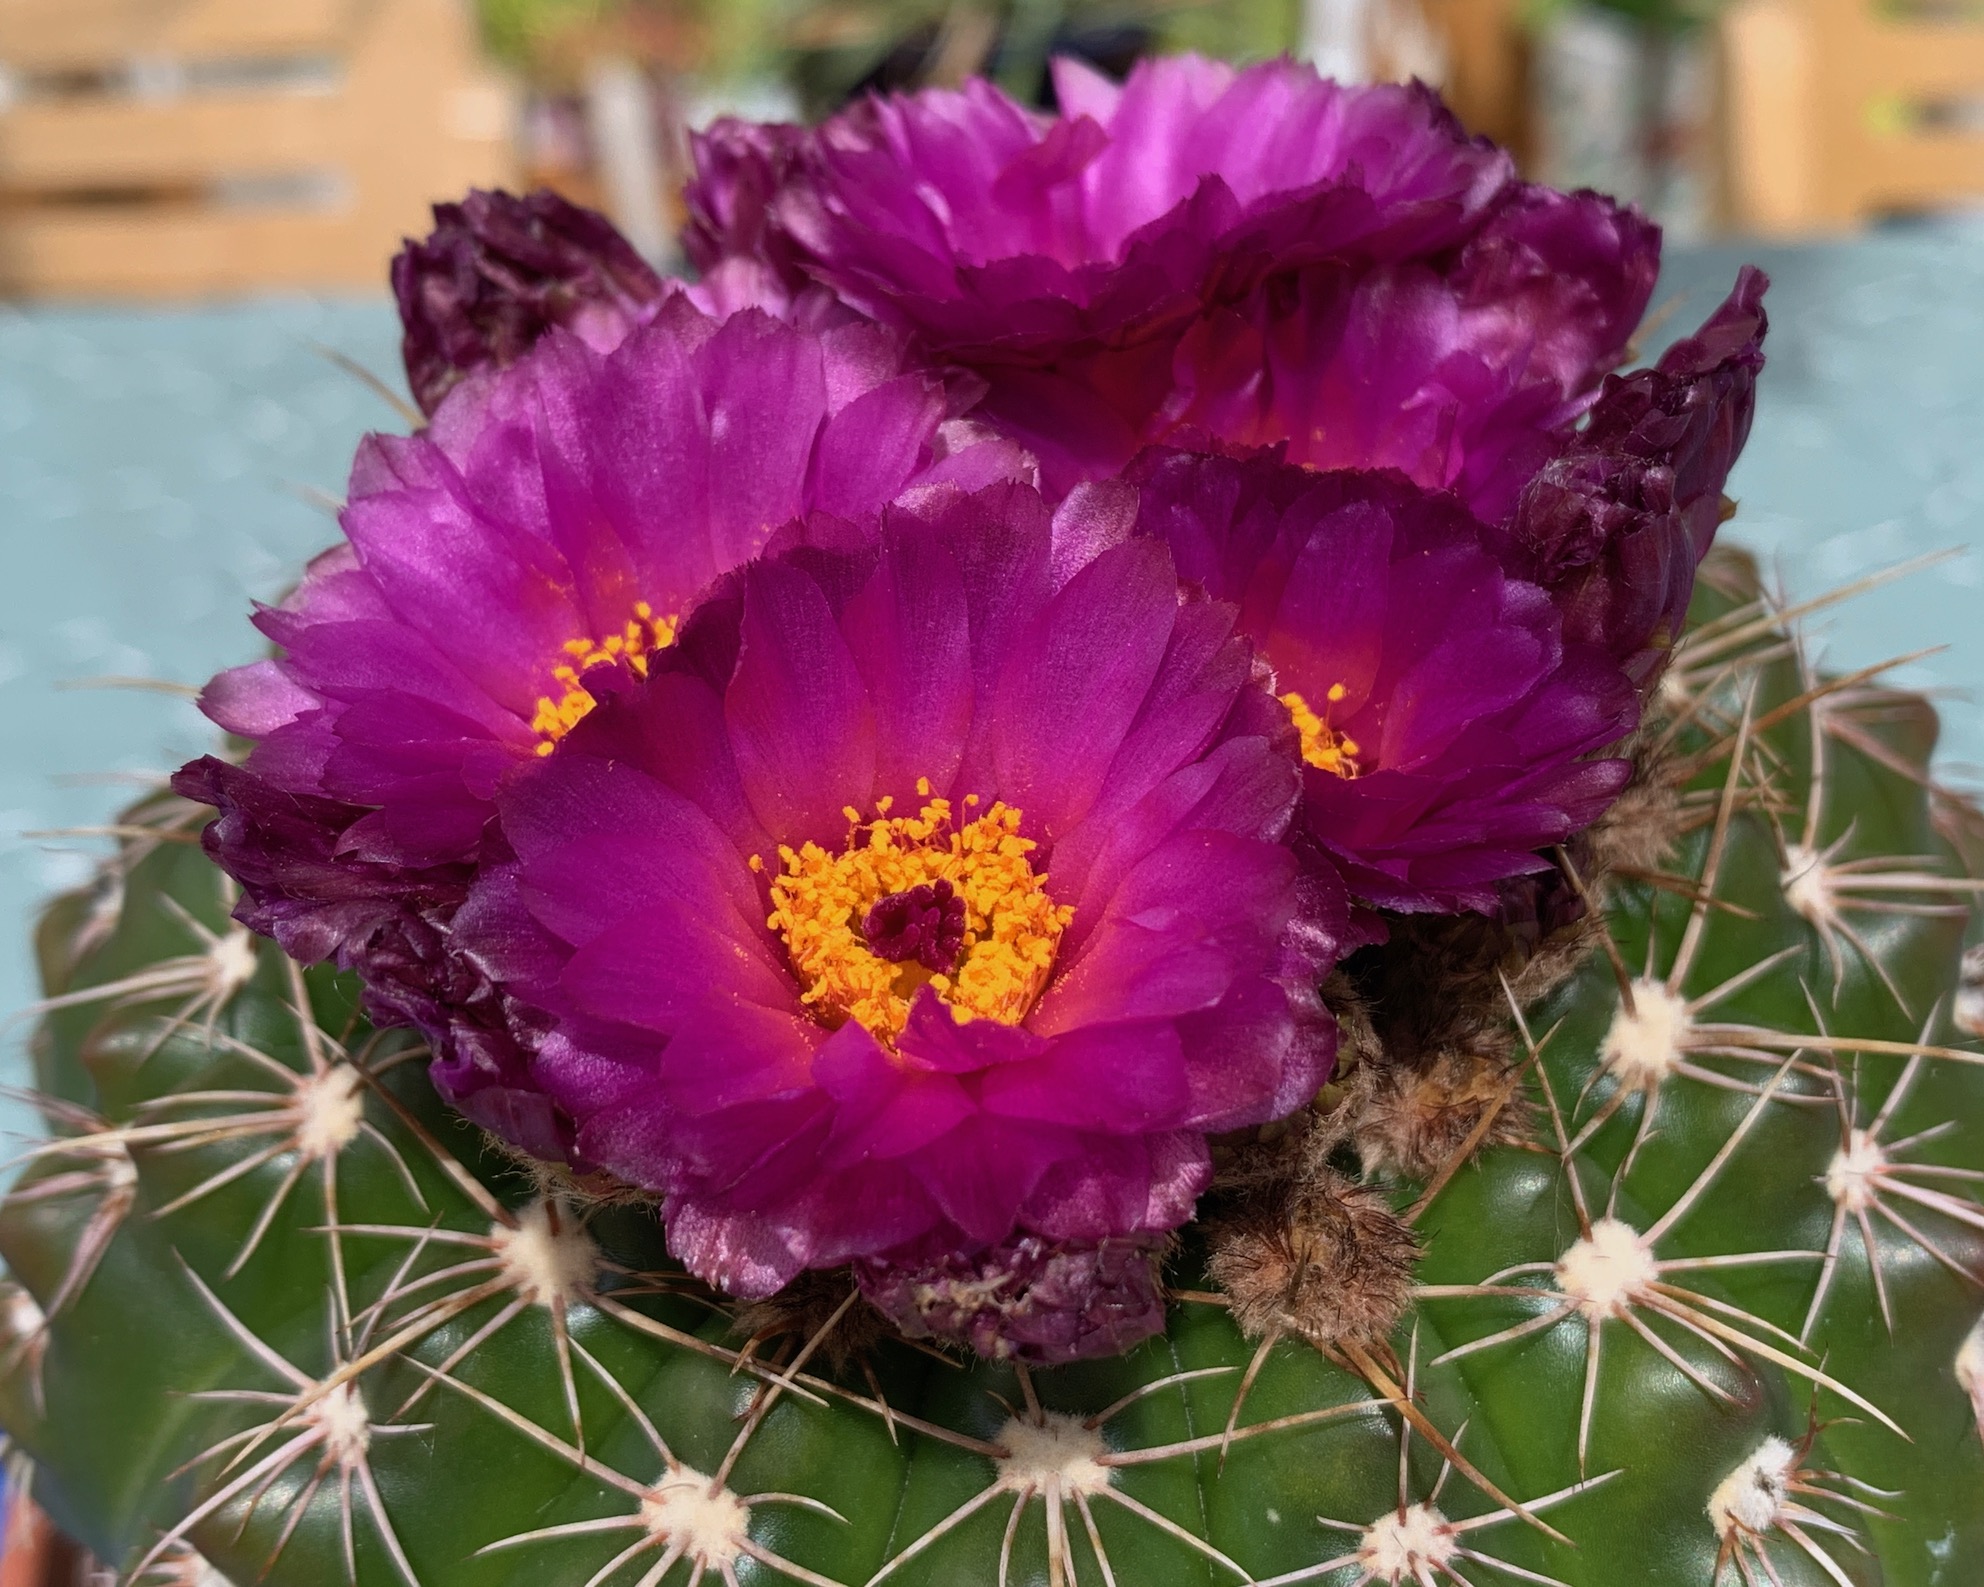
No, this is not the Bog rosemary, I will get on to that shortly. It says it is an Echinopsis mammillosa, but as ‘they’ had spelt the 2nd name wrongly, I thought I would check it out. Trouble is the only thing I can find is that it is not what it says it is on the box! If it had been, the flowers would have been on outgrowths from round the side of the barrel. The flowers are all on the top and almost without stems. Can anyone tell me what it is please?

We do have a lot of cacti and it isn’t me that collects them! But I have found them surprisingly intriguing. They were removed from the south facing porch and put on the edge of the pond about three weeks ago. Many have put on a show of beautiful flowers and grown hugely since then. How they will survive this weeks sudden drop in temperature from 25℃ to 0℃, I have no idea. Time will tell.

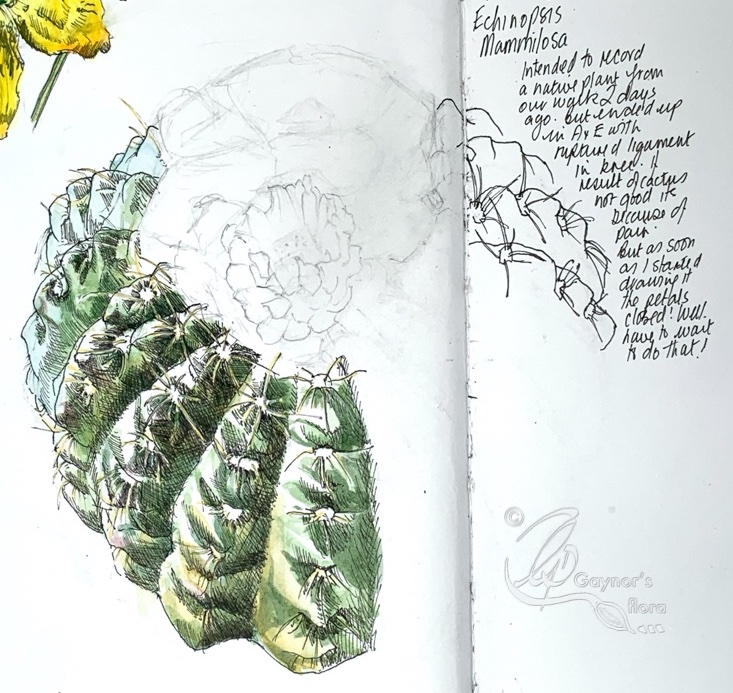
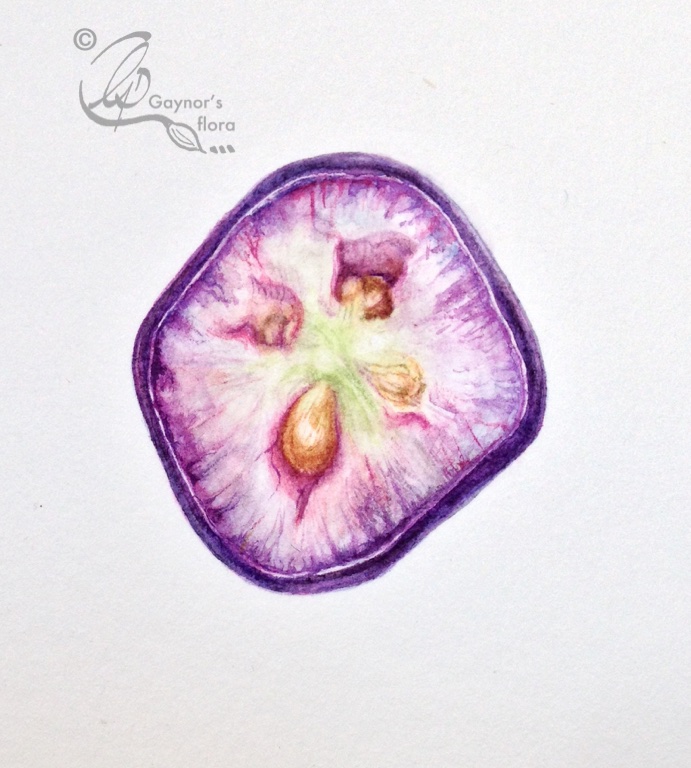
But, the reason I am showing this plant at all is because I am unable to go on walks at the moment and I am keeping a Perpetual Journal, doing a quick botanical sketch once a week. I saw the above cactus flowering in the sun and decided it would be this week’s topic. As soon as I started sketching, the sun went in and the flowers closed. They have remained closed since due to very little sun. But I did sketch some of the barrel. All I want is just one open flower to show its colour.

I’m sorry I am branching into other topics at the moment due to my incapacity, but the reason for the blog is development of the Andromeda polifolia.

For the last couple of years I have been attracted to very small plants with tiny flowers and/or leaves. But I am convinced that one of the reasons I was attracted to botanical art in the first place was my ability to open up these plants for everyone to see who viewed my work.

One might think that because the plant is smaller and often also the picture, it takes a lot less time to paint and therefore is cheaper. Unfortunately the opposite is true. The smaller the plant, the more difficult it is to portray. As you can imagine, my paintings are not sold by the square metre.

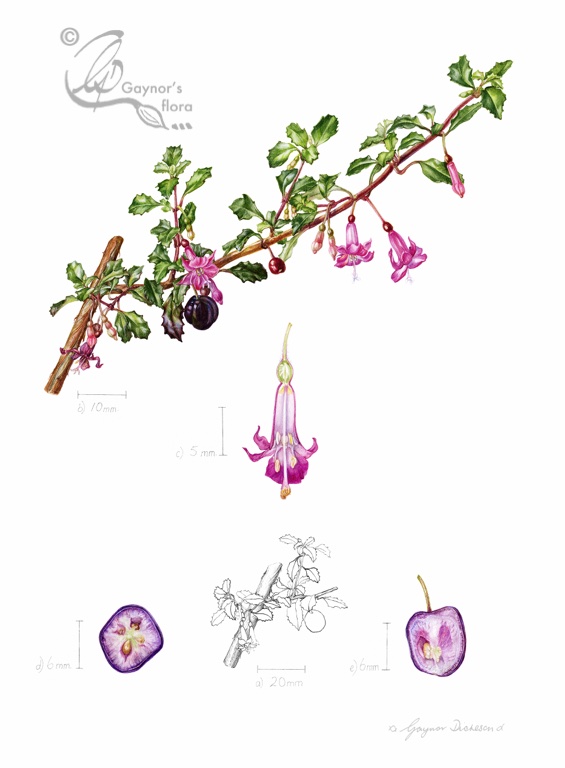
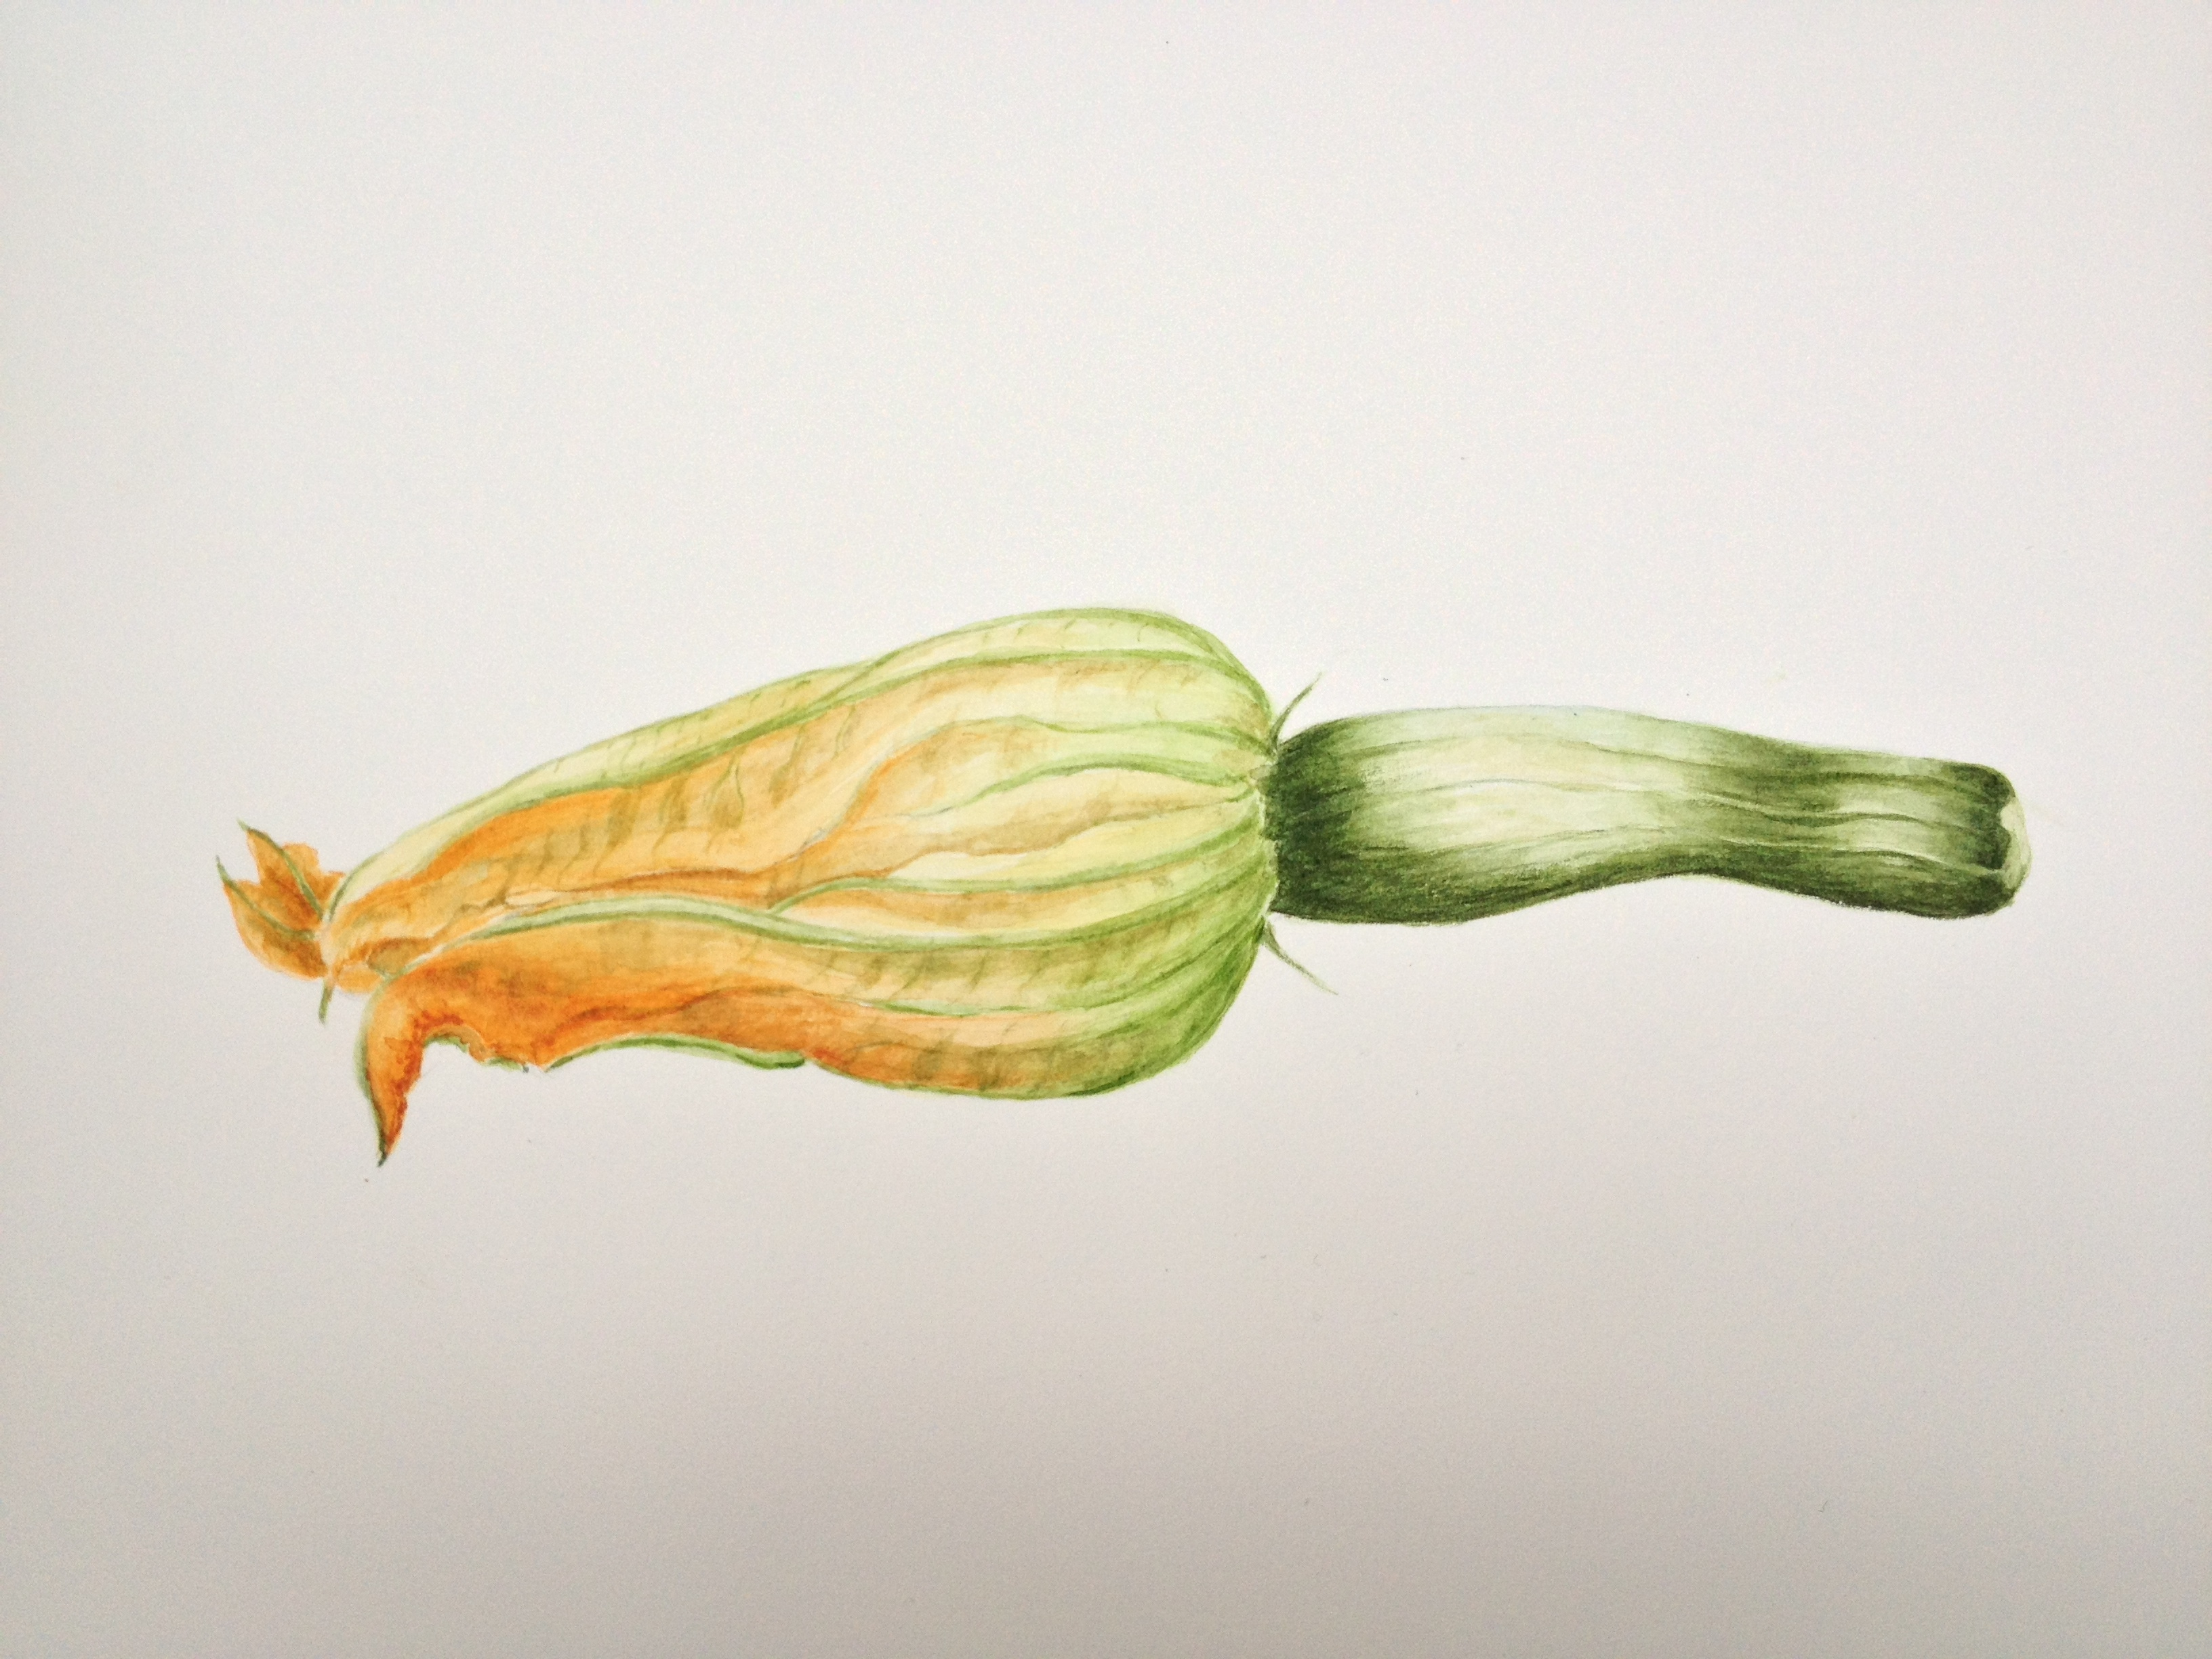
So far I have shown you the parts of my painting that are magnified so that you can see them in detail. But in doing this I also need to give you an idea as to how it looks real size; a ‘habit’ drawing. I wouldn’t want you to go hunting around for a plant with flowers the size depicted in the first blog – you would never find it.

You saw my composition in the first blog and know that I have planned the habit section to be in the centre, drawing all the elements together. When you see the final picture in the next blog, it will be up to you to decide if I have suceeded.

The traced image and start in graphite.

A little of the traced image remains. I  further lighten every section with a putty rubber so that every final visible stroke laid is intended.

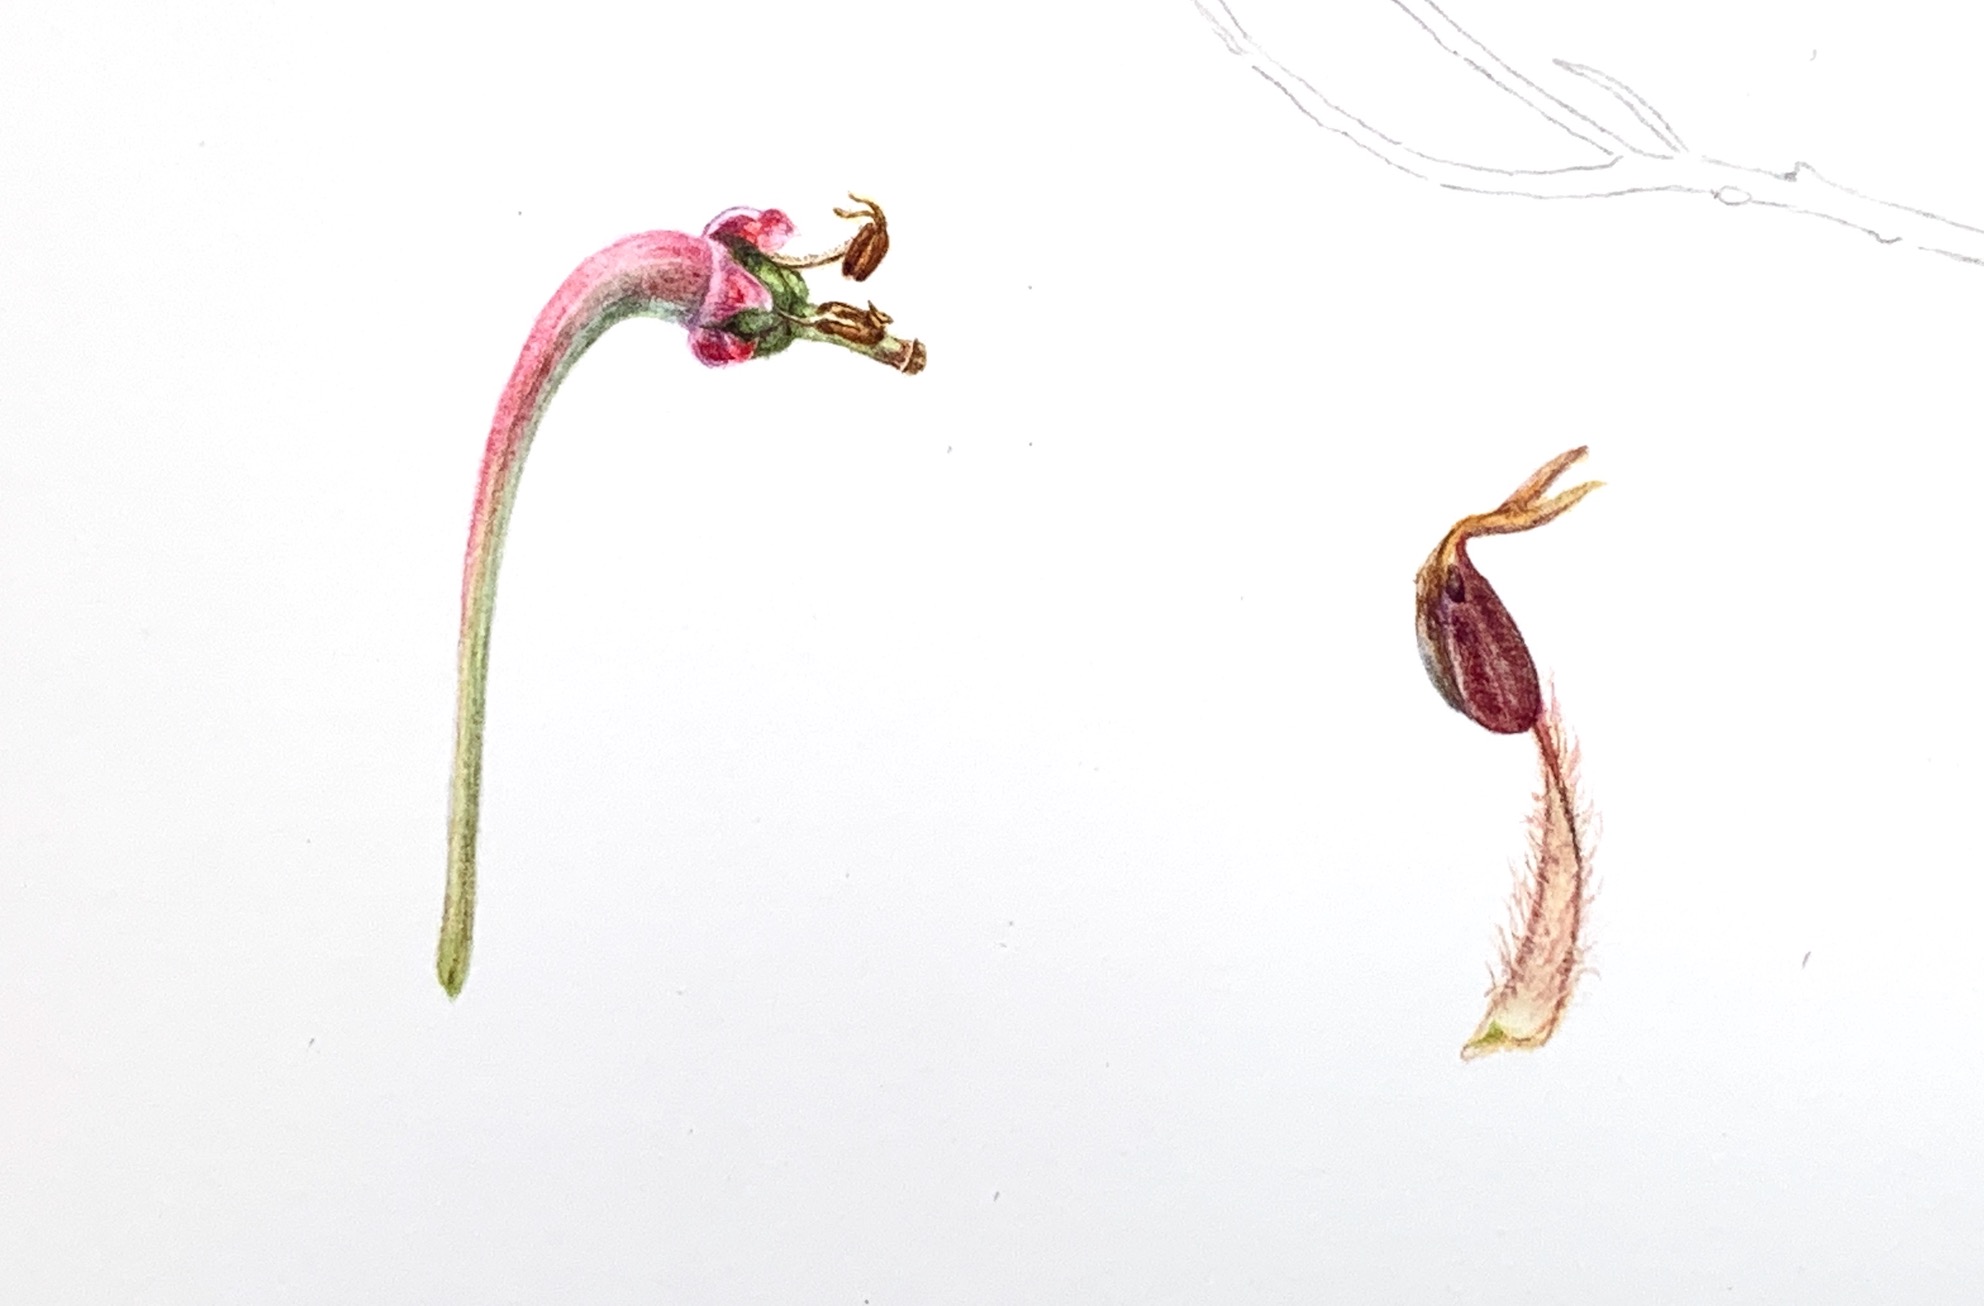
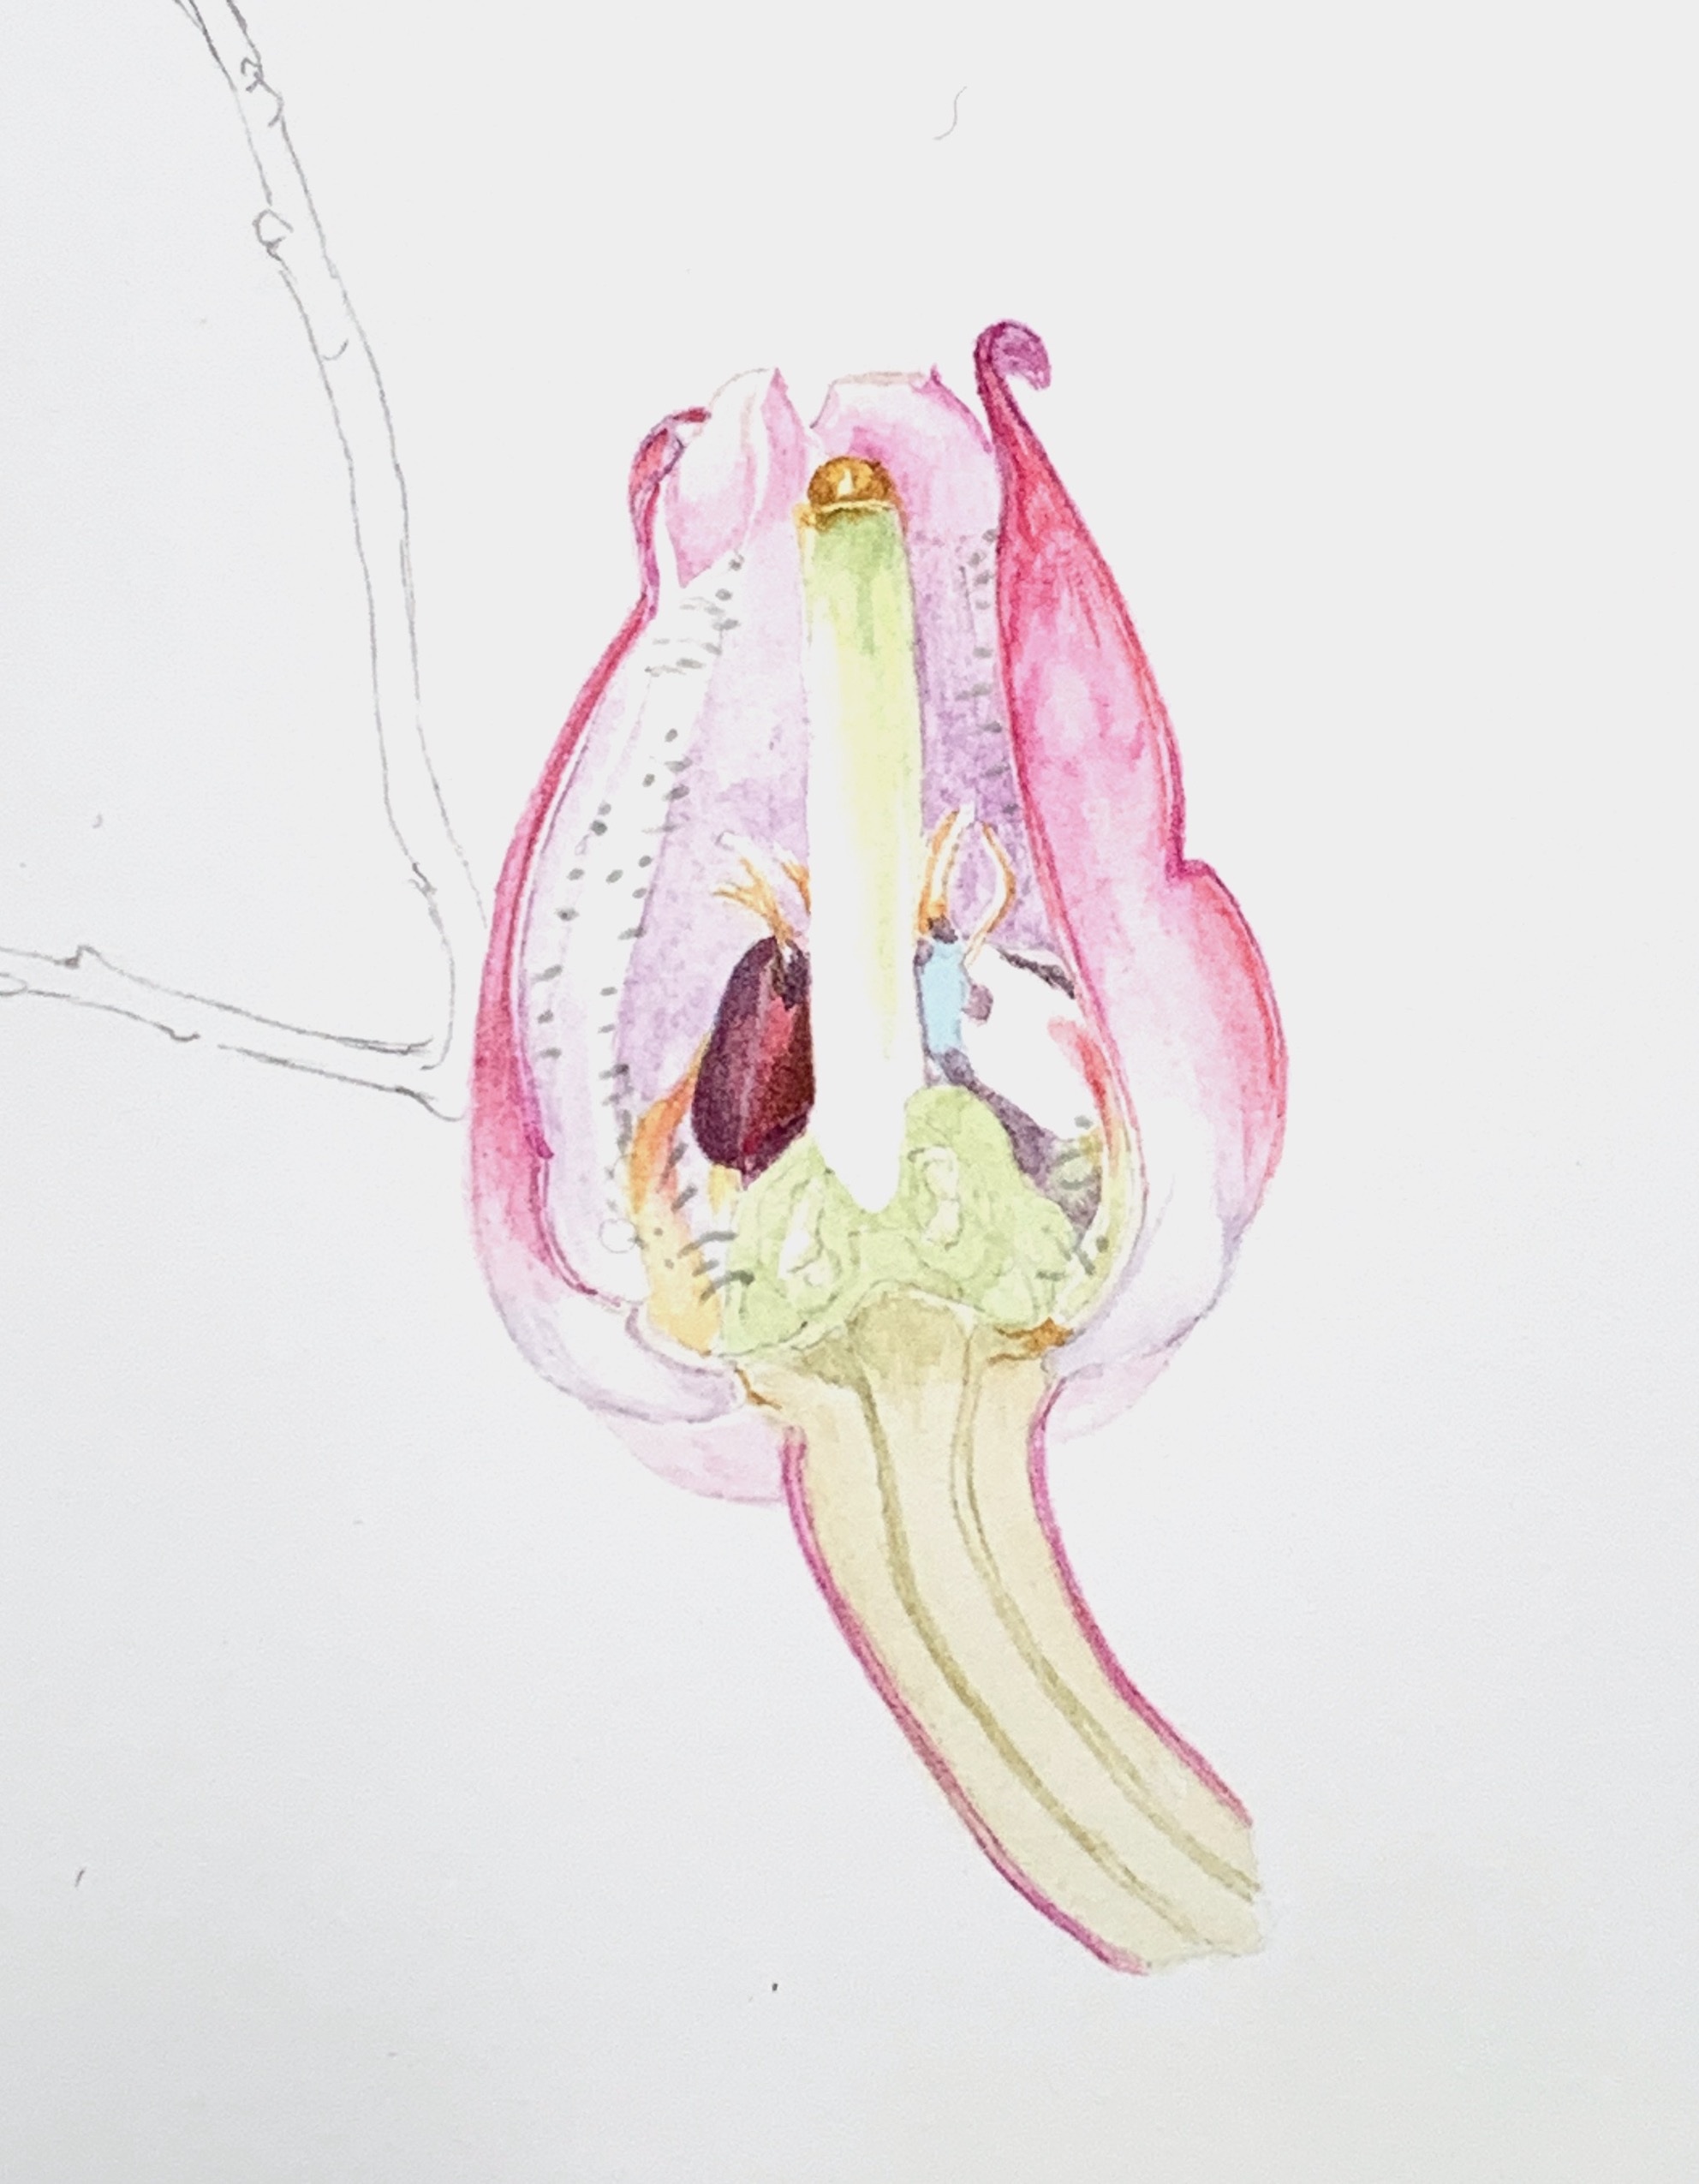
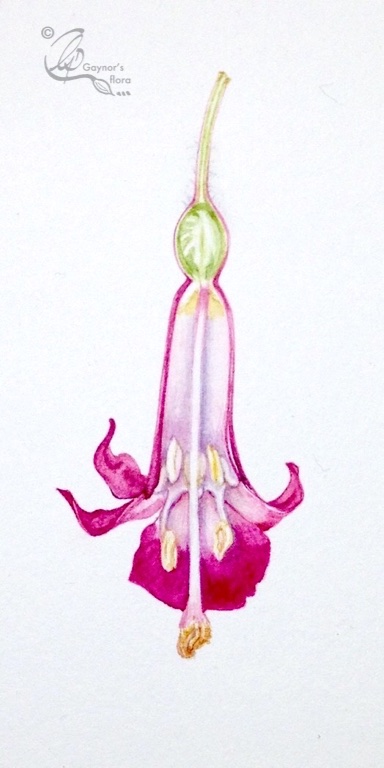
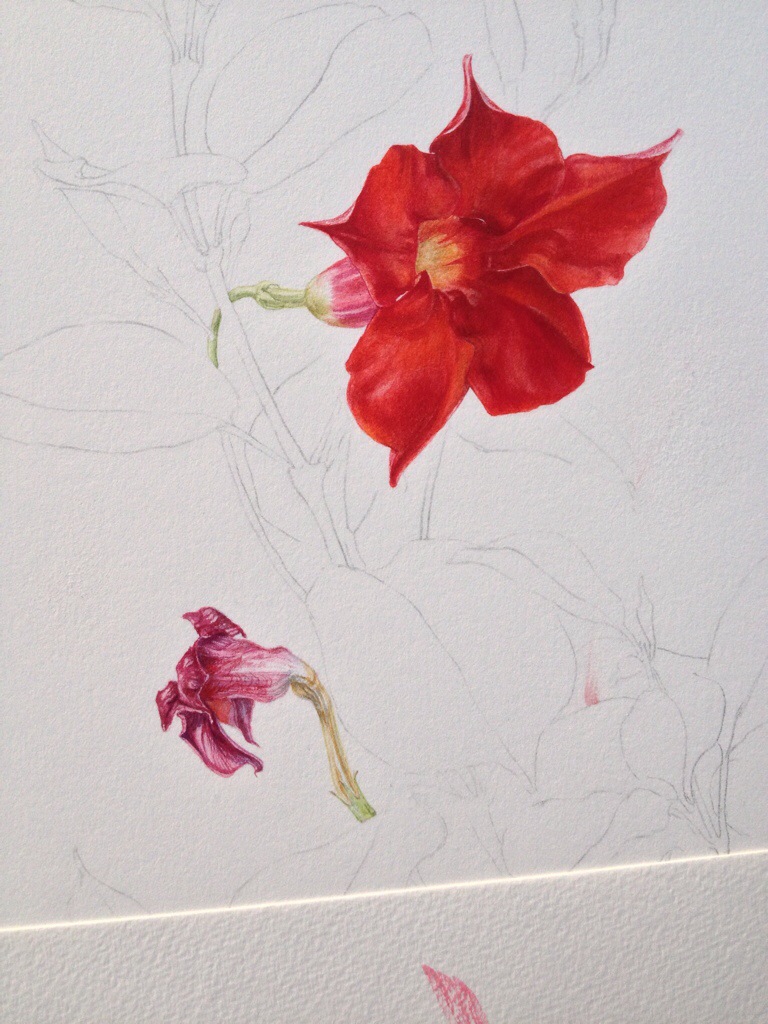
The leaves are long (relatively speaking) and narrow, leathery and curled under along the edge. I am carefully showing this first. The upper surface is veined and the colour varies from a pinky hue to a blue-green; the underside is a pale greeney-blue. But of course this doesn’t show in the graphite drawing.

By the time I get this far into the painting, the original leaves may have changed or no longer exist. However, I do have my drawing and loads of photos for reference, but I also have  some of the live sprig given to me by Chelsea Physic Garden. I draw from the plant, but check the direction of each leaf with my line drawing and photos. Sometimes, I might find a more interesting leaf and use that instead, always checking placement and attachment to the stem.

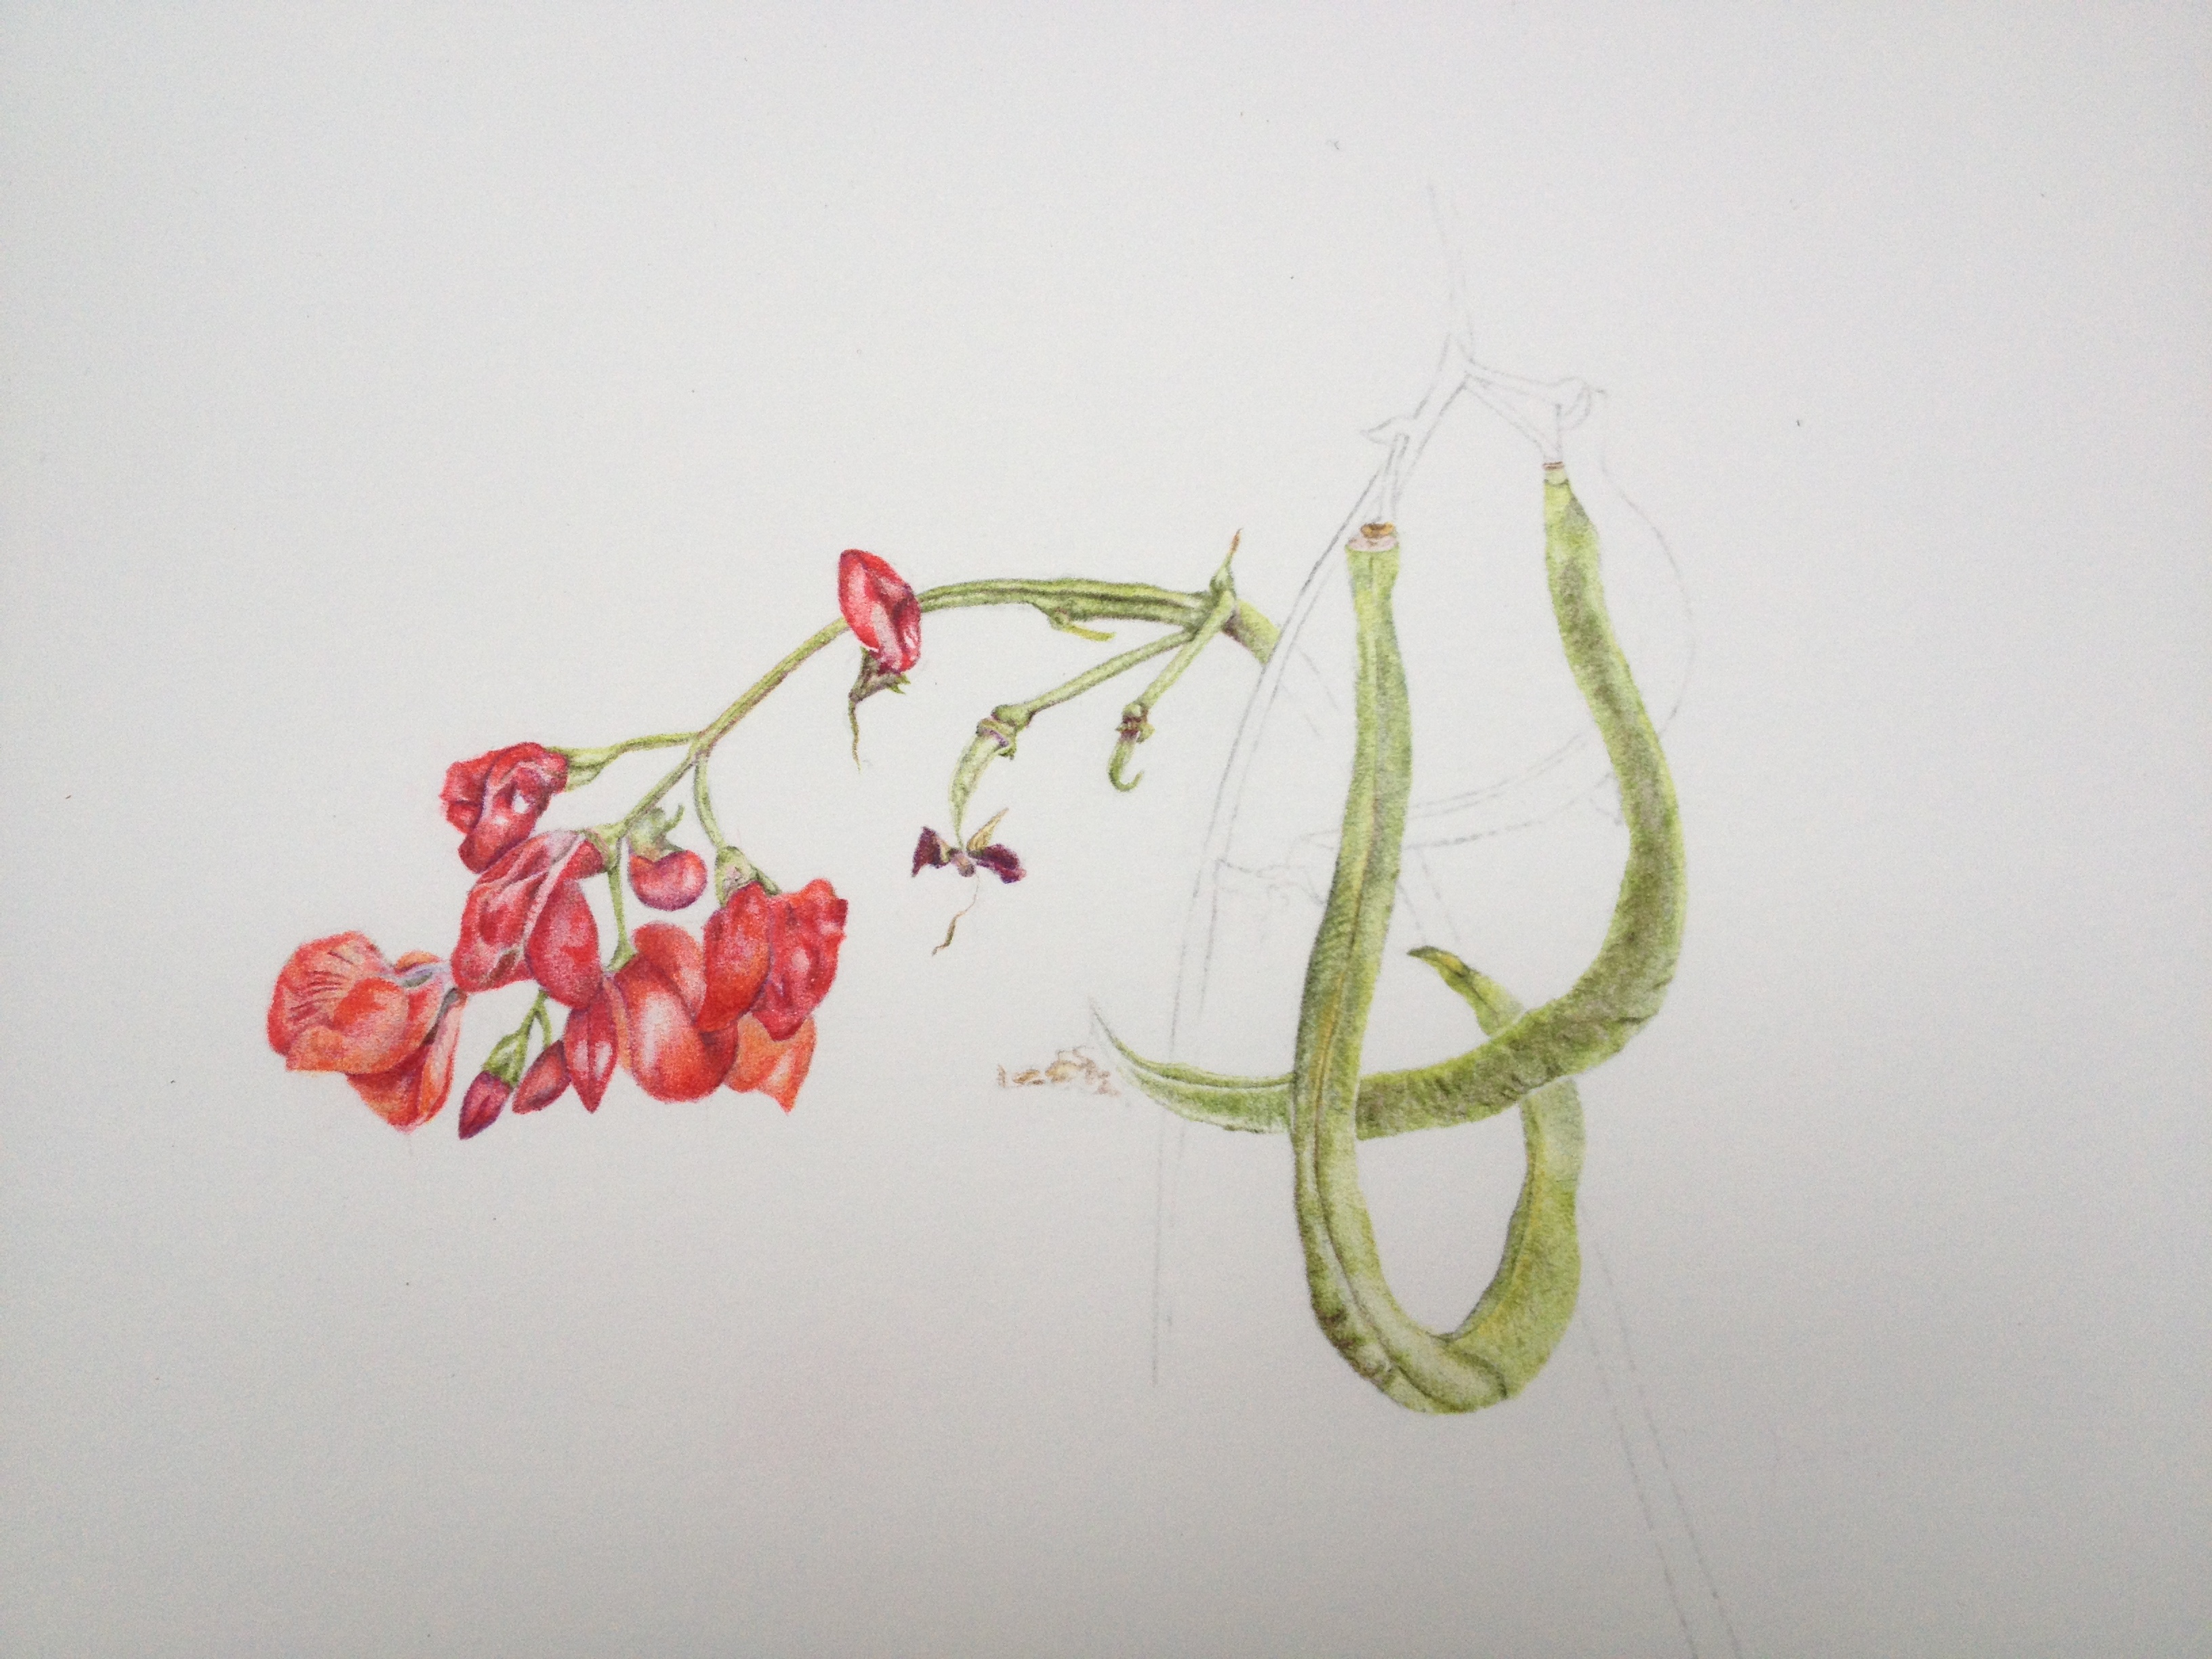
The branch going off to the right is slightly further back than the middle one, therefore has a little less detail. I increased the amount of detail for the middle branch so that you get a better idea of the leaf texture and veins. Note the actual size of the flowers at the top of the middle stem.

Next time I will show you the finished artwork and describe how I do the scaling.

Second part of Andromeda polifolia – Bog Rosemary picture

Distanced celebrating of VE day in the front garden. Reminds me of Claude Monet, The Picnic.

I have to say first of all that we are so lucky when so many people are struggling with Covid19. We have room to move and we can get out at the same time as recognising we have to leave two metres between us and anyone we might meet. The idea is to prevent the spread of the virus as much as possible and save the NHS.

That gets me clearly to my next point as I am a sinner in relation to the NHS – I had to go to A&E after a walk whilst keeping fit a couple of days ago! We had a lovely long walk over heathland and I was looking for a spot where I knew  Vaccinium myrtillus – Bilberry grew. This is one of the plants I have been studying and preparing for my next RHS exhibit. All of a sudden, my knee gave a great ‘snap’ mid-stride. So now I am extra grateful to the NHS for their treatment and advice.

I am now not only having an enforced lockdown because of the virus, but also enforced rest with my leg up. I hope that the tear will mend soon so the powers that be can determine if more treatment is necessary.

This means that for a few days I won’t be able to respond to the call from my shed to paint!

So imagine, Friday was VE day – 75 years since the end of World War 2. We had afternoon tea with our immediate neighbours, distancing from each other in our front garden. I am now paying the price and sitting with legs up on the settee, with crutches at the ready. But, I am enjoying the peace and quiet to sit and write this blog.

My previous blog finished with the flower spike of my Andromeda polifolia botanical illustration completed. I didn’t tell you that at natural size the flower and leaves are quite small; the flower is ca. 8mm long and the leaves ca. 2cm long. In my painting the flower spike is done at three times its natural size so the detail of the plant can easily be seen and admired. I have planned to talk about how I did the scaling in the last blog about this plant.

The next two parts are the stages of painting the pedicel and receptacle. You can see that the ovary is most likely fertilised and swelling just slightly. Also there are still a couple of stamens hanging on for dear life. 

To the right a stamen is enlarged just a bit more. I was so intrigued seeing the horn-like appendages to the anther and it was incredible to think that all this was packed so beautifully into that tiny flower. The stamens were just over 2mm long and very colourful.

So the packaging; I carefully did a longitudinal dissection of the flower. See the previous blog to view the shape of the flowers. The petals are 5-lobed and fused so I needed to cut two and a half petals carefully away to show what was underneath. I then shaved back the single carpel so that you can see the ovary inside, leaving the style and stigma whole. Again I am including the dissection painting in two stages so that you can see how I have built up the colour.

It is hairy inside the flower and I used a little masking fluid after I had done the first layer. If I do this again I might put in the masking fluid on the white of the paper or not use masking and paint around it. The final result is fine, but I personally feel I could have done it better.

You can see how the enlargements follow on from each other. The flowers on the flower spike are the same enlargement as the pedicel and receptacle; that is equal to x 3. I then enlarged the stamen further to make the detail even clearer and this time you see it at x 10, the same size as the longitudinal dissection.

From these photos of my work it is impossible for you to work out the actual sizes on the painting, or even the actual size of the plant. I am trying to make a point here because many people still write a magnification on their artwork, then post it online or even print it. You might be reading this on your phone, tablet, laptop or desk top computer; All are different sizes, so if you give the magnification as I have done here, you have no way of knowing what the real size is. I will be showing how to do scaling in a later blog.

Finally, I want to mention paper – OLD Fabriano hot-pressed. I have both Fabriano extra white and 5. I have come to the realisation that I will not need all this paper to last out my years of painting and teaching. If anyone is interested and will be able to come and buy some (Bosham, West Sussex) after the restrictions are lifted, please get in touch with me.


Far from common time!

Thymus vulgaris; how did the painting go?

The last time I posted a blog about my Thyme painting was 30 May, when I was doing sketches of it. I had also started my final painting. For those interested you can go back to that blog to see my thoughts (written down) and preparations. Since I started I have been doing a lot of sketches for other plants too, which hopefully I will talk about in due course. You have seen the preparation I did for one of the Norwegian plants.

I eventually returned to the Thymus vulgaris painting, but for some reason I was unhappy with it. This sometimes happens and I know that although I might not have a good reason for starting again, I know that were I to do so, my second attempt often goes without any hitches. On this occasion, I felt that one of the small flowers was a little too dark, so 1 August I started it again. I won’t mention how many hours I used on the first attempt, but the second one took 65 hours – with the sketches and prep in addition.

A few of the pictures I took on the way:

This slideshow requires JavaScript.

And so the final painting that will be delivered at the beginning of October.

Far from common time – Thymus vulgaris. Watercolour and graphite.

First botanical art picture accepted by Chelsea Physic Garden

I am so excited. I got a letter in the post today to tell me that my first picture has been accepted by the Chelsea Garden Florilegium, without needing to be adjusted in any way. On top of that, the comments from the Kew Botanists who evaluated the work, were pretty good too – that made the acceptance even more special.

I applied to and was accepted as a member of the Chelsea Physic Garden Florilegium in the middle of last year; full membership is limited making membership even more exciting. The intention of membership is to document all the plants that are in the Chelsea Physic Garden. As you can imagine, there are thousands, so it will take a long time.

For the privilege of being a full member, everyone is meant to submit a picture each year, of one of the plants in the garden. Of course, a plant needs to be chosen that is not already in the archives. As I became a member half-way through the year I was in reality excused from painting a picture until 2016, but those who know me know I like a challenge.

I painted the Fuchsia microphylla. As the name suggests the leaves are minuscule, as are the flowers, although I was surprised by the size of the fruit. Except for the pen & ink habit drawing, which is life-size, the rest of the painting is on a larger scale. Once the scale of anything is increased, the colours become much more intense. Anyone who has looked through a microscope to see the detail of grey-looking grass, will know how intense the multitude of colours is in reality. The Fuchsia microphylla was painted enlarged because it was so tiny and I wanted to convey its real beauty.

I have posted the picture before, but here it is again, now as part of the archives of the Chelsea Physic Garden.

Fuchsia microphylla from Chelsea Physic Garden, in watercolour with ink.

At last the Fuchsia microphylla picture

Yesterday we spent a super day in London, visiting Kew gardens. We had a lovely time and lunch with a good friend (also a botanical artist) at Kew, before going to have a look at the latest exhibition in the Shirley Sherwood gallery. The pieces that struck me most, were a series of Poppies by Denise Ramsay. If you get the chance to go and see them, please do.

We had been invited to an exhibition at the Herbarium in the early evening. The artist was Gustavo Marigo from Brazil, who had been on the Margaret Mee Fellowship programme. Watch this space, the last piece he worked on right up to the exhibition had so much depth and was quite beautiful.

The weather yesterday was so miserable and wet; we never thought, when we got up that the day would be so interesting.

Today I have been in the shed finishing off the Fuchsia microphylla. I mentioned last time that I had one or two problems because of the intense colours. Like anything else, when one sees a plant up close the colours become very clear and stronger than they might seem from a distance.

I had intended to draw a snippet of the plant actual size, in graphite. However the graphite appeared so subdued against the strong colours.

Fuchsia microphylla in watercolour with graphite section actual size.

Robin suggested that i change the graphite section to ink to balance the picture. I was very dubious, but traced the section in ink on a sheet of acetate.


Fuchsia microphylla in watercolour with trial ink section actual size.


Doesn’t look too bad does it? So I took the plunge.

Fuchsia microphylla in watercolour with ink section actual size.

Here is the final painting. Try and imagine it without the watermark as it unbalances the actual composition:

Fuchsia microphylla from Chelsea Physic Garden, in watercolour with ink.

Fuchsia microphylla progress report and BT broadband hassle!

I am getting so fed up with BT broadband, phone and TV. I cannot believe that they sell us a service like this and we have to pay as we signed a contract with them. I don’t know how many times the server fell out today, starting whilst responding to emails before 08:00 this morning. The hub seems to be going orange on and off all day and the phone is an old fashioned crackling line; a repeating problem!

Grumble over – until it goes again when I try to send this blog!

I have been concentrating on my Fuchsia microphylla picture (its gone again! – Broadband I mean.) for the last few days. I left you with some composition plans I had for redoing the picture. During the open studio event early August, I decided to change it and that meant starting all over again. The detail I had originally painted was too low on the page, and I felt that in fact the paper colour was a little too creamy. This meant that the pink that I saw in the flower, couldn’t be replicated on the paper I was using. The off-white of Fabriano Artistico extra white, affected the pink, warming it up too much. I therefore needed to paint the picture on Fabriano Classico 5, which I think is about the whitest watercolour paper. I of course tested out the colours before tracing my chosen design on to the paper.

I still intend to keep you in suspense about which composition I chose. Although I have had a lot of people looking at my blog both on WordPress and Facebook, so far no-one has got back to me with suggestions as to which one I did choose!

I am going to show you the various elements in my composition right before putting the picture together.

Fuchsia microphylla side branch - magnified x 2
Fuchsia microphylla side branch – magnified x 2
Fuchsia microphylla longitudinal section of flower, magnified x 4

Notice how two of the stamens hang down and three curl up. This is completely different to the standard Fuchsias you may be familiar with, where the stamens hang quite a long way below the  skirt of the flower. There are a total of eight stamens attached round the base of the sepals before they split up into four sections; looking like an outer whorl of petals. There is one style with four stigma. Therefore it is very appropriate that there are four ovaries in the fruit.

Fuchsia microphylla cross-section of fruit. Magnified x 3
Fuchsia microphylla longitudinal section of fruit, magnified x 3

Funnily enough, although quite small – just under 1 cm when ripe, the fruit really stain.

When the plant is seen close to, the colours are so intense, which is very obvious in the final picture – causing additional compositional problems! Watch this space.

CPGFS and IAPI meetings – all botanical art of course!

What does CPGFS and IAPI mean? Read on.

We got back from Norway on Wednesday last week after a two-day drive. I was tired and so was Robin. But of course as usual the diary was full when we got back. Against my better judgement I had said yes to an invitation to an 20th anniversary lunch held by the Chelsea Physic Garden Florilegium Society (CPGFS). This was of course in London, but was held at the Royal College of Physicians; what a wonderful building and a delicious meal. we were lucky enough to sit at a table with some really nice members and it gave me the opportunity to put my mind at rest in relation to the expectations of me as a member. I haven’t yet started the work on the picture I will be doing, although I have decided what I am going to do.

After the meal we were invited into the garden by Dr Henry Oakley for an introduction to the gardens. Although we only had a short time being led around the garden (we had a train to catch) it was absolutely fascinating. We got a potted history of the garden and then a thoroughly interesting reasoning behind its layout and the plants that were there. I think that many were surprised that so many really important medicines that are in use today, can be evolved from one and the same plant. There were several instances of this happening. I just wish we could have stayed longer. I’m glad that we made the effort to go.

Dr Henry Oakley explaining about the uses of the Opium Poppy.

Thursday was spent catching up with cleaning and washing clothes (followed all the time by the cats), before we went away for the weekend! Once a year the Institute for Analytical Plant Illustrators (IAPI) has a weekend away. There is normally a meeting every two months which we try to attend when we can as there is so much to learn from the rest of the group: botanists and botanical artists.This time it was decided that the meeting should start in the National Museum of Wales in Cardiff. Maureen Lazarus and Heather Pardoe were to show us some of the botanical art in the collection. They were very knowledgeable about the collection which included artworks from Ehret up to modern day artists.

Although we missed the beginning of the session (junction closed on the M4), we still saw most of the pictures they had selected for us and heard some of the history behind them. Pictures ranged from ones by Ehret to modern day botanical artists.

Part of a work by G. Griffiths
11.IAPI 0715
Work by Ehret.
Part of a picture by Bryan Poole. The composition on this one was very exciting.


The following day we planned to go to the National Botanic Gardens of Wales as a group. In between times we found each to our hotels for the night and we happened to end up at the same place as another group of people we were due to see the next day. Funnily enough, our visit coincided with Gardeners Question Time; they had chosen the same hotel as us – or the other way round!

We had a really beautiful day at the Botanic Gardens. The sun shone and it was warm. But we wanted to see everything. In the end we only watched one of the show recordings (they took two, obviously with a different panel), caught some of the talks round the garden, but we also wanted to SEE the plants as well as HEAR about how to look after them. These are one or two pictures.

This slideshow requires JavaScript.

Fruit & Veg or Strawberries and Cream Botanical art workshop

We painted the vegetables and ate the strawberries and cream!

I was very disappointed for two students who at the last minute were unable to come to the workshop because of personal difficulties. We did think of them often during these two days.

Quite early on during the workshop I felt that the students would have some results that they would be proud of. Having picked suitable subjects from the garden, as usual we spent time on the preparatory work; the composition and drawing. Having said that, one of the subjects we knew would fade very quickly and therefore it was important to get down the first layers of colour fast. This time most people used coloured pencil and only one person used watercolour. It is exciting using different media in the same workshop as each student sees how each affects the final work; although less than one would imagine.

You want pictures, so here they are.

What concentration on a lovely summer day!
What flowers are these?
A fading flower waits for no-man
Now guess what this is.

Today – at the end of the workshop. They promised to finish the pictures that still had work to do on them.

Runner Beans in coloured pencil
What a beautiful little Courgette. Watercolour
Home grown tomatoes - but not from my garden. Coloured pencil.
Home grown tomatoes – but not from my garden. Coloured pencil.
Globe artichoke before its haircut. Coloured pencil and no embossing tool.

After just two days work, aren’t these amazing?

The next workshop is entitled ‘ Hedgerow produce – those colours!’ Tuesday 2 September until Thursday 4 September. As usual it is between 10:00 – 16:00 each day with lunch included. I do have spaces on the workshop, so get in touch as soon as possible.

Demonstration at Society of Floral Painters in Chichester

Following a lot of preparation on composing and drawing a new botanical art picture, I spent the day starting the watercolour painting as a demonstration for the SFP.

The day dawned sunny and warm; the first nice day for a while. Watching the weather forecast as I write this, it reverts to cooler and wetter weather for a few days! Has spending the day inside demonstrating botanical art been worth it?

I am told that the SFP exhibition at the Oxmarket in Chichester, has attracted a lot of visitors. Visitors who I spoke with today, found the exhibition to be very interesting and many were amazed at the variety of floral painting; from very loosely painted Irises in oil, through the tighter botanical art, to strict botanical illustration. There is something there for everyone.

From previous experience, I knew that even though warm outside it can be cool sitting and demonstrating. I was well prepared. We didn’t have huge numbers of visitors and I am told that Sundays do not seem to attract the crowds. However there were quite a few people interested in my demonstration and I was able to talk a little of what I was doing.

The following is pictures from today finishing off with what I have done so far. The plant is a Mandeville, or Dipladenia.

20140602-000931-571714.jpg

20140602-000932-572696.jpg

20140602-001005-605837.jpg

Tomorrow I will be catching up:
– with London Art College assignment marking;
– preparation for the exhibition in Palmengarten Botanical gardens in Frankfurt, Germany. A joint exercise between Palmengarten and the SBA. My husband and I receive botanical art from across the UK and take it over to Frankfurt in October for the exhibition;
– preparation for the Garden Show at Stansted House (http://www.thegardenshowonline.com/gardenshow_stansted/) this coming FRiday, Saturday and Sunday. We have a stand there for the first time. Do come and support us. I intend to demonstrate some more.