Foraging plants in the norwegian mountains – 23. Lingonberry Pt. 1


Ripe Lingonberry ready for picking with Bilberry plants already done and dusted.
Distal view of ripe fruit – inferior ovary

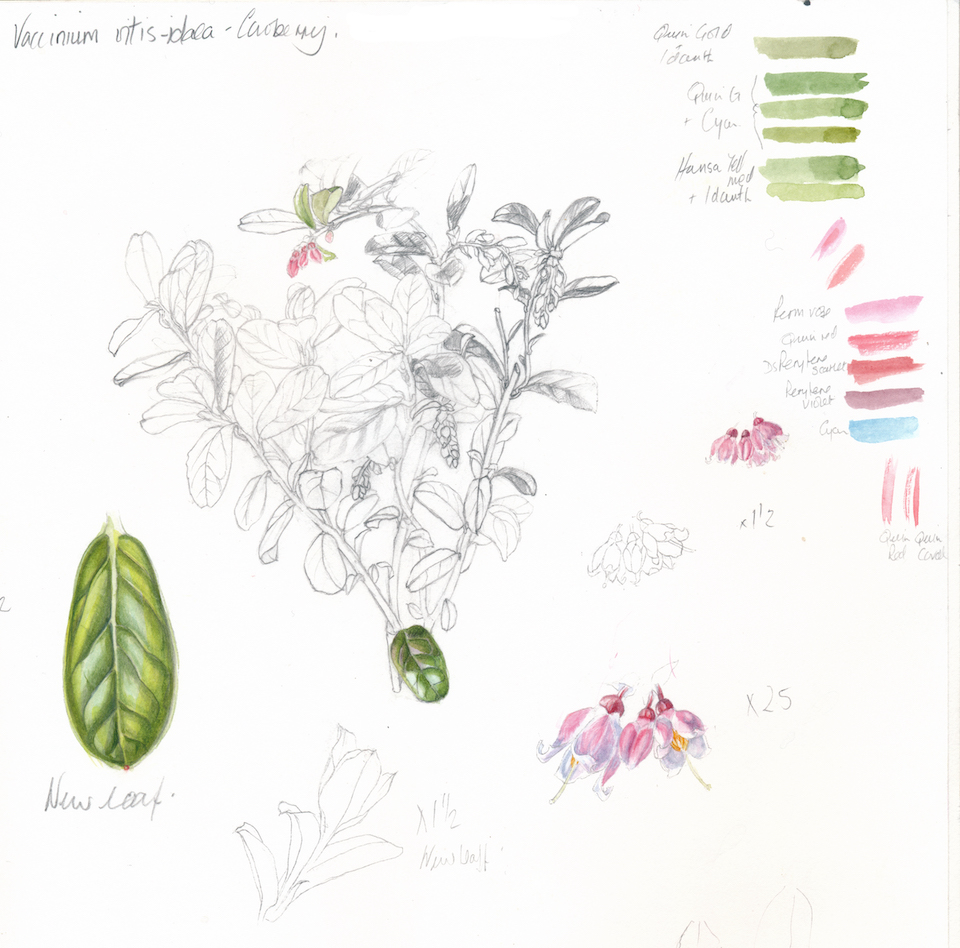
Vaccinium vitis-idaea, or cowberry, the common english name and tyttebær the Norwegian name is more commonly known as lingonberry if you visit Ikea. It forms the sharpish berry sauce you get with your meatballs!

In fact, there are several ways you can eat the fruit and one of the recipes I will be sharing with you is one where the raw fruit is whipped with sugar – it is absolutely delicious – especially on lovely bread with sour cream!! A friend introduced me to this bad/delicious habit, but I have learnt to restrict myself!

I am glad that we picked quite a bit of fruit this last year and it is safely kept cleaned and ready for use in the freezer. Like the Bilberry, I use it in all sorts of recipes, sometimes even together.

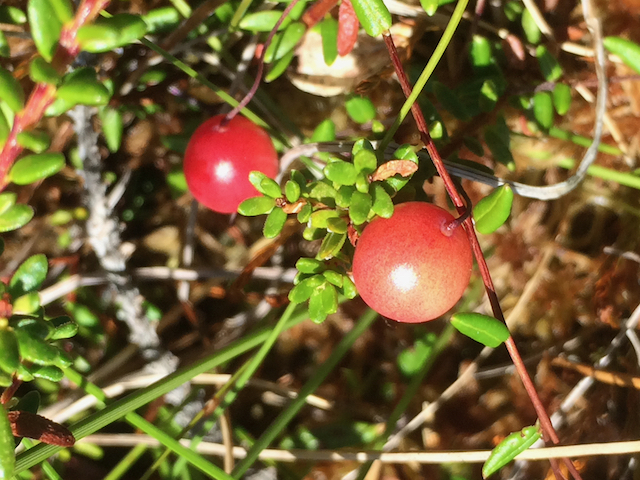
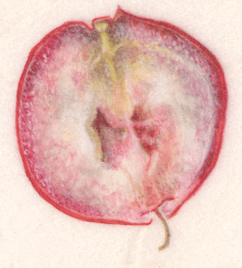
Many will think that the Lingonberry is similar to the small cranberry and in many respects it is. They are both Vacciniums, similar in size; 5- 8mm, but the lingonberry is almost completely spherical whilst the cranberry has a very slightly elongated spherical shape.

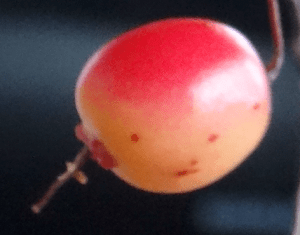
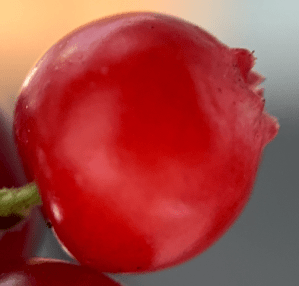
Because the Lingonberry and Cranberry prefer completely different habitats, there is little risk of picking from the two species at the same time. But, both can be used in the same way and for similar recipes.

The Lingonberry is generally found on heathland and shrubby areas, but as discussed in my blog released 7 May, the Small cranberry grows in very boggy areas covered with sphagnum moss.

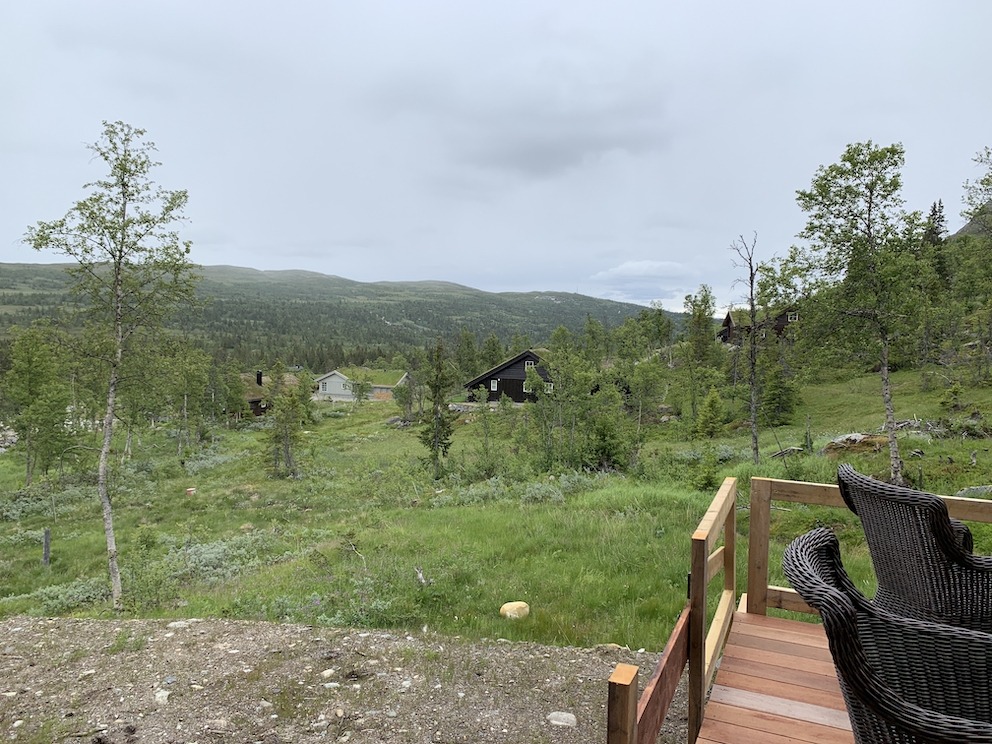
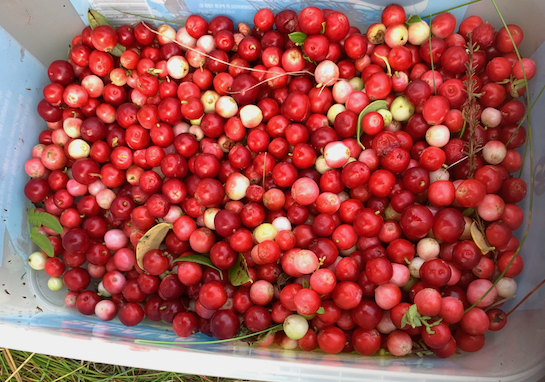
The next two picture were taken late September at 1100 metres over sea level. The red berries are

the Lingonberry and you can see that as they hang in bunches they are easy enough to pick. Unlike the bilberry (the red/yellow leaves), the fruit is pretty solid and bullet-like making them even easier to pick that that species. In the same picture is the Mountain Crowberry with their black berries, heather and some very short birch.

We are lucky enough to have some Lingonberry also growing in our garden, but in the two years we have been here I haven’t seen any fruit. Possibly this is because the plants are in shade and it has been very dry since we have been here, and our house is on rock. Therefore, with climate change even the native plants suffer. There is more fruit as one walks from our house into the protection of the woods. Often it grows on the top of extinct anthills, indicating how the seeds were transported.

The Vaccinium vitis-idaea (Cowberry) and the Arctostaphylos uva-ursi ( Bearberry) are, in fact, the main reason that I thought to do this series of plants. I have already written about the similarity between the Vaccinium myrtillus (Bilberry ) and the Vaccinium uliginosum (Bog bilberry), and in that case mixing the one with the other won’t spoil a recipe. But because the Cowberry and Bearberry are so similar, mistakes can be made and although both edible, Bearberry is dry and tasteless and has large stones rather than small seeds.

I will talk about the Bearberry as the last plant in this series. But the second section about the Lingonberry is scheduled for 6 June 2023.

Foraging plants in the norwegian mountains – 16. Small cranberry Pt.2

The marshy area where the small cranberry was found.

Planning the artwork

Digital callipers shown in an earlier blog. I use gloves so that fat from my hand is not transferred to the vellum, making it more difficult for pigment to adhere to the surface.

I began sketching the Vaccinium oxycoccus subsp. microcarpum (Small cranberry) in August 2018. The measurements of the tiny details were done using my trusty and accurate digital callipers.

Everything about the plant is tiny – except for the fruit, which is about the same size as a bilberry 5-8 mm.

When I first saw the plant and fruit meandering through the top of the moss, I couldn’t believe that such a slender plant could actually bear the weight of its fruit. As it happens, it doesn’t as everywhere I looked the fruit was either lying on top of the moss or supported by other structures in the marsh. The stems are so tender they are smaller than a blade of grass.

As with each of the other pictures I chose which sketches I would utilise from my sketchbook and arranged them with the help of the computer. I made continual adjustments to all of the plans so that visually they would appear as one exhibit. 

Can you see some of the parts sketched in the final artwork?

Digital plan of the composition. It is nearly the same as the final piece of work.

Each picture in the series was to hang ranged according to habitat from boggy and wet to sandy and dry.

The small cranberry was intended to start off the boggy end. But as the series has taken so long in the making, the criteria for exhibition has changed and I am allowed no more than six pictures.

Unfortunately, although completed, this picture will not be in the exhibit at the Saatchi gallery in June this year, but is still part of this series and will be treated as such in these blogs. I intend to show you all seven of the completed pictures after the judging process.

As with most of the pictures I did small trials on unmounted vellum to make sure I was choosing the right colours.

If you have read all the blogs about this series so far, you will have seen the finished trial piece in section 7, the last part of the history of the project.

The next photo is of that trial piece being worked on. I painted it twice natural size, the same as on the final artwork; you can see the flower sprig used as my model, lying on the vellum. Perhaps now you will have a better understanding of how tiny the species is.

Trial piece on vellum – in progress.

The colours I used: 

  • Quin Magenta PV122
  • Quin red PR209
  • Perylene violet PV29
  • Quin Gold PO49 (I don’t think single pigment can still be obtained)
  • Winsor Blue Green PB15.
  • Lemon Yellow PY175

Most of the trial pieces were painted at the cottage we rented, where I could easily source my subjects. I took over the dining table, with windows and light coming from the left. The family had to accept eating meals either outside or from a low coffee table. I was happy though!

My ‘studio table’ in the mountain cottage.

One of the biggest challenges with this plant was the root system. I remember a comment a judge once made about a botanical art piece; where the roots were likened to something having been put under the tap!

The Cranberry roots lie in very boggy wet areas and the hair-like system seems to fall away from the main stem lying along the upper layer of moss. The hair-like roots do plunge vertically down giving the appearance of having been under a tap! The Cloudberry coming from a similar environment and often intertwined, is not like this.

During the annual stay at the cottage in the mountains, in addition to my sketchbook and painting materials I had also cut a piece of Perspex to the exact size of my vellum block. I used this to try out samples of my subject to see how they would flow naturally across the picture.

Here you see a thread-like piece of small cranberry plant together with a couple of line drawings from my sketchbook; one drawing is the enlarged section in the trial piece and the other is actual size.

Compare this both with the compositional plan above and the final artwork. The more ways one can look at composition whilst planning a picture, the better will be the result.

I started sketching the small cranberry in August 2018, started work on the final artwork July 2021 and except for scalebars, finished in January 2022. 

The native range of this species is Subarctic to Temp. Northern Hemisphere. It is a subshrub and grows primarily in the temperate biome. This includes Great Britain and Norway.

Kew – Plants of the World Online

Fruit of the Forest liqueur

From Randi and Arne Christian Halseth, Skoppum (thank you)

  • 500 ml Bilberry
  • 50 ml Bog bilberry
  • 150 ml Mountain Crowberry
  • 100 ml Lignonberry
  • 700ml 60% spirit
  • 500 ml sugar.
  1. Put well-ripened berries into a suitable glass and sprinkle with sugar. The berries don’t need to be meticulously cleaned of leaves and tiny stalks. 
  2. Top up with the alcohol. Shake well then refrigerate. 
  3. Turn the jars as often as possible for 4 – 6 weeks.
  4. Strain and pour into bottles. 
  5. Age for a few weeks.
  6. Enjoy

I will start the detail about the Bog bilberry plant in my next blog 14 May 2023

Foraging plants in the norwegian mountains – 15. Small cranberry Pt.1

How rich in different flora a boggy marsh area can be!

When looking for an image suitable for highlighting the small cranberry I came across this one. You can see from the covering of sphagnum moss that this is a boggy area, and although few nutrients has a very rich flora. In fact this photo was taken in the area from which I found several of my chosen species to paint.

This picture was taken in July 2019. The new small cranberry flowers are out but I also found some shrivelled berries from the previous year. You can see clearly both the flowers and the tiny leaves all attached by a very thin stem meandering through the moss. The bog bilberry leaves have a lovely red edge at this time of year and the cloudberry plants show either the red sepals of the male plant or the immature fruit. In this instance the plant we see is obviously male. The mountain crowberry also does well in the same environment.

Vaccinium oxycoccus subsp. microcarpum 

Vaccinium oxycoccus subsp. microcarpum a tiny insignificant looking plant – but an even more exciting find.

In norwegian the plant is called Tranebær, which directly translated means Crane-berry – or as we call it in English – Cranberry. 

Firstly, why Crane-berry? This is a picture of the flower and perhaps you will get a better understanding of why. 

In the USA Cranberries are farmed in huge bogs and this is a significant industry. But the cranberry is slightly different to the one I have painted and is called Vaccinium oxycoccus subsp. macrocarpum. The difference between the two species is that subspecies microcarpum is very tiny and grows wild in the mountains, whereas the subspecies macrocarpum has a much larger berry and leaves. It is generally a larger plant altogether.

As a comparison I thought it might be interesting to show some of my photos from when I was in teaching botanical art in the USA in 2016. My husband and I visited a Cranberry farm south of Boston. It was intriguing, and I learnt quite a bit about the fruit and what happened to it. Note the size of the North American species of farmed berries at 9-14 mm against the small wild cranberry at 5-8 mm.

One of the questions regularly asked at the farm was why the fruit floats. The plants grow in bogs in America and when the fruit is ripe and the area flooded, the plants are shaken mechanically, releasing the loose fruit. The fruit each have four ovaries which are also air pockets, making the berries float to the surface of the water where they are collected. The small cranberry has a similar construction.

We weren’t actually looking for the wild small cranberry when we found it. We were in a very boggy area and tracing roots of a Cloudberrry plant when we found a small, obviously preceding year’s, fruit. We noticed that running through the Sphagnum moss was a tracery of fine hair-like stems with the tiniest of leaves. We started following this until we found a flower. I had no idea what it was so had to find out. 

In 2017 when we first found the plant, I had no idea how widespread it was or if it was a fruit that people foraged for. Since then I found out that very few seem to know of its existence and it is rarely picked to make jams etc – possibly because it is so small. Since then I also noticed I didn’t see either flower or fruit reliably every year. Sometimes we were unable to find any at all, although hunting in areas we had seen it previously. 2021 was just like this perhaps due to the lack of rain for the previous eight months.

In two of the pictures above you can see the previous year’s berry. It was these that alerted us to the plant and we went on to find the flowers.

It is a very boggy area but you can see some of the other plants in the series including bog bilberry flowers and leaves and the Mountain Crowberry. The other plants there in addition to the Sphagnum moss are heather, Andromeda polifolia or Bog rosemary, Vaccinium uliginosum (Bog bilberry), and Empetrum nigrum subsp. hermaphroditum (Mountain Crowberry). 

I painted the Bog Rosemary before I moved back to Norway and this is now in the Chelsea Physic Garden collection. The Bog bilberry and Crowberry are included in this series.

Although the wild small cranberry is not well known, it is certainly a plant with edible fruit and sometimes we found quite a few. It was amazing to see the marsh dotted with small bright red fruit, making it worthwhile to pick for a dessert or decorate a Norwegian cream cake. Uhmm!

The 2nd part about the Small cranberry will be posted 11th May 2023.

Foraging plants in the norwegian mountains – 12. My working practice

Bearded Iris in graphite
Accidents happen

In my last blog I showed you how careful I generally am to cover my artwork as I go along. But in this case I had finished the piece and had it propped up by my computer to scan and print it.

Unfortunately I ran out of pigment in the printer and needed to refill. Once this was done, I sat at the computer to check everything on the screen, looked up and saw this magenta splash across the artwork. I was shocked. How many hours had I used to no avail?

Be careful to keep artwork safe!

In my previous blog I wrote in general terms about the materials I use, including colour. My sketchbook contains notes of the colours used in the sketches, but these are only a guide for the final artwork.

The sketched colours are on white paper and the final artwork is on a warm vellum which can affect the overlaid transparent paint. If possible I try to match up the colours I used in the sketches if I don’t have enough live material to work from. For example, the leaves often change colour over a growing season and if I’m unlucky I might be painting young leaves in the autumn. This happened with the Bilberry leaves.

I try to limit the number of pigments I use in a picture but still have favourites that appear in most paintings. 

Watercolours used to paint the Small cranberry picture.

As an example, I used these colours in the small cranberry picture:

  • Quinacridone Magenta PV122
  • Quinacridone red PR209
  • Perylene violet PV29
  • Quinacridone Gold PO49 (I don’t think single pigment can still be obtained)
  • Winsor Blue Green PB15.

The last three are a must for me, but I might also use a brighter yellow or warmer blue. On this occasion I added a lemon yellow to lift the green in the leaves.

Introduction of graphite

Getting graphite on vellum is normally considered a negative. Graphite does not seem to work in the same way on vellum as it does on paper because of course it is slightly greasy and tends to slide around on the surface. 

I wanted sections of graphite in my pictures to try and give some relief to the colour. The compositions are quite small with a lot of detail. To separate details from each other I wanted to allow some of the picture to fall back and behind sections of colour to create focus.  I therefore decided that elements conveying habit would be either in graphite, or in graphite with a slight colour wash. But how was I going to get the graphite to go on reasonably evenly and to sit? 

I checked out how other botanical artists had handled using graphite on vellum, then tried out various ways of developing a technique on scraps of vellum.

Bilberry trials on vellum with colour and graphite

Luckily, as with graphite on paper, the use of water on top helps it to adhere to the surface. I also learnt that using a little mucky pigment/graphite water and allowing it to dry would also help to control use of the graphite on top. But, some of my details were much too tiny to make full use of this technique.

The way forward was to use a combination of graphite pencil for the finest detail and soluble-graphite. I generally used a graphite pencil first – possibly a 2H, then with a very small brush I either went over it with pure water or used the water mixable graphite. I found that the graphite worked much better where I had used a light watercolour wash first. 

Process for each picture

Once each composition was complete and transferred to the vellum mounted block, I started with the watercolour sections.

Except for the Cloudberry, the main branch which catches the eye, was enlarged to twice its normal size. I normally started with this so that I could determine how much other elements of the picture needed to come forward or fall back. After this I completed the flower and fruit sections.

Once the watercolour-only sections were complete, I worked on the graphite sections. As mentioned before, the use of graphite means that these sections fall a little into the background and give relief to the eye of the beholder. But the detail in those sections needs to be just as clear as for the remainder of the picture. Each part of the picture needs to give new information otherwise there is no reason to include it. In this case, the graphite sections were done life-size.

Last of all came the scale-bars. To work out the best placements for these, I scanned each picture onto my computer and digitally placed and sized the scale-bars, comparing them from picture to picture. This happened in January 2023 when preparing for professional scanning of the artwork.

Actually drawing the scalebars onto the final artwork caused most headaches. Applying the graphite in even lines on the vellum was more difficult than doing the line drawings, but I got there!

Now I will write about each species individually – starting with the next blog 30 April 2023.

Life-size small cranberry flower and stems. Water-soluble graphite being applied with Rafael 8408 size 1 brush over faint graphite pencil lines.

Foraging plants in the norwegian mountains – 10. My working practice

Composition

Do these three pictures have good compositions? It is not easy for you to judge from these as composition is the area within the mount edge – the image and background.

  • Benton Iris ‘Farewell’ is Watercolour and graphite. The painting is part of the Cedric Morris Florilegium.
  • Dying Rosa rugosa is in Watercolour. It was one of the first paintings I did after returning to Norway. The sprig was sticking up above the snow, so it shrivelled quite fast.
  • Rhododendron impeditum is also watercolour and graphite. This picture is part of the Chelsea Physic Garden Florilegium.

Composition in botanical art is not necessarily very straightforward. As botanical art is ‘art’ it should have a main focal point that draws you into the picture. Once your eye is drawn into the picture, something needs to lead it around within that picture and prevent it from being lead off elsewhere.

On top of this, botanical art must be botanically correct. 

The first digital arrangement of my cloudberry sketches

Combining the art and botany for each picture is hugely difficult particularly when you have different sections telling a story about a plant. Having a series of plants in separate pictures that elaborate the story compounds the problem. 

To try and reduce the problem a little I started to arrange the pictures digitally. I scanned some of my sketches and moved them around within a 31 x 25cm area. It gave me something to think about when deciding what to include in each picture and how many more sketches I would need to get all the information I needed.

Scanning and arranging digitally gave me the opportunity to do something similar with my other species and the ability to compare them against each other. This composition looks nothing like the final one, but I kept rearranging until I was satisfied.

I worked hard to compose my set of pictures so that they looked a series. This can be quite difficult when some are from different families 

  1. Rubus chamaemorus – Rosaceae
  2. Vaccinium oxycoccus Subsp. microcarpum – Ericaceae
  3. Vaccinium uliginosum – Ericaceae
  4. Empetrum nigrum subsp. hermaphroditum- Ericaceae
  5. Vaccinium myrtillus – Ericaceae
  6. Vaccinium vitis-idaea – Ericaceae
  7. Arctostaphylos uva-ursi – Ericaceae

The first word in each species is the Genus name from which the plant is derived. Four are Vacciniums from the same Genus.  Six of the plants are from the Ericaceae (heather) Family and you can see this by the similarity of the flowers. One is from the Rosaceae(rose) family, and the stipules on the leaves (tags at the base of the leaves) is a clear indication of this.

Deciding the enlargement was relatively easy with the plants from the Ericaceae Family where the fruit is comparable. But as everything was larger on the Cloudberry picture, only the scale bars can give the size.

My aim with all the pictures was to let people see and understand the incredible flora and edible fruit available in the mountains. Many look at plants and think them pretty, or know where to pick certain fruits, but not so many study the plant and understand how intriguing it really is. This is an opportunity.

What to include in each composition.

I went through my sketchbook and made sure that I had enough information about each plant to fit on my vellum, mounted on blocks by William Cowley’s. I didn’t want to overcrowd each picture. 

The focus was the plant and its fruit, but one can’t do this without highlighting its flowers. I decided to introduce a picture of the flowers and fruit but restrict dissections to the fruit only. That is until I got to the cloudberry which was going to be the most difficult to integrate into the series. But it isn’t called ‘Mountain Gold’ for nothing.

In the end, all but the cloudberry picture included a branch enlarged and branches actual size to indicate habit. Each had an enlarged flower, plus fruit with both longitudinal (LS) and transverse sections (TS). These are the finished longitudinal sections from each fruit; the largest being the Cloudberry.

In the next blog I will be talking about my transfer process. This comes 23 April 2023.

Only Eight weeks until the RHS Exhibition at the Saatchi Gallery in London;

https://www.saatchigallery.com/exhibition/rhs_botanical_art___photography_show_2023

Foraging plants in the norwegian mountains – 9. My working practice

By the lake Fjelløkteren at 1000metres – Ripe Cloudberries mid July

Imagine how the artwork might look if measuring various parts of a chosen species was not accurate. The photos above all contain the Vaccinium oxycoccus subsp. microcarpum – small cranberry. Click on the images to see them larger.

  1. Small cranberry flower in the moss with Bog bilberry leaves, bog rosemary leaves, and heather. Note the tiny leaves of the cranberry lying across the moss surface bottom right.
  2. Small cranberry flower with bog rosemary to the left, bog bilberry leaves and flowers. Note the woody stem that distinguishes it from the bilberry. Sprigs of mountain crowberry also clearly seen with the white line on the back of them – this is the leaf folded back.
  3. Two small ripe cranberry fruit lying on the top of the moss by the side of a larger cloudberry leaf. There is also heather and mountain crowberry leaves. The stems of the small cranberry can be seen across the moss if you know what to look for – narrower than the grass.
  4. Two ripe small cranberry fruit either side of a cloudberry leaf. The reddish stems of the cranberry with the tiny triangular leaves can be seen.
  5. The growing tip of the small cranberry.
  6. A stem and leaf of the small cranberry. A further series of well chosen photos would show the connections of leaves to the stem, the branching and flower connections.

Measuring for the sketches

Amongst my original chosen plants for the 2023 exhibit were some very tiny flowers, but each of the species contained some tiny detail. I needed the facility for measuring accurately, particularly whilst sketching and of course for enlarging where needed. 

To the left is my trusty digital calliper in use for measuring the Cranberry. Whenever I take a measurement, I make a note of it with the drawing and additionally check it against the research done on books and the internet.

Unfortunately, I didn’t have this essential tool when initially sketching the Cloudberry and spent several years trying to catch up as already mentioned. As I wasn’t living in Norway at the time, I tried to coincide my visits with the months that I thought I might be able to get the missing detail, but either the plant flowered earlier or later than my visit. In fact, I didn’t get the missing dimensions until 2022 when I was again living in Norway. But even then, it still took several trips up into the mountains to hit the right time!

Another tool I use when making enlargements accurately is a technical divider. You can see it in use here when I did my Bilberry sketches. The divider allows me to measure exactly or enlarged by a specific amount. 

Technical divider adjusted to make a 1.5 enlargement.
Technical divider in use with bilberry sketch.

The other picture here shows the technical divider adjusted to create an enlargement of 1.5. In the ‘old days’ before digitalisation, one could write an enlargement of 1.5 (x1.5) on the illustration. Although this helps when doing the illustration, it will not work if showing artwork digitally on a website etc. 

In such a case one has no idea at which size the original drawing will be seen, therefore scale bars need to indicate exact measurements.

Example: When drawing x 2, or twice the size of the actual subject, one knows that 2cm of the illustration is actually 1cm in real life. So one could draw a 1cm long scale bar with 5mm written beside it to indicate that the 1cm line is in fact equal to 5mm. This means that when looking at the original enlarged illustration, if it measures 5cm, you know that the plant section is 2.5 cm in real life. 

But, these days if viewing an illustration digitally, there is no way of knowing what the size of the illustration is.

Scale-bars from bilberry illustration.

To overcome this if viewing on-screen or in a book, measure the scale bar marked as 5mm (our example) and note the measurement, then measure the whole section on-screen and multiply that measurement with the measurement of your scale-bar. This will give you the size in front of you on your screen or book. But you will want the real-life size and to do this, multiply again with the figure written by the scale bar – in this instance 5mm.

As an example use this picture from my bilberry illustration to work out the size of the finished detail and the size of the actual plant. The picture shows where I planned the scale-bars digitally to repeat in graphite on the artwork. But remember that the scale bar is in mm i.e. 4mm = 0.4cm.

On my screen, the scale bar measures 0.7cm and the section is 2cm high. Therefore 2 x 0.7 = 1.4 x 0.4cm= 0.56 cm. This means that the illustration is 1.4 cm tall, but as the scalebar is equal to 0.4 cm, the live flower is 0.56cm high.

My next blog is scheduled for 20 April 2023

Foraging plants in the norwegian mountains – 6. History of the project

My best view – Andersnatten at 23:00 in June.

Anyone would think I am trying to sell Norway. I am, it is a fantastically beautiful country. The picture above is in Sigdal, the valley below Haglebu. It is the view we had from the house we built in the late 1970’s. It is from here that I learnt to love Norwegian flora.

In the previous blog I finished off by saying that I still hadn’t seen any sign of one of the two species that got me going with this series of plants. This was the Bearberry (Arcostaphylos uva-ursi). I had already found out that they were not known to grow in the county I now live – along the west side of the Oslo Fjord; In fact locals didn’t seem to know about the plant!

In 2017, that very first summer of sketching, I managed to do some sketches of each of the five species already found. This gave me a feel for the plants but I still needed to do a lot of research into them. I had found that the cloudberry is dioecious – the male and female reproductive organs are separated in two different organisms; each plant is either male or female. My girlfriend from whom we had borrowed the cottage that year, was not aware of this. But, it seems, she was not alone in this as it was a surprise to many Norwegians with a cursory knowledge of the plants around them.

There was plenty of mountain crowberry ( Empetrum nigrum subsp. hermaphroditum) in the area round the cottage. The crowberry is a family of plants that isn’t quite straight forward in that the species at lower altitudes is dioecious like the Cloudberry, but at this altitude in the mountains is more generally a subspecies called ‘hermaphroditum’. This means it carries both male and female reproductive parts.

Finding plants and choices in 2018

The cottage at Flatvollen, near Haglebu. 906 metres over sea level.

As I realised I was going to need quite a few years to complete my series with only two weeks at a time when we could get to Norway, we decided to rent a cottage at a higher level in the mountains. We looked at an area where I had used to go skiing when younger – Haglebu at the top of the Sigdal valley where it goes over the mountain then steeply down into the next valley. This time we found a cottage at 906 metres over sea level and I could see that I would be near the plants I intended to paint. Although I still hadn’t found the one plant I had been looking for.

In front of the cottage there was quite a boggy plain and I knew that I could get plants such as Cloudberry there. Behind the cottage was steep mountain and I knew most of the other plants would be available to me there. 

We went for a short hike and explored. The marshy area was quite wet, but there were a lot of Cloudberry plants. Unfortunately, it was too late in the season to see any flowers but getting onto my hands and knees I got a real surprise. Weaving in and out of the boggy moss was the tiniest plant, with the smallest flowers and leaves. The plant was so insubstantial but lying on top of the moss were the remains of some red berries. This was Vaccinium oxycoccus Subsp. microcarpum (small Cranberry). The Cranberry bought in our shops is Vaccinium macrocarpum – large cranberry, and of course cultivated in large amounts in the US. 

I had just found my 6th plant, but still not the bearberry.

Below you see the small cranberry on top of the moss with sprigs of bog bilberry and mountain crowberry and a little Betula nana (Dwarf birch), often found as the last tree (no more than a low shrub) on the tree line.

I had to remind myself that the reason for getting interested in this series of plants was because the bearberry often got mixed up with the lingonberry (cowberry), and this often happened at lower elevations. I needed to continue my hunt for the species.

We went hunting and eventually I found quite a few plants in a dry sandy forest area in the next valley. This was Arctostaphylos uva-ursi (bearberry). I now had my seven species, although one of them was not in the immediate area where I was collecting my samples. That is, until I found some very near the cottage, growing down a rock face.

Finding the Arctostaphylos uva-ursi (bearberry)

More on the 9 April 2023

When I wasn’t walking in Norway …

…..I was either hunting for plants or painting.

I had a list of plant detail that I had worked out I needed to complete the composition planning for my series of pictures. My vellum size for each piece is 25 x 31 cm – which I suppose relatively speaking is quite small. But all but one of my plants is very small with leaves varying from 2-6mm long on the Vaccinium microcarpum, to the Rubus chamaemorus where the leaves vary hugely in size.

Vaccinium microcarpum – Small Cranberry – Leaves 2-6mm long.

Impetrum niger ssp. Hermaphroditum – Crowberry – Leaves 3-6 mm long

Rubus chaaemorus – Cloudberry (image is 13cm high)

I decided that rather than work on all seven pictures at once as I have done so far, I would work on half this year and the rest next year. For all of them I needed to do some colour matching on vellum as this will be different to the colours I have used on paper. You have already seen the small piece I did on the Cranberry a couple of blogs ago. You may also have noticed the difference to the actual flower size (tiny) and the painting  which I did at twice the size.

Luckily enough although there is a slight difference in the terrain from which each of the plants come from, we have found each species within walking distance of the cottage in which we have been staying. The Cloudberry and the Cranberry can be found intertwined with each other in the soggy sphagnum moss – but not always. The Bog Blueberry (Vaccinium uliginosum) comes from a similar area, but I have seen it reaching up the side of rugged outcrops. The Crowberry can be found all over the mountains although the Ssp Hermaphroditum can only be found at higher altitudes. The Bilberry can also be found pretty well most places, but doesn’t seem to be above the tree-line and doesn’t seem to like really boggy areas. The Cowberry – Lignonberry (Vaccinium vitas-idaea) is spread on ant mounds and rocky outcrops.  Common Bearberry (Arctostaphylos uva-ursi) likes much drier conditions and is often found in pine woods. But we did find an example not far from the cottage. Last year Robin drove about 150km to find a spot that I knew about!

Below is the colour sample of the Bog blueberry done this year. The very new new leaves start out quite red and as they get older they become bluer and stiffer. Sorry the photo is a little dark.

Vaccinium uliginosum – Bog blueberry – Watercolour on vellum 5×7″, painted twice natural size.

Go back

Your message has been sent

Warning
Warning
Warning
Warning

Warning.

Summer snow in the Norwegian mountains

Whilst everyone else is suffering extremely high temperatures in Europe, we are experiencing +4 high in the mountains of southern Norway! I believe it is warmer at the North Cape.

However, as there is now no longer a direct ferry from the UK to Norway, we drive here over several days, with our cargo of painting equipment. A necessity for the job I am going to do whilst here.

On the way we stopped off in Amsterdam to visit my son and partner and had a cycle ride to the coast in 37 degrees. It was almost a relief to eventually get to a cooler climate, although the day we arrived it was in the high twenties lower down in the valley.

Today’s view from our rented cottage.

Since then, the temperature has gradually sunk even lower. Today we are awaiting my daughter who lives on the Norwegian coast, advising her to bring  winter woollies. I didn’t dare tell her that it has been snowing today – although it hasn’t settled.

So why am I subjecting my sun loving and warmth seeking husband to todays chill in the Norwegian mountains? It’s the plants of course. I am now back to getting all the plant information to paint my pictures for my next RHS exhibit. I know I have spoken about this for a couple of years or so, but my involvement in the Worldwide Botanical art exhibition last year and continuance with setting up the Association of British Botanical Artists (ABBA), rather delayed things.

Because of the delay, I also lost my right to exhibit at the RHS – this year being five years since I last exhibited. I therefore had to apply again. Luckily, my work in general was again accepted as potentially worthy of a medal place, so now I am going to work through my subjects properly and, rather than rushing it, plan to exhibit in 2021.

Små Tranebær is Small Cranberry in Norwegian. The practice piece is twice natural size (the actual flower top right) is on vellum – as the final work will be.

This year I am focusing on three of the plants I have chosen and plan to get information I feel is lacking to complete a picture. My first is Vaccinium microcarpum – or Small cranberry. Last year I was able to find ripe fruit and was able to get all the information from that. Previously I had only drawn one flower, so I am concentrating on these now.

I thought you might be interested in my already messy workplace setup at 910 metres over sea level!

If Denise Walser-Kolar sees this blog, I hope she will notice I have taken on board her teaching. As long as I practice what she taught in Vienna, painting on vellum is going much better – even with the tiny leaves! Thank you Denise.

The other two plants I hope to get some more information on is the Vaccinium uliginosum (Bog Blueberry) and a little from the Rubus chamaemorus (Cloudberry). In both instances, it is only small details I need. I have already noticed that the leaf colour of the Bog blueberry seems to change in the sun. New leaves have a red tinge to the edge of the leaves, older leaves don’t, but in the sun they become red to almost a Perylene Violet (for watercolour artists) colour. I didn’t realise that before.

The Cloudberry fruit is only to be found on female plants. Each plant can be quite huge and spread many metres. Around the cottage I have only seen the male flowers of the Cloudberry – no female ones at all. it might be because it hasn’t warmed up very much yet where we are. The temperatures are set to improve, but I doubt we will be here long enough to benefit from it.

Please don’t get the wrong impression of Norway. The summers can be hot and the winters cold. It is a fantastically beautiful country and every area has its own attraction. I like it in the area we are staying as I lived in the valley for several years. Lastly, a picture of the sun rise a couple of days ago. It doesn’t get totally black at night at this time of year, but this was taken at 03:30.