Foraging plants in the norwegian mountains – 8. My working practice

A year in the life of a Magnolia x soulangeana tree. In watercolour and graphite.

In 2011 I did my first RHS exhibit – ‘A year in the life of a Magnolia x soulangeana tree’. The tree was in my front garden, so I had a good source for the material I would need. But to get my eight pictures completed in time, I needed to paint throughout the year. The main picture from which all the others derived contained all the phases the tree went through during the year. It was whilst I was doing this series that I became interested in the inner workings of plants and started using a microscope. Of course, to do this I also needed a sketchbook. 

Sketchbook work

Malus x scheideckeri “Red Jade” in Colour pencil

Being a very impatient person I always wish I could get the perfect result first time around. When I started out painting plants, although I had drawn and painted most of my life, I was not very good at using sketch books. But I quickly understood that most of those who did botanical art also did a lot of work in sketch books. 

Sketches from my Crabapple pages.

Encompassing sketchbook work I felt was difficult as I paint directly from the plant in front of me. Why would I want to sketch it several times before painting the final piece? Surely the plant, or flower or leaf would at least have changed or even died before I got to the final painting!

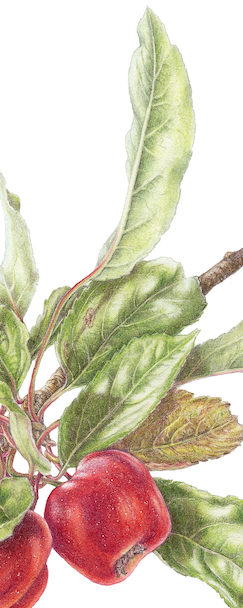
For my second exhibit in 2014, ‘Small is beautiful; Crab apples explored’ I did six pictures from six different crab apple trees – also in my garden. As the title suggests I was doing an exploration of each crab apple  – again over the year. The final artwork displayed the fruit and flowers and dissections of both; I again needed my microscope and sketchbook to get together the necessary information about each of my plants. 

Malus x atrosanguinea ‘Gorgeous’ setup

But this time. I also worked out another way of using my sketches and my photographs. Yes, I take an awful lot of photographs which I use to confirm detail. I have painted three pictures using this photo; but each picture is completely different.

I used the same photo setup but picked different apples and leaves from the garden each time I painted a picture.

Below are sections from two of the paintings. Compare the difference.

But what has all this got to do with my work process towards my current RHS exhibit? 

I learnt a lot during the process of planning for my previous exhibitions and it has all come in very useful for planning this one.

My first exhibit was done in watercolour on paper and the second one was colour pencil on paper. This time it is watercolour and graphite on vellum. A completely different kettle of fish! 

Preparation and plenty of sketches is everything. 

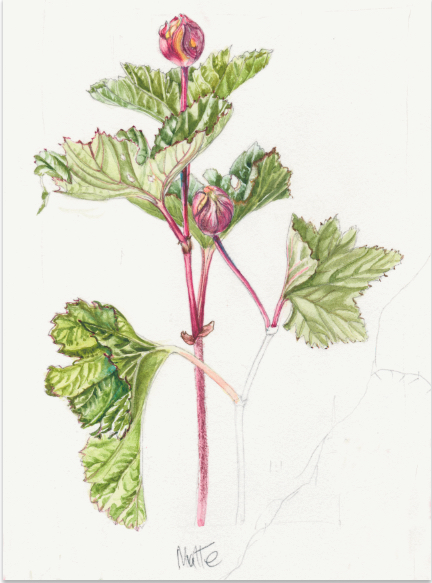
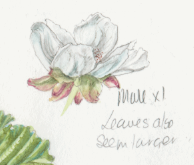
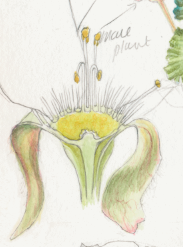
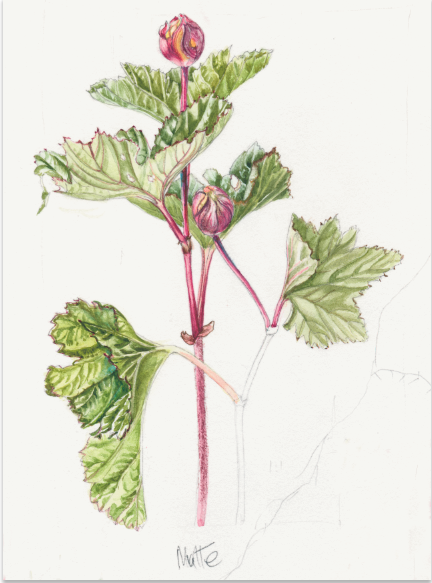
The main sketch that I used in the Cloudberry painting was the one below, drawn in 2017.  When working on my final artwork in 2022, I found appropriate plant pieces to paint from and the Work In Progress (WIP) is as you can see. The immature top fruit is rather different to the sketch, and the lower one has even started opening. This development is not on my original sketch, but I liked the layout of the sketch and wanted to incorporate it in my final piece. The final leaves were painted from several new ones, to include the ‘tatty’ nature of one of them from the sketch.

Rubus chamaemorusCloudberry WIP
Rubus chamaemorus – Cloudberry sketch.

Foraging plants in the norwegian mountains – 4. History of the project

Weather is very changeable in the Norwegian mountains and although mid-summer, it can snow. This can make it difficult not only in choosing species to paint, but also finding them and making sketches in the open.

I still. hadn’t decided which species I was going to choose to follow up on, although I did have a rough idea. A lot depended on how easy it would be for me to access the plants and whether I could find them in the vicinity of the cottage we rented each year.

Several of the plants I had been thinking about had fairly small fruit and elements of the plants were also very small. How was I going to display this? One plant had large leaves and two had very tiny leaves. Some plants lived in very boggy areas, several had access to water but the roots weren’t lying in water, and one was happiest in dry areas such as sandy pine forests. Some of them intermingled.

How was I going to work this out? I wanted an exhibit that drew together seven different plants into a whole.

I started by just sketching mountain plants with fruit that were edible (not toxic). This started my several-year long period of ‘Constructive Procrastination’!

I started painting the final pieces in 2021 after moving back to Norway.

Sketching

First page in my sketchbook – Cloudberry sketches

Today, my sketch pages are rather a mess. They started out beautifully organised, but as time has progressed, I have added more sketches, more information, and more colour matching. This means that my sketch book is now not a beautiful work of art but a tool to get enough information for completing a final composition.

This is the first page in the sketchbook I kept for this series. You can see the very first sketch of the cloudberry leaf that I did in 2014 whilst teaching at Åsgårdstrand. In later years I was able to add both male and female flowers actual size and enlarged dissections. BUT, I was stupid enough to forget to get all the measurements and have spent the last two summers chasing to find the relevant pieces at the right time of year. 

I had other pages with Cloudberry sketches including research done on the net, and referencing different photos I had taken, but none gave me all the information I needed!

It took me years to catch up on this plant as every year is so different. One can’t guarantee that flowering will happen at the same time each year, or, as in this case that you find both sexes of flower. One year, we had planned our trip from the UK to coincide with a roughly general fruit picking time for this plant. But when we got up to the cottage, everything was long over as it had been a very hot summer. 

I am telling you this here as it shows how important it is to get all the necessary information when you are doing the sketches. 

Cloudberry fruit sketches from berries given to us by a kind couple who had found ripe fruit 200m above where we had looked.

Each year we rented the same cottage in the mountains for a two-week period. I spent the whole time sketching and painting, when we weren’t out hunting for specimens or picking fruit.

By 2018 I had not been lucky enough to find any fruit since starting the project in 2014.

One day we were out picking Bilberries when below me I saw a couple walking along a path with two bulging plastic bags full of something orange. I knew immediately what they were and rushed down to ask the stupid question ‘where did you find these’? I knew full well no-one gives up the location of their ‘mountain gold’ – a name used for Cloudberry fruit. But luckily enough when I explained what I wanted them for, they gave me two berries. The above sketch is those two berries. My husband had never even tasted them at that point, so they became a treat for him!

This will continue 2 April 2023

Mountain gold!

This is a plant found amongst other places, in the mountains in Norway. It is one of the reasons For my next RHS exhibit – probably in 2019, I decided to paint Norwegian mountain plants that provide food for us mere mortals. Its scientific name is Rubys chamaemorus, but the common name in Norwegians is ‘Multe’, and in English, ‘Cloudberrry’.

Unripe Cloudberry

Why is it called ‘mountain gold’? Apart from its very special taste, it is not always easy to find. It likes boggy areas and generally you will find that Norwegians will not tell anyone else where ‘their’ patch can be found. I know one or two places because I used to live in the mountains in Norway. I also found some whilst staying in a friend’s cottage this summer (Tusen takk Eva og Jon for låne av din nydelig hytte Thank you Eva and Jon for lending us your beautiful cottage). I was in the mountains specifically to sketch these and other plants I had decided to include in my exhibit.

If you travel to Norway and ask someone where cloudberries can be found, unless you know your host well, it is unlikely that you will be told.

The picture on the right is an unripe Cloudberry. There are very strict laws governing this plant, therefore it is illegal to pick them before they are fully ripe. At that stage they are a beautiful golden orange colour. Unfortunately I have no pictures of a ripe fruit as this happens in the autumn, that is why I need to travel back again next year to sketch the ripe fruit.

Over the years I have picked a lot of Cloudberries and thought I knew them! I also found that Norwegians are as un-knowledgeable as I am. Because I am now studying the plants to paint I decided to delve deeper. But I also needed to find the flowers and the unripe fruit to draw. This year, there were few fruit ripening, but an awful lot of flowers. On closer examination and with the help of a very good series of old botanical books borrowed from the Eggedal Library (Tusen takk Jorunn. Thank you Jorunn), I discovered that Cloudberries are dioecious, either male or female plants. Each plant has a huge underground root system travelling for some distance and that is why I found difficulty when looking for the unripe fruit.

Patch of male cloudberries.

Patch of female cloudberries.

The large patches of flowers were mostly all male, but we were soon able to distinguish these patches at a distance. They had a lot of beautiful white flowers, but also  many red sepals where the petals had fallen off.

The female plants seemed to be few and far between – less than last year. The flowers were  fewer and smaller, but with several immature fruits at different stages of development.

Like so many of the plants I have painted, I study them first then become completely intrigued by them. This of course helps me portray them as best I can.

Before I show you the sketches, this is a picture of a small female cloudberry patch in quite a boggy/Sphagnum moss area, together with nearly all of the plants I had chosen to do and which I will talk about in other blogs.The picture also includes Robin’s boots, Vaccinium oxycoccus(which I didn’t think I would find as its so tiny),Vaccinium myrtillus (small blueberry),Empetrum nigrum (crowberry),Vaccinium uliginosum (bog blueberry) and Andromeda pilifolia (a heather I won’t be including in the series).

Robin’s foot and a mix of plants.

So what is the difference between male and female flowers? It should be obvious, but I’m afraid I never looked and saw previously. I just took things for granted.

Male Cloudberry flower – larger than female.

Longitudinal section of Male Cloudberry flower.

The male flower contains stamens in a ring round the inside of the outer whorl.


Smaller female cloudberry flower.

Longitudinal section of female cloudberry flower.

The female flower is slightly smaller than the male flower, has several styles and stigma in the centre – one to each ovary, but round the edge is a ring of white, sterile stamens.


Cloudberry plant with developing fruit.

Sketch page of Cloudberries.