Foraging plants in the norwegian mountains – 24. Lingonberry Pt. 2

Vaccinium vitis idea – Lingonberry plants in dry moss.

The reason for even thinking of doing a series of plants like this was because of this plant – Vaccinium vitis idaea (Lingonberry/Cowberry) and the next plant in this blog series Arctostaphylos uva-ursi (Bearberry). They are fairly similar and their habitats cross over into each other’s. So unless you know what you are looking for you can easily make a mistake.

Lingonberry leaf back.

It isn’t a ‘dangerous’ mistake to make, but it can spoil a recipe!

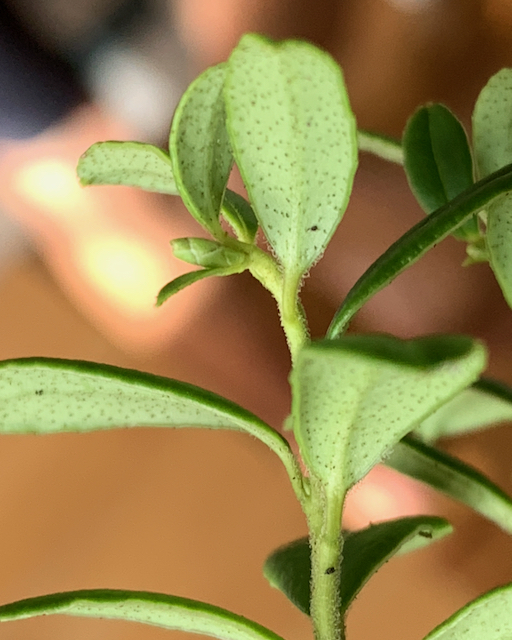
Above is a photo of the Lingonberry in its typical habitat. Both species have leathery leaves as well as similar flowers and fruit. But the Bearberry prefers even drier surroundings than the Lingonberry.

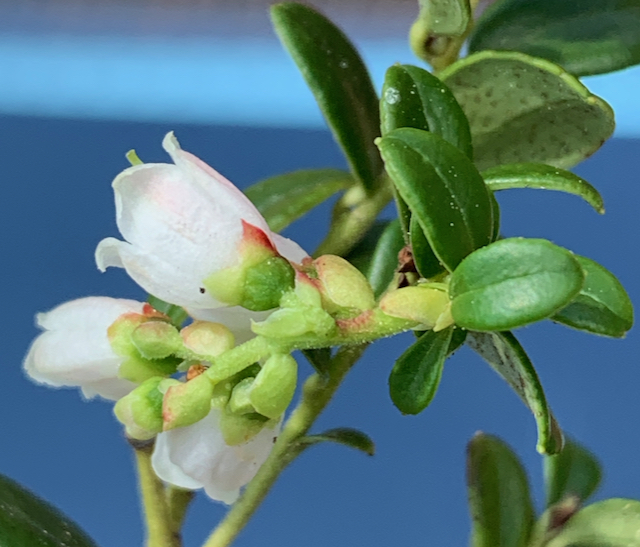
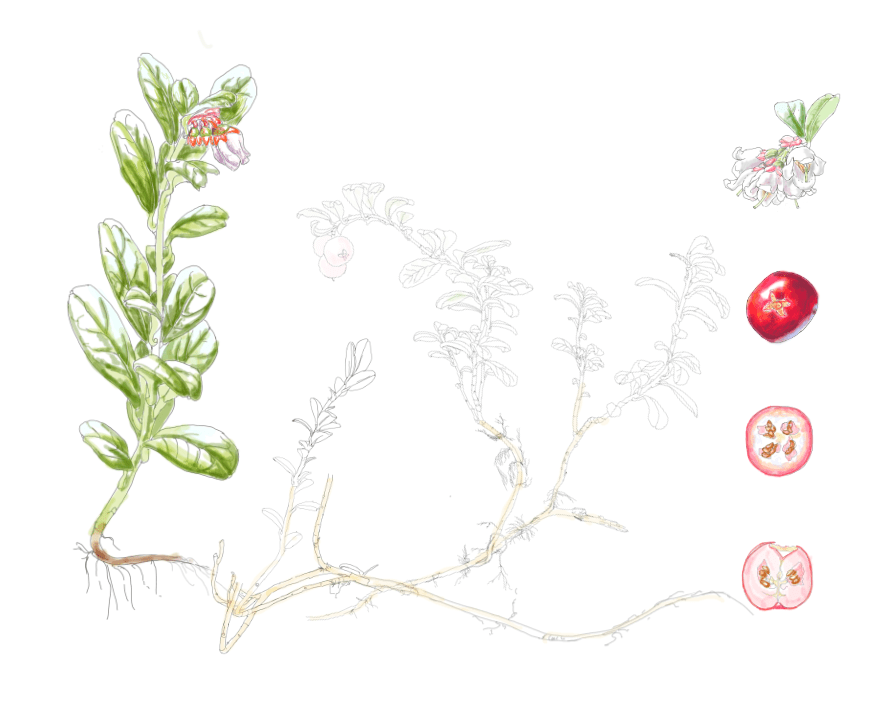
The Lingonberry leaves are oval as you see above, whereas the Bearberry leaves are paddle-shaped; The Lingonberry leaves have small dots on the underside, whereas the Bearberry leaves are finely veined; Both sets of flowers are typically Heather-like, but the Lingonberry flower is bell-shaped and the Bearberry flowers are more urn-shaped. The rhizomes of the Lingonberry sit deeper in the humus than the Bearberry, which are prostrate and limply creep across a surface.

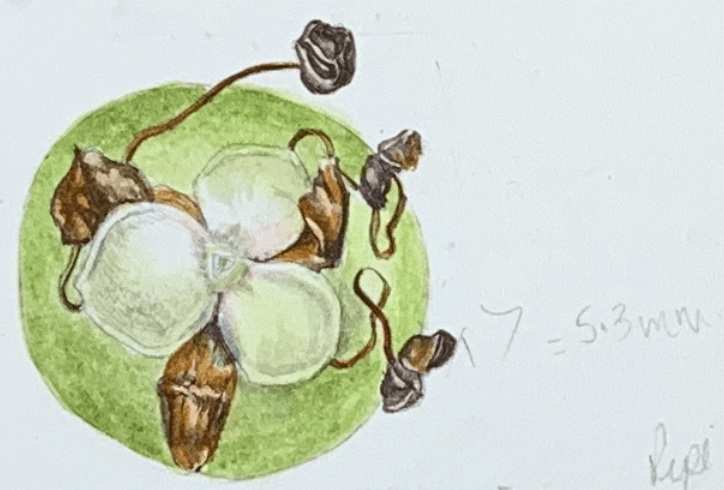
The fruit for both plants are in clusters, but the Bearberry fruit has a slightly flatter spherical shape than that of the Lingonberry. Most importantly the Lingonberry has an inferior ovary (the flower parts arise above the ovary), meaning that the remains of the sepals are at the bottom of the hanging fruit, distal to the pedicel (stalk). The opposite is true of the Bearberry where the calyx (sepals) remain on the fruit around the pedicel. 

Fruit developing. Petals fallen off to reveal shape of distal end of fruit formed with sepals.

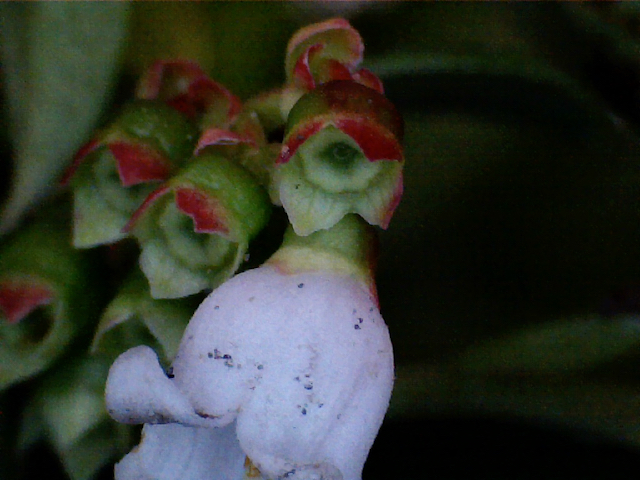
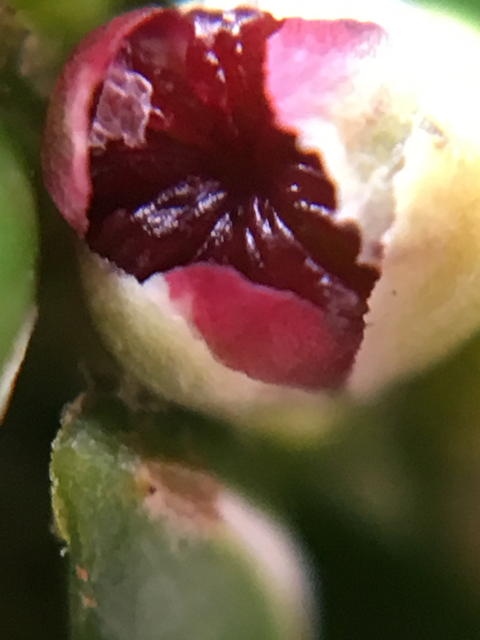
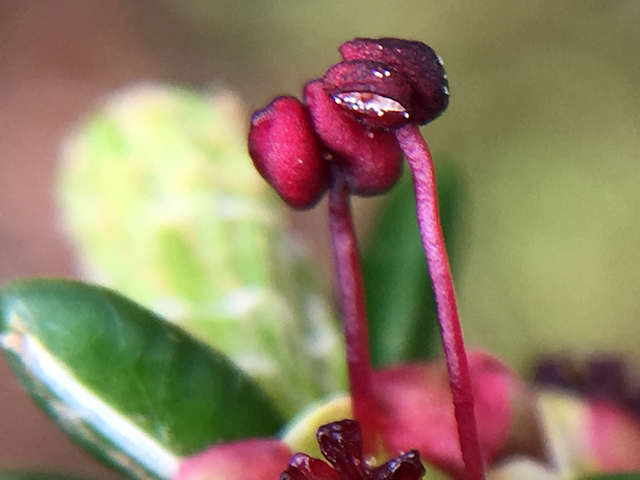
If you look at the painted berry at the beginning of the last blog when I started discussing the species, you can see the remnants of the sepals. Compare it with these three pictures showing the development of the flower and swelling of the ovary in its inferior position.

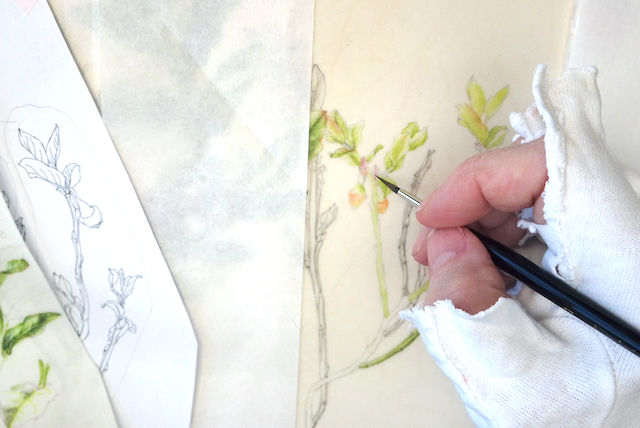
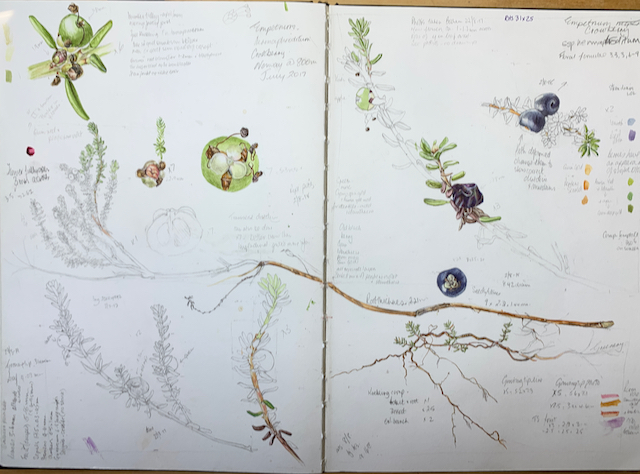
At the end of the previous blog I showed you some of the sketches I did from various Lingonberry plants. Here you see additional ones and you may notice that they were part of the basis for my final artwork.

Below you see my first compositional plan for the Lingonberry picture, but I didn’t really like it. I suppose in this plan I wanted to avoid painting so many small, but detailed leaves. As you now know they have several diagnostic elements to them, but at the same time are quite shiny. The composition just didn’t give me the right ‘feeling’ of the plant.

One weekend I had been out picking fruit with my daughter and we were discussing the way the plants grew and the impression they gave. We again looked at my planned composition and she suggested I replace the flower on the stem with a fruit cluster.

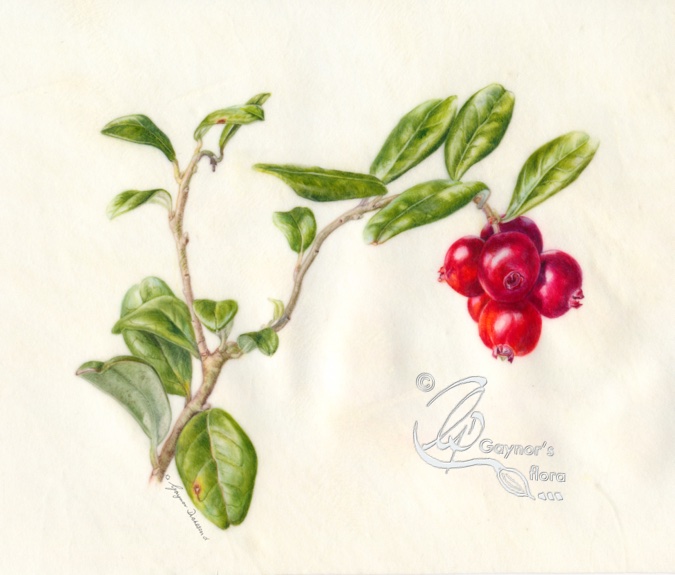
That was the answer – the series emphasis was about the fruit. I decided to do a trial on vellum of the new piece of stem with the berries and this became the basis for the final composition.

My first sketches of this plant were done in March 2017, but I didn’t start painting the final picture until October 2022 (after harvesting), finishing December 2022. Because this plant is not deciduous, it allowed me to work on the leaves right up until the first fall of snow.


The native range of this species is Subarctic & Temp. Northern Hemisphere including the UK and Norway. It is a subshrub and grows primarily in the temperate biome.

Source: Kew – Plants if the World Online

The species in my next blog scheduled for 8 June 2023 is the Bearberry, favoured by bears when they wake up from their hibernation – or so I am told.

Eva’s Raw Lingonberry Jam

300g Lignonberries

100gm sugar

Blend together the berries and the sugar until berries well macerated. If possible let it stand for few hours in the fridge before being used.

Eva Biringvad gave me this recipe and sent me on a ‘no-return’ journey. Her father made the most delicious bread, so we ate chunks of his bread with sour cream and the raw lingonberry on top. Delicious!

This is also used with meals instead of Cranberry sauce – and it is much nicer.

Foraging plants in the norwegian mountains – 22. Bilberry Pt. 2

My sketchbooks can be messy in comparison to many!

This is the main double page for my sketches done on the Bilberry plant. I try to keep as much information as possible together so that when I do my final work I don’t have to search too much in the sketchbook. I try to find a hole on the relevant page to add things, either more sketches or research I might have done. I often find that when I am researching on the internet, the gaps are usually left along the bottom edge of the page, so I frequently use this area to write any notes.

As I have already mentioned in the previous blog, there is a similarity in the fruit of the Bilberry and the Bog bilberry, but the stems are very different for starters. The Bilberry stems are very angular and last year’s branches remain green over winter and into the next season. The deer seem to like them and paw away the snow eating the shoots. The Bog bilberry stems are brown and woody; I talked more about this plant in the blogs published 14th and 18th May.

Serious times – the pandemic!
And additional serious times – moving!

By the middle of 2020 I felt that I had enough sketches for most of my final pictures  and had already decided to stop the extended period of ‘productive procrastination’. We were in the middle of the pandemic and for most people, the world had turned upside down. My daughter, living in Norway, felt we were too old to live on our own any longer and she was too far away should anything happen to us. 

The decision to move back to Norway was thought about and made quite quickly. I think we started talking about it mid June and sold our home with the large beautiful garden and the ‘shed’ – my studio, quite quickly.

The actual move came in August 2020. I had planned all my compositions before leaving the UK and when we arrived in Norway I was all set to start painting the final artwork. 

I won’t talk about all the problems moving during a pandemic caused – we were lucky to be completely healthy. But some of the benefits from moving back to the country I loved included being much nearer to the plants in my series. There were lots of others, but I leave that to your imagination.

Goodbye shed at the bottom of the garden.

In between looking for a new home and sorting out all the official stuff and additional problems caused by Brexit, I started working towards doing the first picture. Of course, it had to be the Bilberry. This plant also grows at sea level and was easy to access now.

I only had to walk up into the woods behind my daughters house where we stayed until we finally moved. There were lots of native plants along the tracks, including loads of Bilberry. In our new home, to which we moved in January 2021 when the area was ensconced in snow, we eventually found it contained a lot of Bilberry plants. Heaven or what!?

I started with a trial piece of Bilberry parts on vellum and began the final artwork in June 2021, finishing March 2022. 

You can see my work station in our new home below. As is perhaps obvious, I continued to procrastinate a little longer as I just had to do more sketches. Working on the vellum off-cut was extremely useful as I also tried out various methods of introducing graphite. Getting the colours right for the bloom of the nearly black fruit whilst I had them was also important. Painting this on paper had been a completely different kettle of fish!

Hello new ‘shed’. This is one of the bedrooms on the top floor, but now my working area consists of two bedrooms turned into one large room – with a view!
Bilberry trial piece on vellum off-cut.

Making sure that I had samples from all the plants in the series at the right time of year was like putting together a puzzle. The flower sections had to be done in the spring and the fruit at various times over the autumn. Leaves also changed through the seasons. 

But basically, I knew that I had roughly six months of the year to paint the deciduous plants (Bilberry, Bog Bilberry, Cloudberry) and those I didn’t have access to under the snow such as the Cranberry. For the remaining plants I would be able to get leaves throughout the year as long as they weren’t hidden too deeply under the snow. It became a matter of planning and making sure I knew where relevant plants were over the winter. 

The native range of this Vaccinium myrtillus is Greenland, Temp. Eurasia, W. Canada to NW. & W. Central U.S.A. It is a subshrub and grows primarily in the temperate biome. Including both Norway and the UK.

Source: Kew Plants of the World Online
Working on the final artwork – graphite and wash section

Mor Astrid’s (my lovely grandmother-in-law) Raw Bilberry squash

3 l Bilberries 

2.5 l water

75 gm Cream of Tartar

4.5 kg sugar

  1. Rinse through the berries to clean of soil. They don’t need to be thoroughly cleaned of leaves and small stalks.
  2. Bruise/crush berries in a plastic bucket and leave for 24 hrs.
  3. Mix the Cream of Tartar into the water and add to the berries. Stir thoroughly.
  4. Let the mixture stand for 24 hrs.
  5. Strain through a muslin.
  6. Add the sugar to the strained fluid.
  7. Stir thoroughly until the sugar has melted in.
  8. Pour into bottles.

The resulting squash can be mixed with water. It is DELICIOUS.

Keep out of easy reach of children or it will be finished off in no time!!

A suggestion from Polly o’Leary after the Bilberry part 1 blog. Thank you Polly.

In this part of Wales theyre called Whinberries. We used to make them into whinberry and apple pie, or whinberry jam. Or both. Depending on how many we found. No recipes, except the usual – plain shortcrust pastry, not too much sugar, because they’re lovely and tart.
Same with the jam. Never really thought about a recipe, just made it the usual way as they were such a treat.

This came from Jane Hogan following the Bilberry part 1 blog. Thank you Jane

We used to pick bilberries on the North Yorkshire moors when visiting my grandmother. She used to line a pie dish with pastry, pile in the bilberries with sugar and top with another layer of pastry. Served with custard or cream and eaten hot. There wasn’t usually any left to have cold! It used to take ages to pick the bilberries. (A quick look online suggests a pound of bilberries and four ounces of sugar)

On 4 June 2023 I will publish the first part of the Lingonberry blog.

Foraging plants in the norwegian mountains – 20. Mountain crowberry Pt. 2

One day, I woke up to find that the male part of the flower which projects an anther over the flower, had been eaten off. I was lucky enough to find other buds I hadn’t noticed before and managed to keep the eating insects away until the stamens shrivelled up of their own accord. This allowed me to complete the picture as I had hoped.

Of course this process was so exciting that it kept me motivated to paint all the tiny leaves!

I used quite a bit of my sketch page information in the final artwork, even the small immature berries I had found when starting to sketch in July 2017 and the trial piece on vellum.

Working out my composition and creating line drawing to trace over.

 When researching more on this plant recently, particularly in relation to its use in food, I discovered that although the berries are edible, apparently there is a potential for the leaves to poison the immediately local environment, making its own habitat more secure; the jury is still out on this question but it is wiser to leave the leaves alone.

But, the berries are fine and because the seeds are quite big and the skin quite tough, it is used mostly for juice, either cooked or raw. Additionally, it is suggested that whilst out walking in the mountains that picking and chewing the fruit is very thirst quenching. I will have to remember that.

Unripe fruit. Actual size 5.3mm

One sketch I didn’t use in the final artwork was this one from my initial drawings. It is very interesting but, in some respects, didn’t give any more information to the final picture. It is an unripe fruit, enlarged (the original fruit was 5.3 mm across), containing the sepals , the remainder of the female flower and the shrivelled stamens. Compare this with the ripe fruit at the beginning of the previous blog where the same parts are also just visible.

The native range of this subspecies is Subarctic to Subalpine Northern Hemisphere including Great Britain and Norway. It is a subshrub and grows primarily in the temperate biome. 

Source: Kew – Plants of the World Online

Having collected enough data and sketches, I started painting the final picture on vellum  August 2021 and finished it January 2022.

recipies

Mountain Crowberry jelly

Crowberry contains little pectin. This means that it is difficult, if not impossible, to make Mountain crowberry jelly based only on the berries. To get Mountain Crowberry jelly stiff, mix the berries with other types of berries that are rich in pectin, for example lingonberries. It is also possible to mix with apples, which contain a lot of pectin or gelatine sheets.

3 dl raw mountain crowberry juice (see recipe below)

Juice of a lemon

1-2 dl water

6-7 sheets of gelatine

  1. Soak the gelatine sheets for 5-10 minutes. 
  2. Pour off most of the water and dissolve them in a small amount of warm water. 
  3. Mix the cold Mountain crowberry juice, lemon juice and water. 
  4. Whilst continuously stirring, slowly and carefully pour the juice mixture into the melted gelatine. 
  5. Pour into clean small glasses. 

This is an excellent accompaniment to venison.

 Raw Mountain Crowberry juice

This is a fresh and colourful juice but not very durable, and requires a lot of sugar and a cold storage place. It is easier to freeze the juice in small portions and thawed when needed.

 1 kg Mountain Crowberries – or the amount picked.

5 dl boiled and cooled water – equivalent 1:2 of berries

10 grams of citric acid – 25-30 gm per litre raw juice.

750 grams of sugar per litre of raw juice

  1. Rinse and crush the berries well. 
  2. Put the berry pulp in a large bowl or bucket, and add pre-boiled, cold water and citric acid. 
  3. Leave the mixture covered and chilled overnight.
  4. Pour the mass into a strainer and let the juice drain well. 
  5. Measure the amount of juice and add sugar. 
  6. Stir well until all the sugar has dissolved. 
  7. Skim and pour it into clean bottles/containers.

Can be mixed to taste with water – or something else. 

The next blog will be 28 May 2023