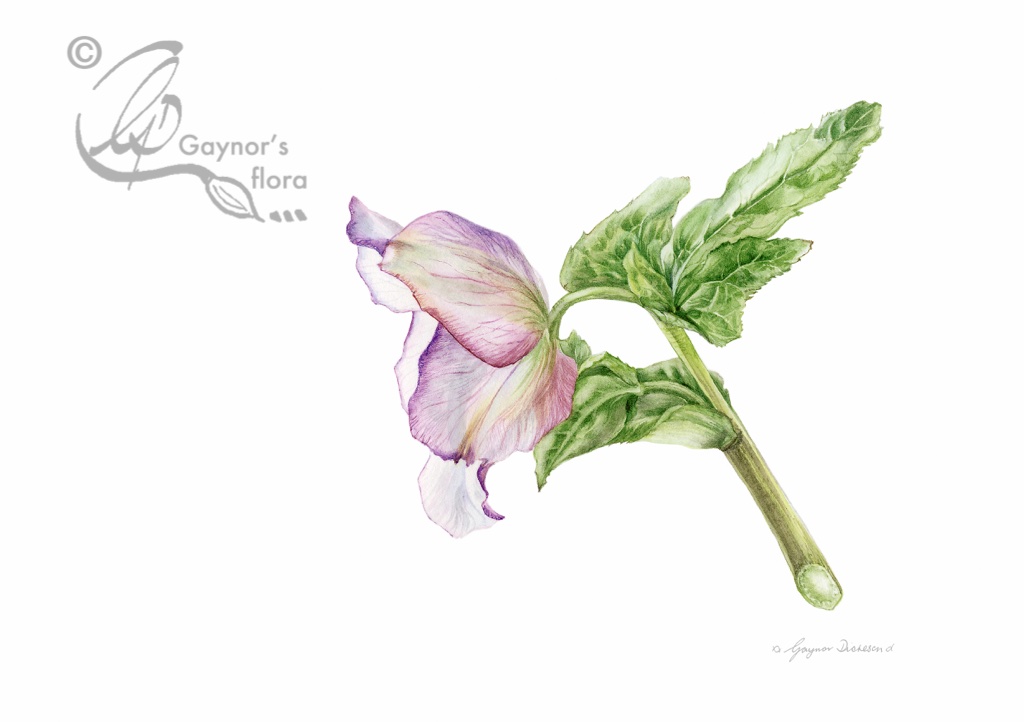
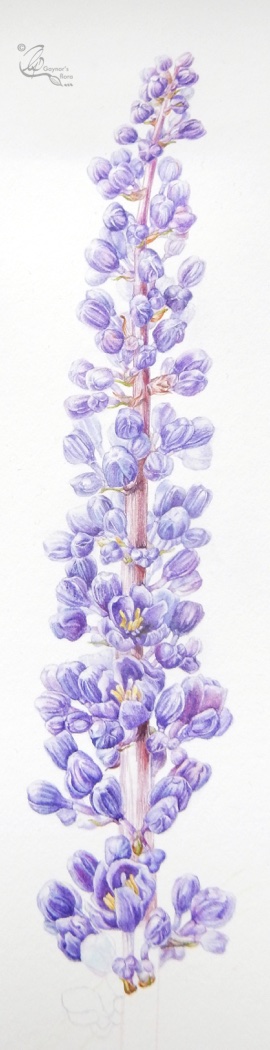
Today I have spent the whole time painting the Liriopa muscari. There is still much to do but the intention is to have it finished by Thursday evening, to deliver on Friday. I think that the wee small hours might be used as well a the long daytime hours.
Photos from the days seven and eight follow. I’m sorry that the quality of the picture is not the best, but you can see the development of the enlarged flower spike.
I’m painting this on Strathmore 500 Bristol vellum. This is a 100% cotton paper which I have used successfully previously. This is instead of my favourite, the old Fabriano Artistico.
Unfortunately, the surface of the ‘new’ paper does not allow for detail in the same way as the ‘old’ paper and this is because of a production change in Italy. We are told that Fabriano have now acknowledged that there is a difference to their paper which affects us botanical artists more than they thought possible. In the meantime I am trying out different papers to help me advise my students.
I will show you here the result of two days work on the enlarged flower spike. I have been trying to take a picture at the end of each day’s work. It is a long process. The quality of the pictures will vary according to the light. I have taken photographs rather than scanning. But it gives a good idea of the progression of the artwork.
What have I been doing of late? You probably think that I haven’t been doing anything at all – but I have been working on my new online botanical art course. Poor Robin, he hardly sees me these days!
For those of you living in the UK you know that the weather has been very mild – and very wet. I live on the south coast and although we haven’t suffered the same floods as further north, it has been wet. All the plants in the garden are in turmoil. Everything is sodden and the cats leave muddy paw prints everywhere – they get the blame as they can’t answer back! A lot of the daffodils have finished flowering and if we get some cold weather now, goodness knows what will happen to those in bud.
We spent Christmas in Norway and had a really super time with my daughter (the hostess) and my son. We even got some lovely snow there – which was refreshing. we enjoyed some very special Norwegian food such as Lutefisk, had a Norwegian Christmas Eve supper of delicious cod and an English Christmas Day meal of Roast pork with all the trimmings. My children are fantastic cooks; they obviously felt they had to learn as I am such a bad cook.
We came back home before the new year to see the Hellebores, Daffodils and Snowdrops in full flower! Starting on the watercolour module of my online botanical art course, I therefore had plenty of subjects to paint from. I chose the Hellebore after picking off a live caterpillar! Several of the flowers had their stamens chewed right off. I’ve pulled this picture off the video, so it isn’t too clear. I wish I had taken a picture of the caterpillar too.
From painting the Hellebore I have done a whole series of videos for the course right from : Stretching light to medium weight watercolour paper (I hope you find it useful), sketch to line drawing, colour matching, tracing over to art paper, tonal value reference study to actually painting the picture. All of the videos are on Youtube, but only the one about stretching paper is available to the public. The rest will only be available to students doing the course, although I am considering doing a very fast one showing the painting. I still have a load of writing to do yet, so I will see how it goes.
I may not be keeping up too well with my own artwork, but I am keeping my hand in when doing the videos.
Yesterday we spent a super day in London, visiting Kew gardens. We had a lovely time and lunch with a good friend (also a botanical artist) at Kew, before going to have a look at the latest exhibition in the Shirley Sherwood gallery. The pieces that struck me most, were a series of Poppies by Denise Ramsay. If you get the chance to go and see them, please do.
We had been invited to an exhibition at the Herbarium in the early evening. The artist was Gustavo Marigo from Brazil, who had been on the Margaret Mee Fellowship programme. Watch this space, the last piece he worked on right up to the exhibition had so much depth and was quite beautiful.
The weather yesterday was so miserable and wet; we never thought, when we got up that the day would be so interesting.
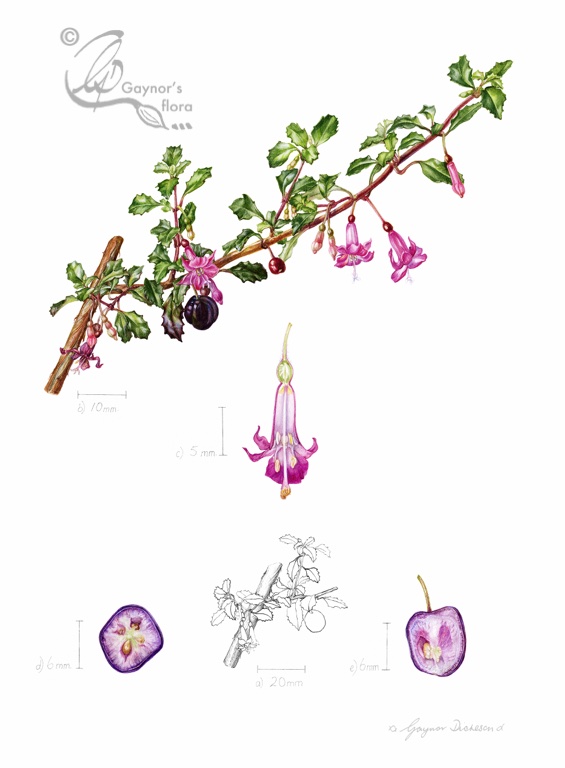
Today I have been in the shed finishing off the Fuchsia microphylla. I mentioned last time that I had one or two problems because of the intense colours. Like anything else, when one sees a plant up close the colours become very clear and stronger than they might seem from a distance.
I had intended to draw a snippet of the plant actual size, in graphite. However the graphite appeared so subdued against the strong colours.
Fuchsia microphylla in watercolour with graphite section actual size.
Robin suggested that i change the graphite section to ink to balance the picture. I was very dubious, but traced the section in ink on a sheet of acetate.
Fuchsia microphylla in watercolour with trial ink section actual size.
Doesn’t look too bad does it? So I took the plunge.
Fuchsia microphylla in watercolour with ink section actual size.
Here is the final painting. Try and imagine it without the watermark as it unbalances the actual composition:
Fuchsia microphylla from Chelsea Physic Garden, in watercolour with ink.
I am getting so fed up with BT broadband, phone and TV. I cannot believe that they sell us a service like this and we have to pay as we signed a contract with them. I don’t know how many times the server fell out today, starting whilst responding to emails before 08:00 this morning. The hub seems to be going orange on and off all day and the phone is an old fashioned crackling line; a repeating problem!
Grumble over – until it goes again when I try to send this blog!
I have been concentrating on my Fuchsia microphylla picture (its gone again! – Broadband I mean.) for the last few days. I left you with some composition plans I had for redoing the picture. During the open studio event early August, I decided to change it and that meant starting all over again. The detail I had originally painted was too low on the page, and I felt that in fact the paper colour was a little too creamy. This meant that the pink that I saw in the flower, couldn’t be replicated on the paper I was using. The off-white of Fabriano Artistico extra white, affected the pink, warming it up too much. I therefore needed to paint the picture on Fabriano Classico 5, which I think is about the whitest watercolour paper. I of course tested out the colours before tracing my chosen design on to the paper.
I still intend to keep you in suspense about which composition I chose. Although I have had a lot of people looking at my blog both on WordPress and Facebook, so far no-one has got back to me with suggestions as to which one I did choose!
I am going to show you the various elements in my composition right before putting the picture together.
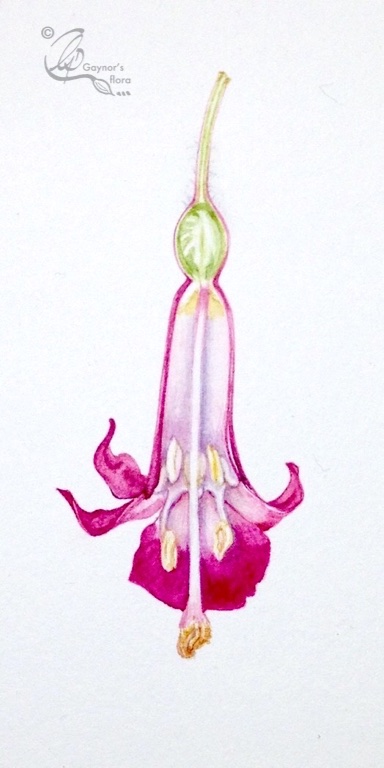
Fuchsia microphylla side branch – magnified x 2Fuchsia microphylla longitudinal section of flower, magnified x 4
Notice how two of the stamens hang down and three curl up. This is completely different to the standard Fuchsias you may be familiar with, where the stamens hang quite a long way below the skirt of the flower. There are a total of eight stamens attached round the base of the sepals before they split up into four sections; looking like an outer whorl of petals. There is one style with four stigma. Therefore it is very appropriate that there are four ovaries in the fruit.
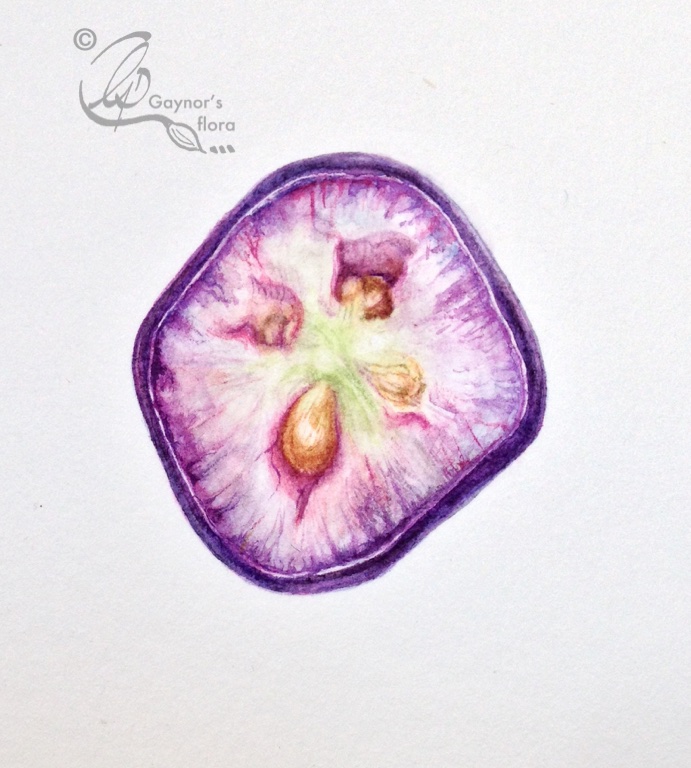
Fuchsia microphylla cross-section of fruit. Magnified x 3Fuchsia microphylla longitudinal section of fruit, magnified x 3
Funnily enough, although quite small – just under 1 cm when ripe, the fruit really stain.
When the plant is seen close to, the colours are so intense, which is very obvious in the final picture – causing additional compositional problems! Watch this space.
Yes, gluttons for punishment! On Tuesday and Wednesday I was teaching the Gloucestershire society of Botanical illustration. Two from that group took the long trip to Bosham for the Fruit & Veg botanical art workshop, when they had already been on the pen & ink one at the beginning of the week. They assured me that it was really Robin’s cooking they came for. I have to say, his lunches are getting really good.
Anyway, once again I am told that the students who attended the workshop over the last couple of days, had a good time and learnt a lot. The group included a couple who hadn’t done any botanical art before and a couple who wanted to learn to use either coloured pencil or watercolour, when they had used the opposite very successfully for many years. They did well, although I know from experience it can be a struggle converting one to the other. It will be interesting to see if they try the new medium again. I hope so, as it is useful to be able to ‘master’ more than just the one medium. Although, I don’t think anyone can claim to ‘master’ any of them. It would be useful to hear if anyone thinks this possible?
We had incredible weather over the two days, so there were some frequent trips to the kitchen garden.
The first picture only includes a few of the students. I’m afraid I forgot to take these until the other tables had already packed up.
Now the gallery of pictures. Make sure that you have a reasonably good Internet connection. Unfortunately, it seems that when out and about, some of the connections limit what you can pick up and sometimes one is unable to see the pictures until you have a full broadband.
Whilst in Gloucester I had been asked to do a second one-day workshop with different members. I felt it was as successful as the first day and here are the results for you to see. You will notice that in fact two of the students came for a second day and continued with their pictures.
This slideshow requires JavaScript.
Watch this space for the results of the ‘Fruit & Veg; strawberries & cream’ workshop happening this Friday and Saturday in Bosham.
What a lovely group of botanical artists – so welcoming.
I was invited to have a one- day workshop with the Gloucestershire Society of Botanical Illustration (GSBI), using pen and ink. I of course said yes as I had heard that the group are very active with a love for botanical art and illustration.
Apparently, as soon as I agreed to this and it was announced in the group, all the places were filled with an additional waiting list. Further discussions and a second workshopday was agreed. That will be tomorrow.
Normally I do this workshop over two-three days as time is also spent on composition and drawing. This one was purely to teach technique although in reality further advice in the field of botanical art is always given.
I know from feedback I get that people reading my blogs are always interested in the workshop results. Here are today’s group. Rather good don’t you think?
Wasn’t the weather horrid on Friday and Sunday – non-stop rain. But we still had a very good workshop; or at least that is what it have been told by those taking part.
Roses are scary subjects. Or at least people think they are. Normally we have loads of roses in the garden even though June is normally the main time for them. But following that very warm and dry spell whilst we were away in Norway, it seems that this year it really took its toll. Still we did have some simple roses and some a little more complicated. One that really caused a headache was a stunningly beautiful one ‘Deep Secret’. It’s perfume is very heady and it is a luscious deep, deep red. Although it was a full rose, it was the difficulty in matching the colour.
Reds can be difficult at the best of times, but as this rose unfolded, the different hues that emerged was incredible. One minute you think you have got it and the next it’s changed! But that is botanical art for you. I think at some point I will have to try it myself, rather than rely on students to struggle with the colour. But my projects are another matter.
Interestingly enough, one of the students arrived having never painted before and wanted to have a go. She started with watercolour, but as there was a mixture of watercolour and coloured pencil artists there, she got to see the effects of Both. On the second day, the student wanted to try CP and eventually got hooked by that medium.
But I expect it’s the pictures you want to see. The Roses botanical art workshop
This slideshow requires JavaScript.
The next workshop is 21-22 August, Fruit & Veg: Strawberries & Cream workshop. We paint the fruit and veg and eat the strawberries and cream! There are a couple of places left, so obviously first come; first served. Get in touch.


 We spent Christmas in Norway and had a really super time with my daughter (the hostess) and my son. We even got some lovely snow there – which was refreshing. we enjoyed some very special Norwegian food such as Lutefisk, had a Norwegian Christmas Eve supper of delicious cod and an English Christmas Day meal of Roast pork with all the trimmings. My children are fantastic cooks; they obviously felt they had to learn as I am such a bad cook.