Foraging plants in the norwegian mountains – 14. Cloudberry part 2

Rubus chamaemorus – Cloudberry -Multe

Planning the artwork.

The piece of mounted vellum I had ready was 25 x 31 cm and I had seven mounted blocks all the same size. Finished, they needed to look like one series of pictures, but the Cloudberry was a plant so unlike the other ones. The element that linked was the habitat. As an example, I only found the Vaccinium microcarpum when following the rhizomes of the Cloudberry because the roots were completely intertwined.

Once I felt I had all the information I needed for each subject, I scanned the sections and manipulated them with editing software on my computer. I then compared them so that I knew each picture had similar information. The Cloudberry was the only one that was Dioecious. The series was about the fruit, so it was these that were prioritised, although I did include pictures of the flowers. 

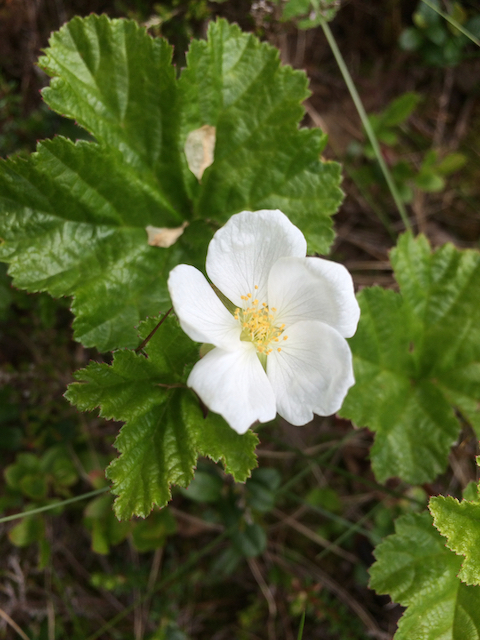
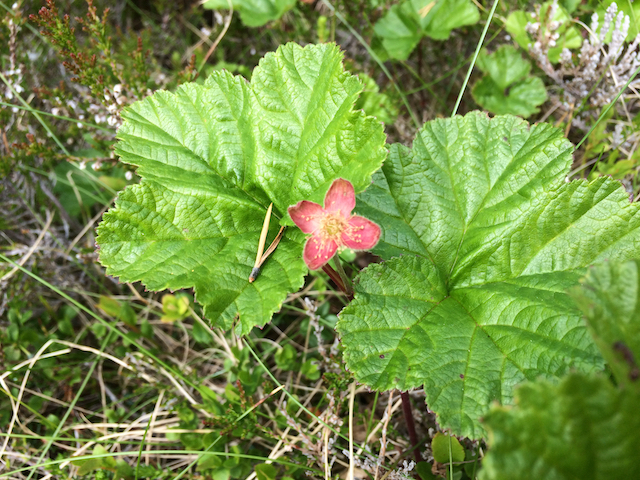
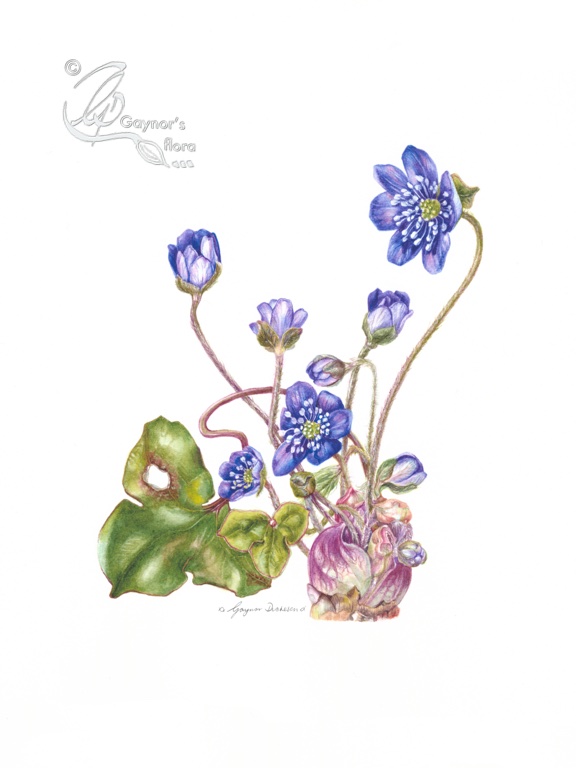
Because each cloudberry plant was either male or female and had male or female flowers, I needed to show the differences. The male flower is generally slightly larger than the female and the centre of the flower is completely different. 

The male flower. Stamens in a ring at the base of the sepals. the centre is concave.
The female flower. A ring of false, white stamens around the centre with several pistils arising from the centre.

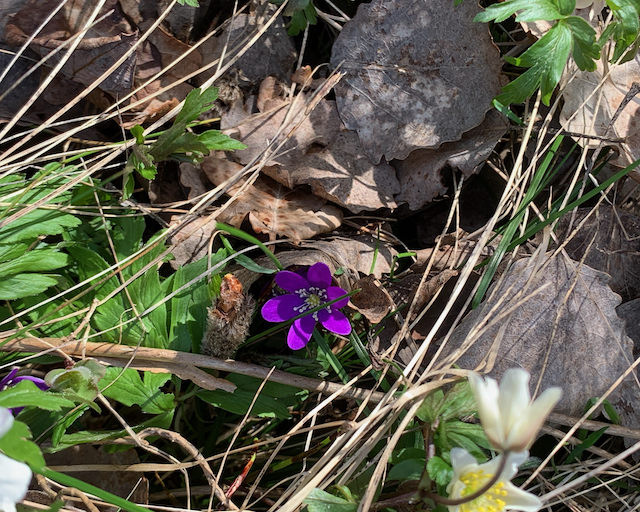
Both male and female flowers have the same number of sepals and petals, but the male flower has a ring of stamens round the base of the petals, with the very centre dipped and smooth. The female flower displays the gynoecium (female reproductive organs) with a ring of white, false stamens round the base of the petals. 

From a distance and once you know what to look for, it is easy to tell the difference between a lot of male or female plants.

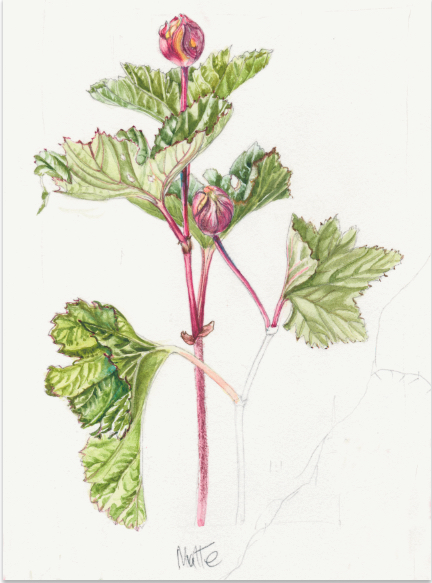
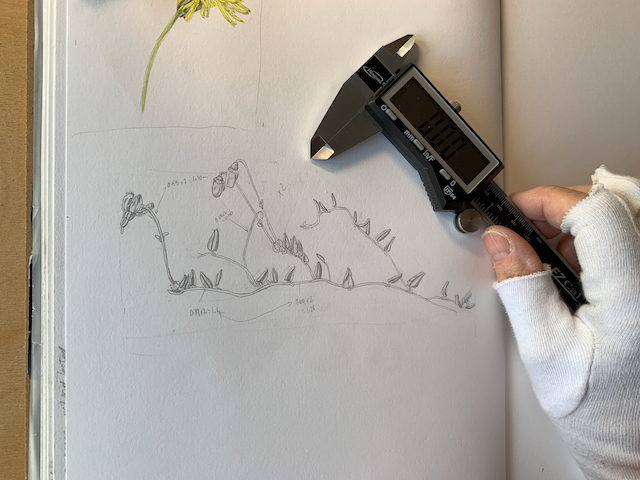
This sketch page shows more cloudberry sketches (with additional ones from the small cranberry). You will find both the deep red male plant and the sketches of the small cranberry in their respective final pieces of artwork.

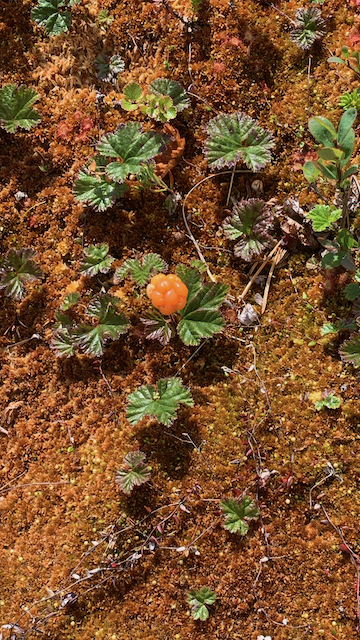
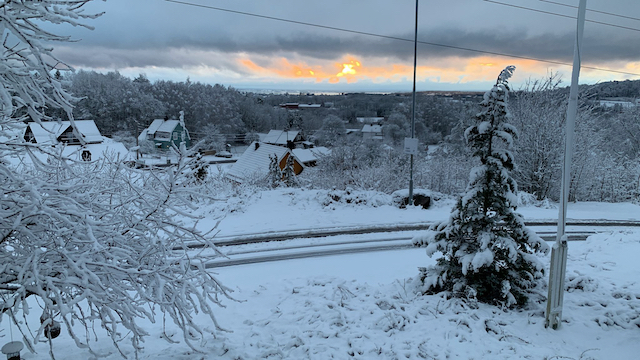
In 2018 when these sketches were done, the summer had been hot and tough for the plants. The Cloudberries ripened very early and by the time we arrived they were long gone. All that remained were some dry leaves and soggy berry remnants. But the sun had really worked well on leaves in the open, changing them from lush green to orange and fiery reds.

More sketches including the two berries we were given in 2018.

Once I had decided which elements were important for the picture, I did line drawings and moved them around digitally until I felt reasonably satisfied with the arrangement. Of course, in some instances adjustments were necessary and easily done on the computer. The line drawing composition above was almost the last one I made whilst well into the artwork.

In my final artwork I used several sketches as a basis. The sketches are used as a template whilst painting from an actual plant. Having the plant in front of me for the final artwork, enables me to paint its portrait as I see it, getting its botanical detail right at the same time as conveying texture and three-dimensionality. These are all things not easy to do from a photo.

I traced the whole composition to get the placing correct on my mounted vellum block, then each element was traced onto separate pieces of paper.

The vellum needed protection as I worked, and I used one of the old tracings that I had no use for, plus a clear acrylic sheet. All surfaces against the vellum are completely clean.  

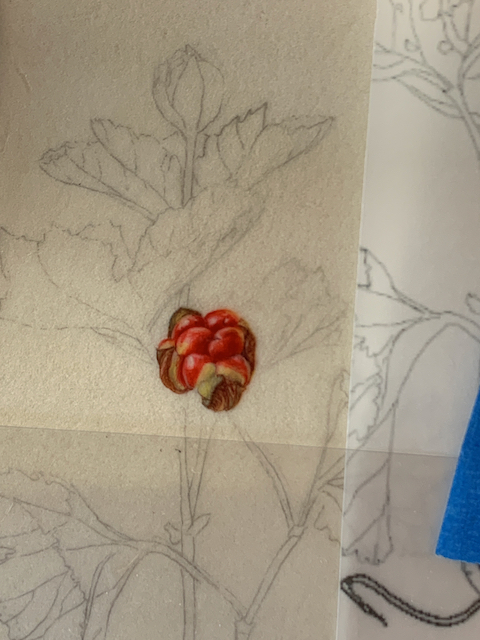
Once the image is traced over to the vellum I lifted off much of the loose graphite from the transfer process. I generally start with a pale wash, allowing this to dry completely, then remove the remaining graphite. I continue painting with a dry technique being sure to lay this very lightly.  

Sketching was started in June 2014, the final artwork on vellum started July 2022 and finished in August 2022 except for the scalebars. 

Cloudberries are a circumpolar boreal plant, occurring naturally throughout the Northern Hemisphere including the UK and Norway, although there is little fruit produced in the UK.

Source: Kew – Plants of the World online

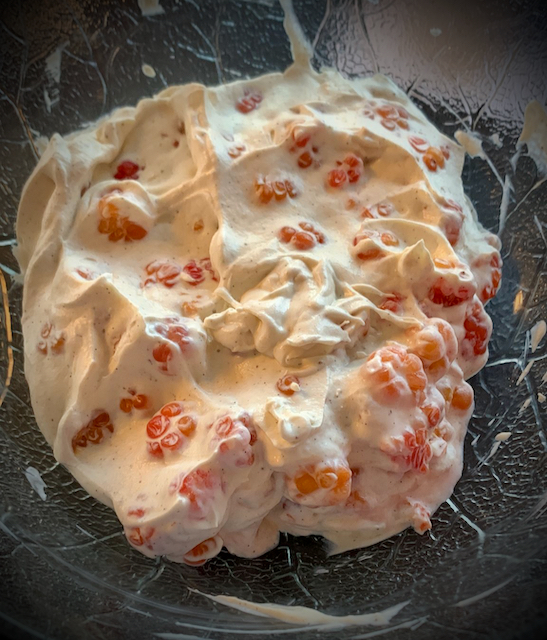
Cloudberry cream recipe

This recipe for ‘Mountain Gold’ is served on very special occasions including Christmas. It is served with cakes/biscuits often made in the period leading up to Christmas. Many of the recipes include almonds .

500ml whipping cream 
2 ss sugar
2 ts vanilla sugar (see recipe at end)
300ml Cloudberries

  1. Whip the cream together with the sugar until light and fluffy. 
  2. Stir in Cloudberries and sprinkle with vanilla sugar to taste.
  3. Place in the fridge until serving.

Serving:
Extra Cloudberries, Shortcake Biscuits

(from https://www.detsoteliv.no)

Vanilla sugar (vanilje sukker)

2 Vanilla beans

300gm sugar

  1. Split the vanilla beans in half lengthwise and scrape out the seeds. 
  2. Put the seeds into a blender with the sugar. 
  3. Blend with the blades until the sugar has become completely fine-grained and well mixed. 
  4. Put it into a glass with a lid and add to recipes as needed. 

The next blog post about the Small cranberry will be on the 7th May 2023.

Foraging plants in the norwegian mountains – 13. Cloudberry part 1

Rubus chamaemorus – Cloudberry -Multe

In Norway, Rubus chamaemorus is often referred to as ‘Mountain Gold’ because it doesn’t grow everywhere, it isn’t always easy to find and in some years is quite sparse. It is a delicacy and the one fruit that people would like to find and pick. If anyone finds an area which has a lot of ripe fruit, they normally keep it to themselves for fear of others picking the spot clean. Up until 2003 it was forbidden to pick the unripe fruit; this was changed as it was difficult to enforce. But in northern Norway where it has economic importance, the landowner can forbid picking.

Cloudberry  is considered to be an endangered species (red-listed), it has a long, up to 10 metres, creeping rhizomatous root system and enjoys life best in sphagnum moss bogs. The species is dioecious with each plant either male or female. Although one generally sees the Male plant flowering every year, sometimes the female flowers are very sparse. But in the two last years, there has been a lot, relatively speaking, and if you know where to look!

Unripe, a Cloudberry is red, but as it ripens it becomes gold and it has a very distinctive flavour. Cloudberry is in the same family as Blackberries, so you will know that each drupelet has pips; once accustomed to the taste, one doesn’t mind the pips.

My friends who lent me their cottage when I started the series, pointed out that there were lots of Cloudberry plants round the cottage, but they had never seen any fruit. I had a quick look at the flowers (the two photos) and was able to tell them that they only had male plants in the patch. But only a few metres away there were loads of female plants busily flowering and developing fruit. They were unaware that Cloudberries had distinct male and female plants, so I showed them how to tell the difference.

Obviously, the distinction between male and female plants was one of the things that I needed to show clearly in my final artwork. But in the meantime, I needed to do as many sketches as possible and of course take accurate measurements. In my pleasure at starting properly in 2017, I straightaway forgot the necessities and didn’t take measurements of my dissections. Unbeknown to me I wouldn’t be able to catch up for another five years in 2022! Luckily, this was the only plant where I seemed to chase my tail year after year.

The page of sketches, is a ‘Cloudberry’ poster showing a collection of drawings from my sketchbook.

I was particularly pleased with the plant sketch showing both leaves and very unripe fruit. But, apart from this initial sketch I didn’t see either unripe or ripe fruit until 2018 when I was given two fruit by passing pickers.

I did the trial on the vellum (at the top of the page) in 2021 when I at last found fruit to take back to the cottage. But I still needed flower measurements.

Cloudberry poster put together from several sketch pages.

The pictures below show the area in which we found quite a lot of fruit in 2022.

Actually we were very surprised because we hadn’t had any rain since early autumn 2021 and all the lakes and reservoirs were pretty low. As you can see to the right, the moss was quite burnt on the surface, although there was still water deeper down. The area in which we were able to walk without getting too wet was much larger than the previous year. Global warming!!

The second part about the Cloudberry will be posted 4th May 2023.

Foraging plants in the norwegian mountains – 12. My working practice

Bearded Iris in graphite
Accidents happen

In my last blog I showed you how careful I generally am to cover my artwork as I go along. But in this case I had finished the piece and had it propped up by my computer to scan and print it.

Unfortunately I ran out of pigment in the printer and needed to refill. Once this was done, I sat at the computer to check everything on the screen, looked up and saw this magenta splash across the artwork. I was shocked. How many hours had I used to no avail?

Be careful to keep artwork safe!

In my previous blog I wrote in general terms about the materials I use, including colour. My sketchbook contains notes of the colours used in the sketches, but these are only a guide for the final artwork.

The sketched colours are on white paper and the final artwork is on a warm vellum which can affect the overlaid transparent paint. If possible I try to match up the colours I used in the sketches if I don’t have enough live material to work from. For example, the leaves often change colour over a growing season and if I’m unlucky I might be painting young leaves in the autumn. This happened with the Bilberry leaves.

I try to limit the number of pigments I use in a picture but still have favourites that appear in most paintings. 

Watercolours used to paint the Small cranberry picture.

As an example, I used these colours in the small cranberry picture:

  • Quinacridone Magenta PV122
  • Quinacridone red PR209
  • Perylene violet PV29
  • Quinacridone Gold PO49 (I don’t think single pigment can still be obtained)
  • Winsor Blue Green PB15.

The last three are a must for me, but I might also use a brighter yellow or warmer blue. On this occasion I added a lemon yellow to lift the green in the leaves.

Introduction of graphite

Getting graphite on vellum is normally considered a negative. Graphite does not seem to work in the same way on vellum as it does on paper because of course it is slightly greasy and tends to slide around on the surface. 

I wanted sections of graphite in my pictures to try and give some relief to the colour. The compositions are quite small with a lot of detail. To separate details from each other I wanted to allow some of the picture to fall back and behind sections of colour to create focus.  I therefore decided that elements conveying habit would be either in graphite, or in graphite with a slight colour wash. But how was I going to get the graphite to go on reasonably evenly and to sit? 

I checked out how other botanical artists had handled using graphite on vellum, then tried out various ways of developing a technique on scraps of vellum.

Bilberry trials on vellum with colour and graphite

Luckily, as with graphite on paper, the use of water on top helps it to adhere to the surface. I also learnt that using a little mucky pigment/graphite water and allowing it to dry would also help to control use of the graphite on top. But, some of my details were much too tiny to make full use of this technique.

The way forward was to use a combination of graphite pencil for the finest detail and soluble-graphite. I generally used a graphite pencil first – possibly a 2H, then with a very small brush I either went over it with pure water or used the water mixable graphite. I found that the graphite worked much better where I had used a light watercolour wash first. 

Process for each picture

Once each composition was complete and transferred to the vellum mounted block, I started with the watercolour sections.

Except for the Cloudberry, the main branch which catches the eye, was enlarged to twice its normal size. I normally started with this so that I could determine how much other elements of the picture needed to come forward or fall back. After this I completed the flower and fruit sections.

Once the watercolour-only sections were complete, I worked on the graphite sections. As mentioned before, the use of graphite means that these sections fall a little into the background and give relief to the eye of the beholder. But the detail in those sections needs to be just as clear as for the remainder of the picture. Each part of the picture needs to give new information otherwise there is no reason to include it. In this case, the graphite sections were done life-size.

Last of all came the scale-bars. To work out the best placements for these, I scanned each picture onto my computer and digitally placed and sized the scale-bars, comparing them from picture to picture. This happened in January 2023 when preparing for professional scanning of the artwork.

Actually drawing the scalebars onto the final artwork caused most headaches. Applying the graphite in even lines on the vellum was more difficult than doing the line drawings, but I got there!

Now I will write about each species individually – starting with the next blog 30 April 2023.

Life-size small cranberry flower and stems. Water-soluble graphite being applied with Rafael 8408 size 1 brush over faint graphite pencil lines.

Spring was here!

Blåveis - Liverwort - Hepatica nobilis. Watercolour on hot pressed paper.
Three weeks ago – 29 March 2023
15 degrees, hike break – 22 April 2023
5 degrees, 24 April 2023

Last week it was getting warmer and warmer, the snow vanished completely the week before and buds started showing on the trees. We noticed that the weather forecast was not going to be quite so good this week and it also threatened slush tomorrow!

Chewed Bramley tree. The top buds are fine!

Last week I raked the rubbish off the front garden from the snow ploughs and saw that quite quickly the grass turned from brown to green. Flowers started poking their heads up from the grass and I am keeping my fingers crossed about the survival of some things we planted last year.

The deer made quite a feast of a few plants and last year was obviously a very good breeding year as we have had steady traffic from foraging young and old . The Bramley apple tree I managed to find and plant last year has had a thrashing, as have one or two of the fruit bushes. They love the green stems of the Bilberry and they are chopped back quite well! But they also love the tips of the tulips that they polish off in one foul swoop.

The badger is a regular visitor again and cleans up under our bird feeders.

Badger tracks to my daughter’s storage box.

My daughter has a storage box on her terrace, where she keeps the peanuts for her birds. It was very obvious when the badger woke up from hibernation as the track to and into the storage box started again. He/she gets into the box to eat in comfort!

I think everyone understands that I love this beautiful country, but the sun doesn’t shine all the time and I felt I owed some less than glamorous pictures😏.

But now, a few beautiful pictures from our 11k walk on Saturday, on a peninsula not too far away. We walked along tracks in the woods, climbed over rocks, sank into sand along the sea edge and climbed up to a viewpoint where apparently a lot of ships came unstuck.

My favourite flower is Hepatica nobilis, which has apparently changed Genus and is now called Anemone hepatica. That makes it easier to describe when comparing it to Anemone nemerosa.

The blue flower in Norwegian is called Blåveis (Liverwort in English) and the white one is called Hvitveis (Wood anemone in English). They often grow in similar areas although the Blåveis prefers chalk areas and deciduous woods. It is found in Eastern Norway where it is more likely to get a covering of snow during the winter. The Hvitveis is found in woody areas almost everywhere in Northern Europe, although not further north than Lofoten in Norway.

The first sign of the Liverwort is when the furry bud peeks up through the leaf litter. The liver-shaped leaves follow, although leaves remain on the plant throughout the winter. Note the different blues with the white stamens like star bursts.

The Wood Anemone leaves appear first with the flower bud on the stem. The backs of the petals can often be pinkish and the stamens are yellow.

We had an absolutely lovely walk and got back home tired and exhausted, but happy.

Now it’s pouring with rain; at least it isn’t snow, but I do have my woollies back on again. My picture for the RHS exhibition are packed and ready to go and the tape from the removals company came in very useful.

Blåveis - Liverwort - Hepatica nobilis. Watercolour on hot pressed paper.
Blåveis – Liverwort – Hepatica nobilis. Watercolour on hot pressed paper

Foraging plants in the norwegian mountains – 11. My working practice

Using a lightbox to make an overall transfer for the bog bilberry picture.

Transfer process

For this series my transfer process hasn’t been very straightforward. Once I knew which sketches I wanted to repeat in the final artwork, I made line drawings of each, scanned them and arranged them on my computer, constantly comparing and assessing. Once I was happy with each composition, I traced each sketch into its place on a sheet of tracing paper (see picture at the top), then transferred the composition to a vellum mounted block. In some instances, I continued to make further adjustments underway.

I also made separate tracings of each element in the design and used these once the overall placement was sorted.

To make a transfer I trace the line drawing onto the right side of tracing paper, and then repeat the process carefully and with a sharp pencil on the backside of the tracing. This allows me to use the tracing several times should it be necessary and leaves only a light line of graphite on my artwork. 

This way of transferring reduces the amount of excess graphite that tends to float around. The pictures to the left demonstrate the transfer process. 

See links to videos and blogs giving more detail on my ‘Online Tutorials’ page. https://gaynorsflora.com/tuition-2/my-tutorials/. ‘How to trace an image to art paper’ contains links to two blogs and a video.

Painting process

Before I start to paint, I arrange some form of cover so that only the section I’m painting is available to me. I might use a sheet of tracing paper, layout pad or clear acrylic sheet – or even a combination. Its easy for accidents to happen, the slip of a brush  or even dropping a laden brush onto the artwork. Accepting this and preparing against there being too much damage is essential for a good result. I have spent time scrubbing out mishaps and I’m sure many others have too.

Bog bilberry covering to protect rest of artwork from splashes and dropped brushes!

Here is my covering for the Bog bilberry picture. I have used a combination of acrylic sheeting and layout paper whilst trying to avoid too much taping directly to the vellum.

Painting on vellum

Painting on vellum is very different to painting on watercolour paper as the pigment lies on the surface rather than absorbing into the paper. Therefore except for the very first layer it is important to paint as dry as possible, otherwise any other layers will lift the preceding layers.

Arctic Tern fired on Ceramic. From an island reserve in the Stavanger fjord in 1989

In some respects, it is a little like painting several layers on porcelain – as I did in the 80’s. Porcelain is very smooth and carefully layering colour on top of an un-fired layer is paramount, or the lower layers are whisked away.

For painting on vellum I use a variety of brushes depending on the level of detail. My first ‘go-to’ brush is a Rafael Kolinski sable brush with a beautiful point; series 8408. The other makes of brushes I use are DaVinci 1505 and Rosemary brushes series 8 and 66. They are all kolinski sable. To lift out I use various synthetic brushes. 

Importantly for all these brushes is a curl free and sharp tip. Brushes wear quickly and the long tip disappears gradually – but the brush still has many useful functions, so they almost never get thrown away.

The watercolours I use are all artist quality but from different suppliers. Most are single pigment and transparent. I have occasionally used Chinese white as an underlay in areas where I need to control ‘lifting out’ as in the Cloudberry flowers.  When lifting off it might leave  a very slight sheen. If I don’t lift the Chinese white off, it mixes with the other colours and dulls them, therefore I have to lift off very carefully to create highlights.

In my next blog I talk a little about the opportunities I had to learn about applying graphite to vellum – That is planned for 27 April 2023.

This is a very short YouTube slideshow from a demonstration I made to some of my students when they were learning to paint on vellum. I painted the tiniest of crab apples on a vellum remnant.

Foraging plants in the norwegian mountains – 10. My working practice

Composition

Do these three pictures have good compositions? It is not easy for you to judge from these as composition is the area within the mount edge – the image and background.

  • Benton Iris ‘Farewell’ is Watercolour and graphite. The painting is part of the Cedric Morris Florilegium.
  • Dying Rosa rugosa is in Watercolour. It was one of the first paintings I did after returning to Norway. The sprig was sticking up above the snow, so it shrivelled quite fast.
  • Rhododendron impeditum is also watercolour and graphite. This picture is part of the Chelsea Physic Garden Florilegium.

Composition in botanical art is not necessarily very straightforward. As botanical art is ‘art’ it should have a main focal point that draws you into the picture. Once your eye is drawn into the picture, something needs to lead it around within that picture and prevent it from being lead off elsewhere.

On top of this, botanical art must be botanically correct. 

The first digital arrangement of my cloudberry sketches

Combining the art and botany for each picture is hugely difficult particularly when you have different sections telling a story about a plant. Having a series of plants in separate pictures that elaborate the story compounds the problem. 

To try and reduce the problem a little I started to arrange the pictures digitally. I scanned some of my sketches and moved them around within a 31 x 25cm area. It gave me something to think about when deciding what to include in each picture and how many more sketches I would need to get all the information I needed.

Scanning and arranging digitally gave me the opportunity to do something similar with my other species and the ability to compare them against each other. This composition looks nothing like the final one, but I kept rearranging until I was satisfied.

I worked hard to compose my set of pictures so that they looked a series. This can be quite difficult when some are from different families 

  1. Rubus chamaemorus – Rosaceae
  2. Vaccinium oxycoccus Subsp. microcarpum – Ericaceae
  3. Vaccinium uliginosum – Ericaceae
  4. Empetrum nigrum subsp. hermaphroditum- Ericaceae
  5. Vaccinium myrtillus – Ericaceae
  6. Vaccinium vitis-idaea – Ericaceae
  7. Arctostaphylos uva-ursi – Ericaceae

The first word in each species is the Genus name from which the plant is derived. Four are Vacciniums from the same Genus.  Six of the plants are from the Ericaceae (heather) Family and you can see this by the similarity of the flowers. One is from the Rosaceae(rose) family, and the stipules on the leaves (tags at the base of the leaves) is a clear indication of this.

Deciding the enlargement was relatively easy with the plants from the Ericaceae Family where the fruit is comparable. But as everything was larger on the Cloudberry picture, only the scale bars can give the size.

My aim with all the pictures was to let people see and understand the incredible flora and edible fruit available in the mountains. Many look at plants and think them pretty, or know where to pick certain fruits, but not so many study the plant and understand how intriguing it really is. This is an opportunity.

What to include in each composition.

I went through my sketchbook and made sure that I had enough information about each plant to fit on my vellum, mounted on blocks by William Cowley’s. I didn’t want to overcrowd each picture. 

The focus was the plant and its fruit, but one can’t do this without highlighting its flowers. I decided to introduce a picture of the flowers and fruit but restrict dissections to the fruit only. That is until I got to the cloudberry which was going to be the most difficult to integrate into the series. But it isn’t called ‘Mountain Gold’ for nothing.

In the end, all but the cloudberry picture included a branch enlarged and branches actual size to indicate habit. Each had an enlarged flower, plus fruit with both longitudinal (LS) and transverse sections (TS). These are the finished longitudinal sections from each fruit; the largest being the Cloudberry.

In the next blog I will be talking about my transfer process. This comes 23 April 2023.

Only Eight weeks until the RHS Exhibition at the Saatchi Gallery in London;

https://www.saatchigallery.com/exhibition/rhs_botanical_art___photography_show_2023

Foraging plants in the norwegian mountains – 9. My working practice

By the lake Fjelløkteren at 1000metres – Ripe Cloudberries mid July

Imagine how the artwork might look if measuring various parts of a chosen species was not accurate. The photos above all contain the Vaccinium oxycoccus subsp. microcarpum – small cranberry. Click on the images to see them larger.

  1. Small cranberry flower in the moss with Bog bilberry leaves, bog rosemary leaves, and heather. Note the tiny leaves of the cranberry lying across the moss surface bottom right.
  2. Small cranberry flower with bog rosemary to the left, bog bilberry leaves and flowers. Note the woody stem that distinguishes it from the bilberry. Sprigs of mountain crowberry also clearly seen with the white line on the back of them – this is the leaf folded back.
  3. Two small ripe cranberry fruit lying on the top of the moss by the side of a larger cloudberry leaf. There is also heather and mountain crowberry leaves. The stems of the small cranberry can be seen across the moss if you know what to look for – narrower than the grass.
  4. Two ripe small cranberry fruit either side of a cloudberry leaf. The reddish stems of the cranberry with the tiny triangular leaves can be seen.
  5. The growing tip of the small cranberry.
  6. A stem and leaf of the small cranberry. A further series of well chosen photos would show the connections of leaves to the stem, the branching and flower connections.

Measuring for the sketches

Amongst my original chosen plants for the 2023 exhibit were some very tiny flowers, but each of the species contained some tiny detail. I needed the facility for measuring accurately, particularly whilst sketching and of course for enlarging where needed. 

To the left is my trusty digital calliper in use for measuring the Cranberry. Whenever I take a measurement, I make a note of it with the drawing and additionally check it against the research done on books and the internet.

Unfortunately, I didn’t have this essential tool when initially sketching the Cloudberry and spent several years trying to catch up as already mentioned. As I wasn’t living in Norway at the time, I tried to coincide my visits with the months that I thought I might be able to get the missing detail, but either the plant flowered earlier or later than my visit. In fact, I didn’t get the missing dimensions until 2022 when I was again living in Norway. But even then, it still took several trips up into the mountains to hit the right time!

Another tool I use when making enlargements accurately is a technical divider. You can see it in use here when I did my Bilberry sketches. The divider allows me to measure exactly or enlarged by a specific amount. 

Technical divider adjusted to make a 1.5 enlargement.
Technical divider in use with bilberry sketch.

The other picture here shows the technical divider adjusted to create an enlargement of 1.5. In the ‘old days’ before digitalisation, one could write an enlargement of 1.5 (x1.5) on the illustration. Although this helps when doing the illustration, it will not work if showing artwork digitally on a website etc. 

In such a case one has no idea at which size the original drawing will be seen, therefore scale bars need to indicate exact measurements.

Example: When drawing x 2, or twice the size of the actual subject, one knows that 2cm of the illustration is actually 1cm in real life. So one could draw a 1cm long scale bar with 5mm written beside it to indicate that the 1cm line is in fact equal to 5mm. This means that when looking at the original enlarged illustration, if it measures 5cm, you know that the plant section is 2.5 cm in real life. 

But, these days if viewing an illustration digitally, there is no way of knowing what the size of the illustration is.

Scale-bars from bilberry illustration.

To overcome this if viewing on-screen or in a book, measure the scale bar marked as 5mm (our example) and note the measurement, then measure the whole section on-screen and multiply that measurement with the measurement of your scale-bar. This will give you the size in front of you on your screen or book. But you will want the real-life size and to do this, multiply again with the figure written by the scale bar – in this instance 5mm.

As an example use this picture from my bilberry illustration to work out the size of the finished detail and the size of the actual plant. The picture shows where I planned the scale-bars digitally to repeat in graphite on the artwork. But remember that the scale bar is in mm i.e. 4mm = 0.4cm.

On my screen, the scale bar measures 0.7cm and the section is 2cm high. Therefore 2 x 0.7 = 1.4 x 0.4cm= 0.56 cm. This means that the illustration is 1.4 cm tall, but as the scalebar is equal to 0.4 cm, the live flower is 0.56cm high.

My next blog is scheduled for 20 April 2023

Foraging plants in the norwegian mountains – 8. My working practice

A year in the life of a Magnolia x soulangeana tree. In watercolour and graphite.

In 2011 I did my first RHS exhibit – ‘A year in the life of a Magnolia x soulangeana tree’. The tree was in my front garden, so I had a good source for the material I would need. But to get my eight pictures completed in time, I needed to paint throughout the year. The main picture from which all the others derived contained all the phases the tree went through during the year. It was whilst I was doing this series that I became interested in the inner workings of plants and started using a microscope. Of course, to do this I also needed a sketchbook. 

Sketchbook work

Malus x scheideckeri “Red Jade” in Colour pencil

Being a very impatient person I always wish I could get the perfect result first time around. When I started out painting plants, although I had drawn and painted most of my life, I was not very good at using sketch books. But I quickly understood that most of those who did botanical art also did a lot of work in sketch books. 

Sketches from my Crabapple pages.

Encompassing sketchbook work I felt was difficult as I paint directly from the plant in front of me. Why would I want to sketch it several times before painting the final piece? Surely the plant, or flower or leaf would at least have changed or even died before I got to the final painting!

For my second exhibit in 2014, ‘Small is beautiful; Crab apples explored’ I did six pictures from six different crab apple trees – also in my garden. As the title suggests I was doing an exploration of each crab apple  – again over the year. The final artwork displayed the fruit and flowers and dissections of both; I again needed my microscope and sketchbook to get together the necessary information about each of my plants. 

Malus x atrosanguinea ‘Gorgeous’ setup

But this time. I also worked out another way of using my sketches and my photographs. Yes, I take an awful lot of photographs which I use to confirm detail. I have painted three pictures using this photo; but each picture is completely different.

I used the same photo setup but picked different apples and leaves from the garden each time I painted a picture.

Below are sections from two of the paintings. Compare the difference.

But what has all this got to do with my work process towards my current RHS exhibit? 

I learnt a lot during the process of planning for my previous exhibitions and it has all come in very useful for planning this one.

My first exhibit was done in watercolour on paper and the second one was colour pencil on paper. This time it is watercolour and graphite on vellum. A completely different kettle of fish! 

Preparation and plenty of sketches is everything. 

The main sketch that I used in the Cloudberry painting was the one below, drawn in 2017.  When working on my final artwork in 2022, I found appropriate plant pieces to paint from and the Work In Progress (WIP) is as you can see. The immature top fruit is rather different to the sketch, and the lower one has even started opening. This development is not on my original sketch, but I liked the layout of the sketch and wanted to incorporate it in my final piece. The final leaves were painted from several new ones, to include the ‘tatty’ nature of one of them from the sketch.

Rubus chamaemorusCloudberry WIP
Rubus chamaemorus – Cloudberry sketch.

Foraging plants in the norwegian mountains – 7. History of the project

Above are the seven plants I chose with trial pieces on vellum offcuts.

The species I chose, with common names also in English and Norwegian

  1. Rubus chamaemorus – cloudberry -multe
  2. Vaccinium oxycoccus subsp. microcarpum – small cranberry – tranebær
  3. Vaccinium uliginosum – bog bilberry – skinntryte
  4. Empetrum nigrum subsp. hermaphroditum– Mountain crowberry – krekling
  5. Vaccinium myrtillus – bilberry – blåbær
  6. Vaccinium vitis-idaea – cowberry/lingonberry – tyttebær
  7. Arctostaphylos uva-ursi – bearberry – melbær

I have listed the plants in the order according to the type of ground in which they grow – from boggy to sandy:

  • The cloudberry and small cranberry often found intertwined together in the boggy moss of a swampy lake edge. 
  • The bog bilberry is more of a bush and guards the very marshy plants perching on rocks in the marsh. 
  • The Mountain crowberry grows in various areas from rocky outcrops at the edge of a swamp, to tiny examples without much soil, clinging to the rock on mountain tops.
  • The bilberry and cowberry are generally in a similar habitat in damp woods and forests; the cowberry can be the main plant on an old wood ant heap often with bilberry and mountain crowberry.
  • Bearberry grows in sandy areas on the edge of forests or creeping down over smooth rock.

The next stage of this blog goes into my working practice for this series. After which I will talk a little about each of the species and how I painted the final pictures. I will use the above order of plants as I would love others to learn more about them, where to find them and their uses. 

The next blog will be on 13 April 2023.