A little more of my Benton Iris ‘Farewell’

Trying to paint more with the Benton Iris – work that I love doing, has been complicated by all the adjustments in relation to the botanical art exhibition ‘ In Ruskin’s Footsteps’. But you can now see the updated website in relation to the new improved venue (still at Lancaster University) and adjustment to the dates. I will give you the link at the end of this blog.

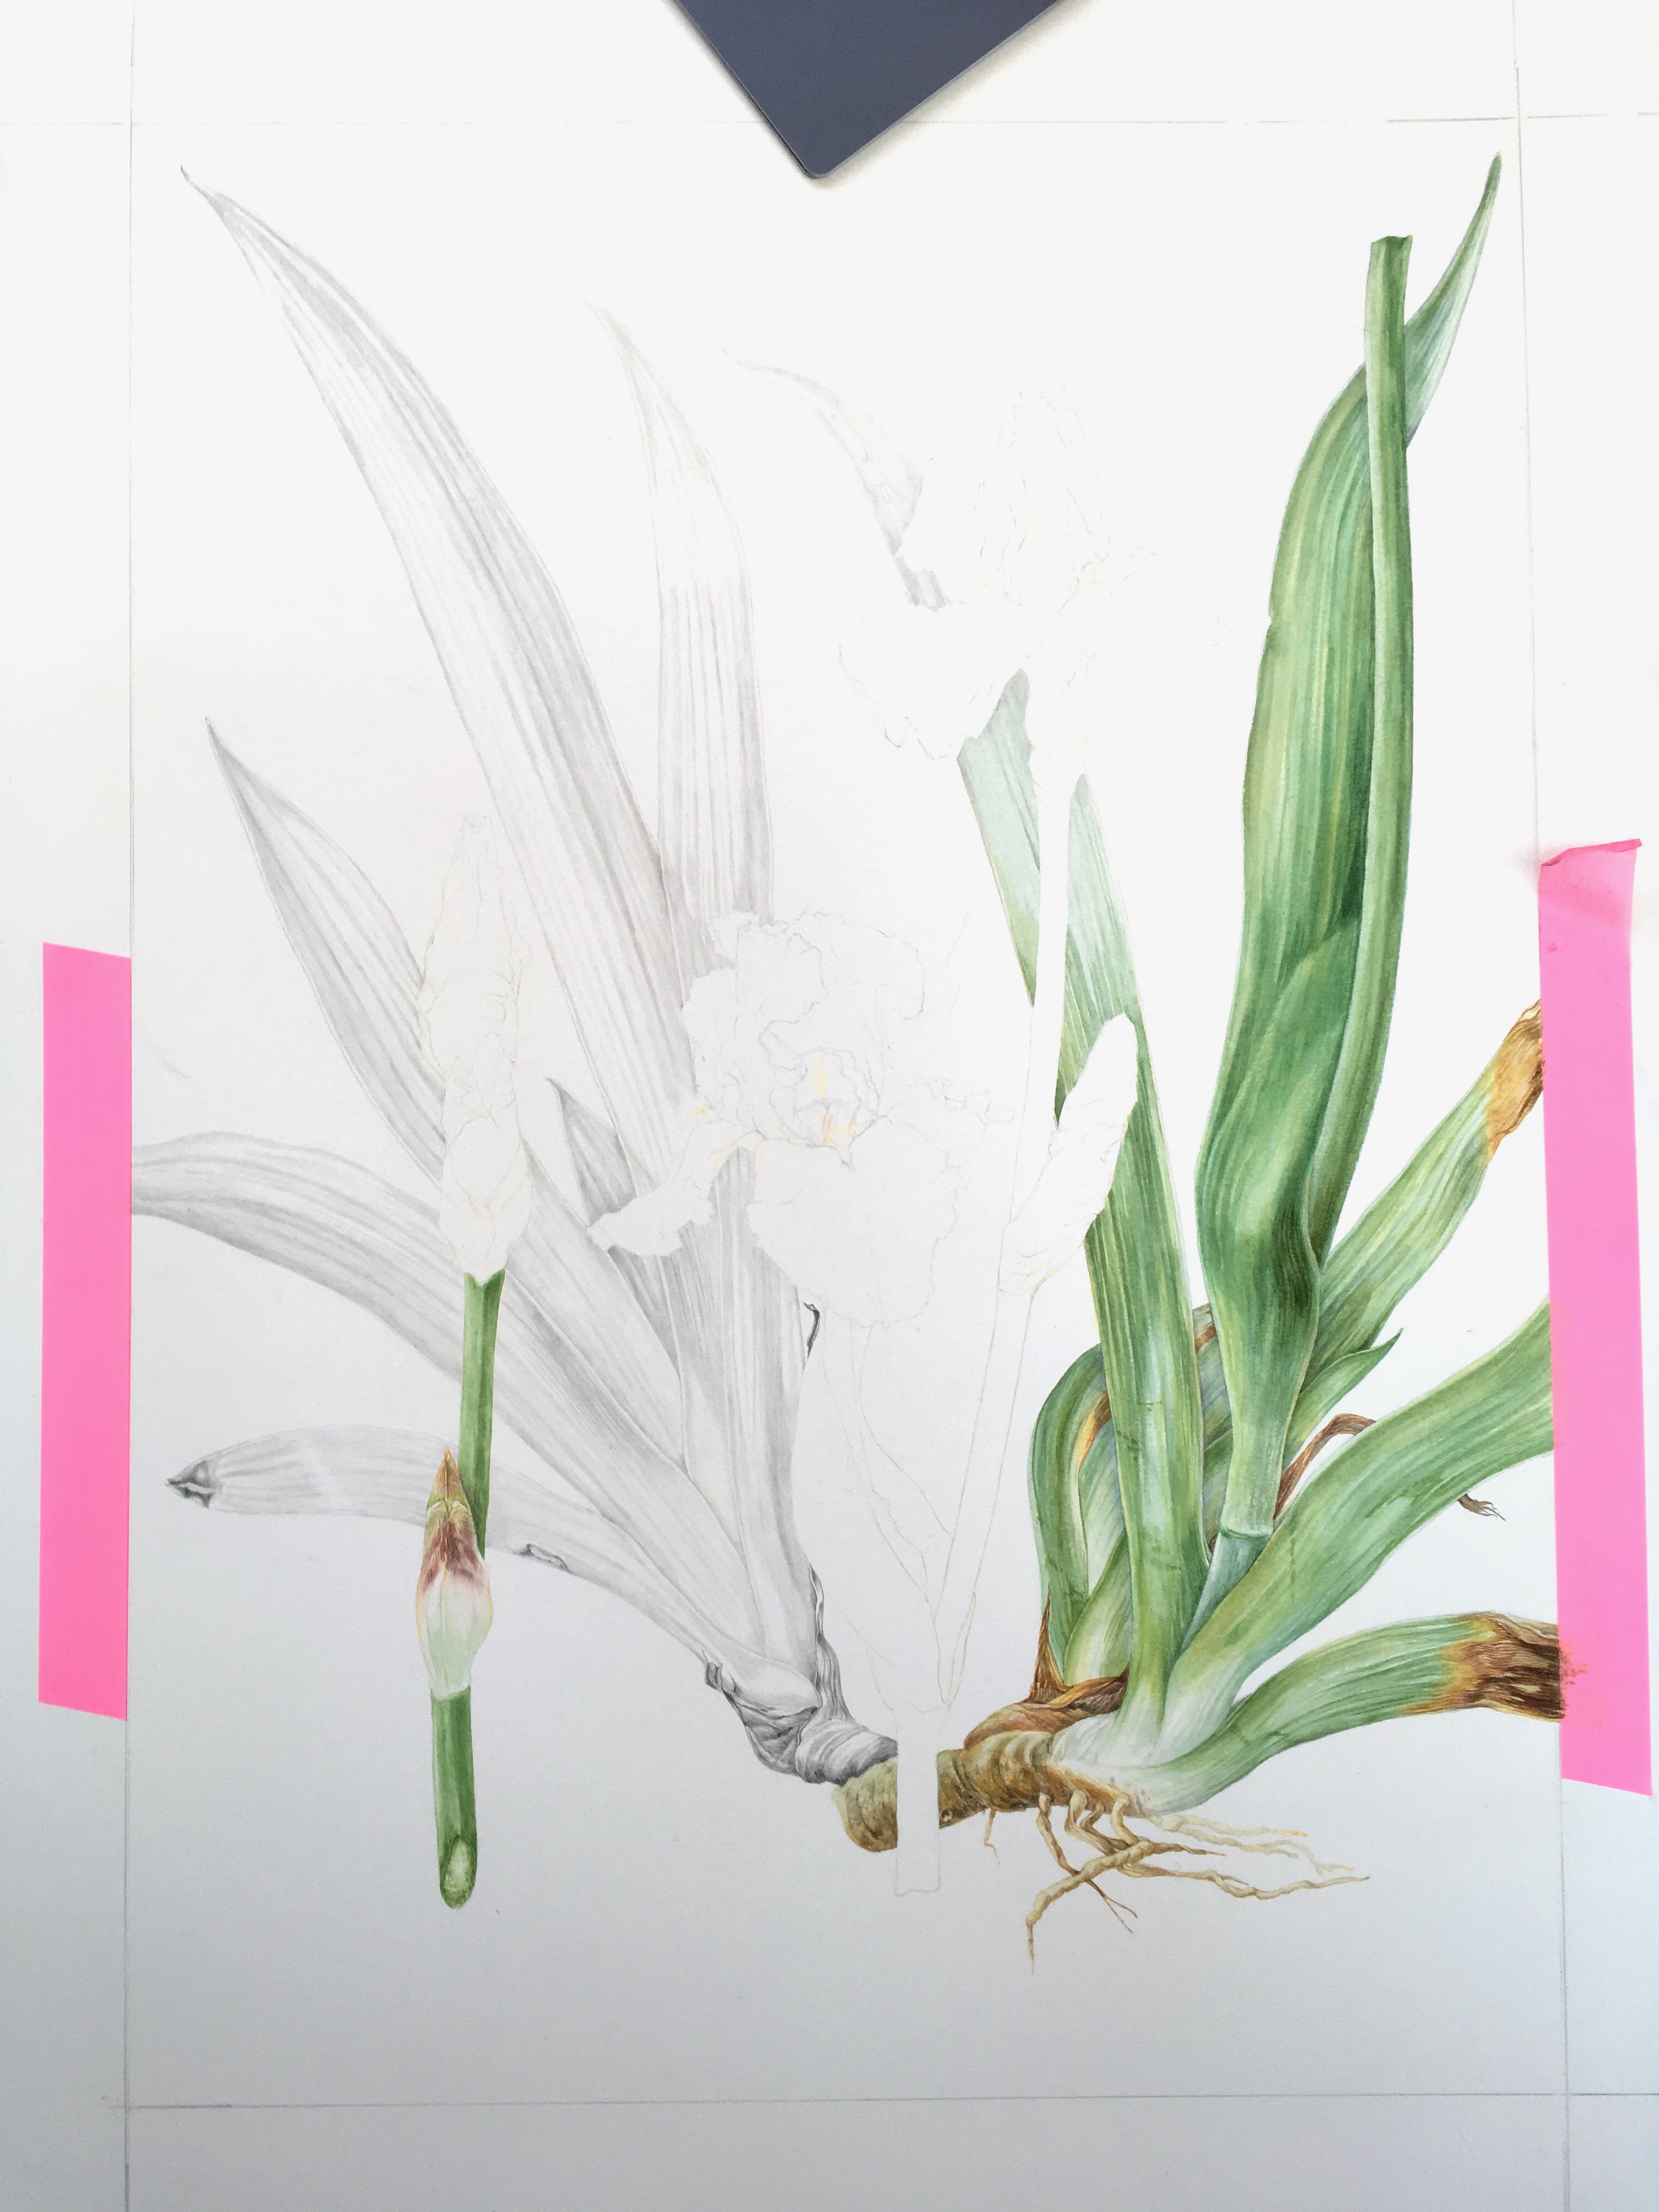
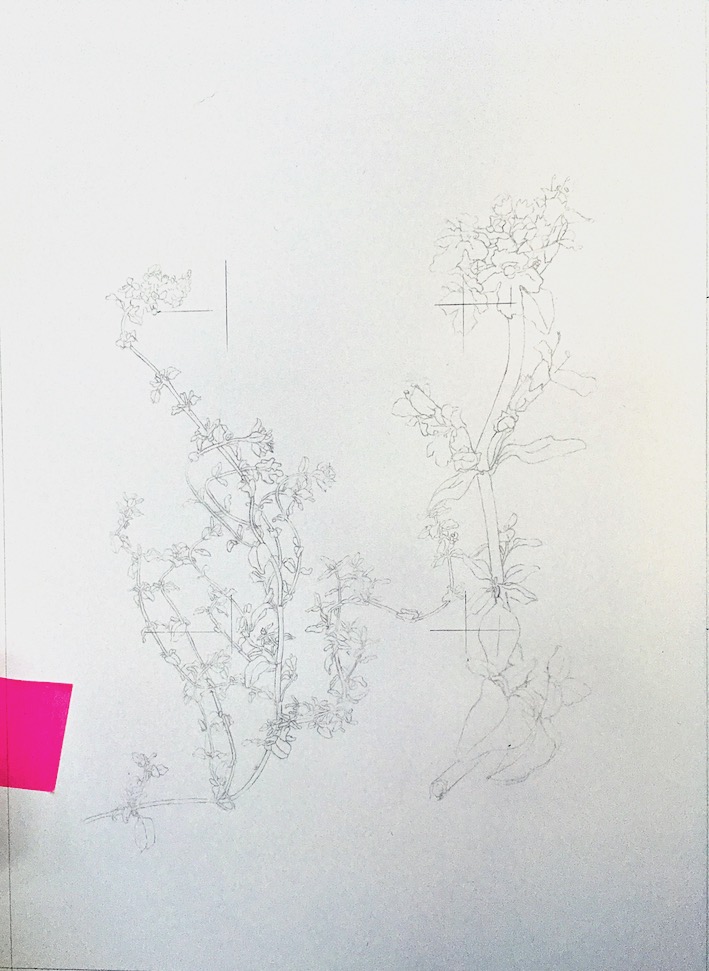
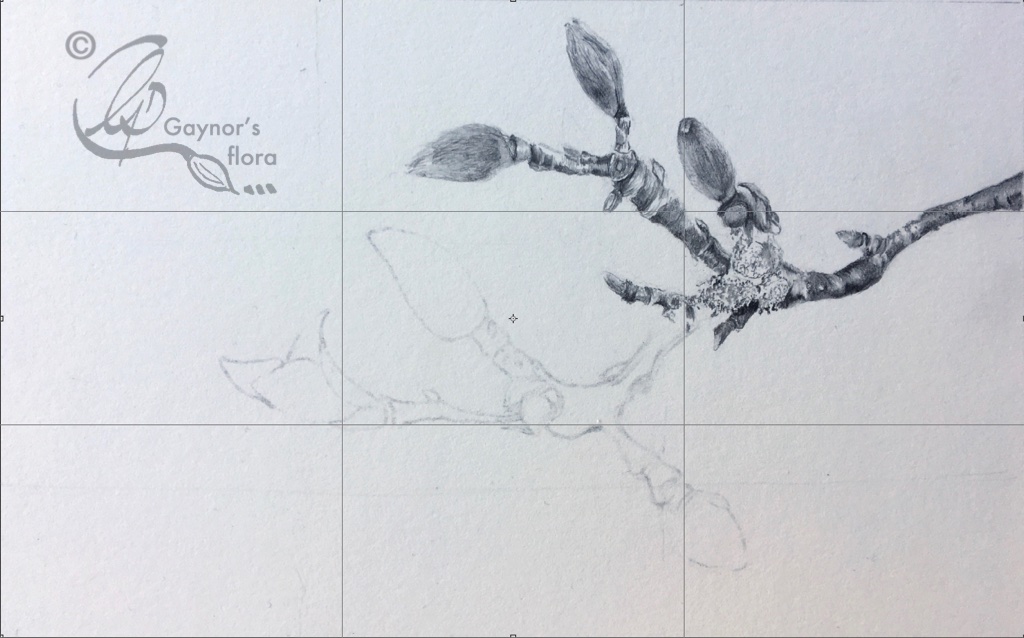
In my last blog I showed you my progression in relation to the large fan-like leaves of this majestic plant. I chose to include only colour for those on the right hand side of the artwork and graphite on the remaining leaves. This was so that the picture would not be overwhelmingly heavy with green leaves. 

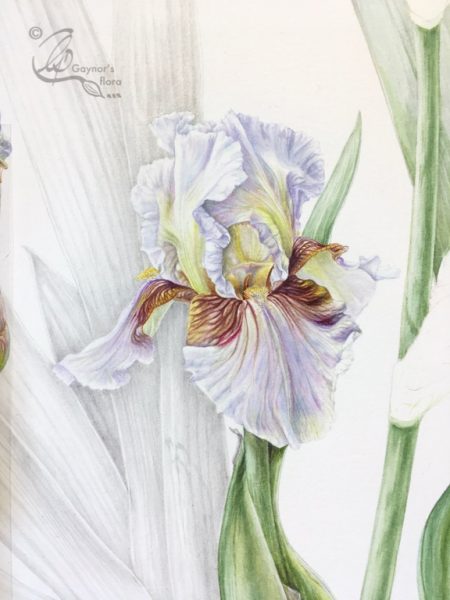
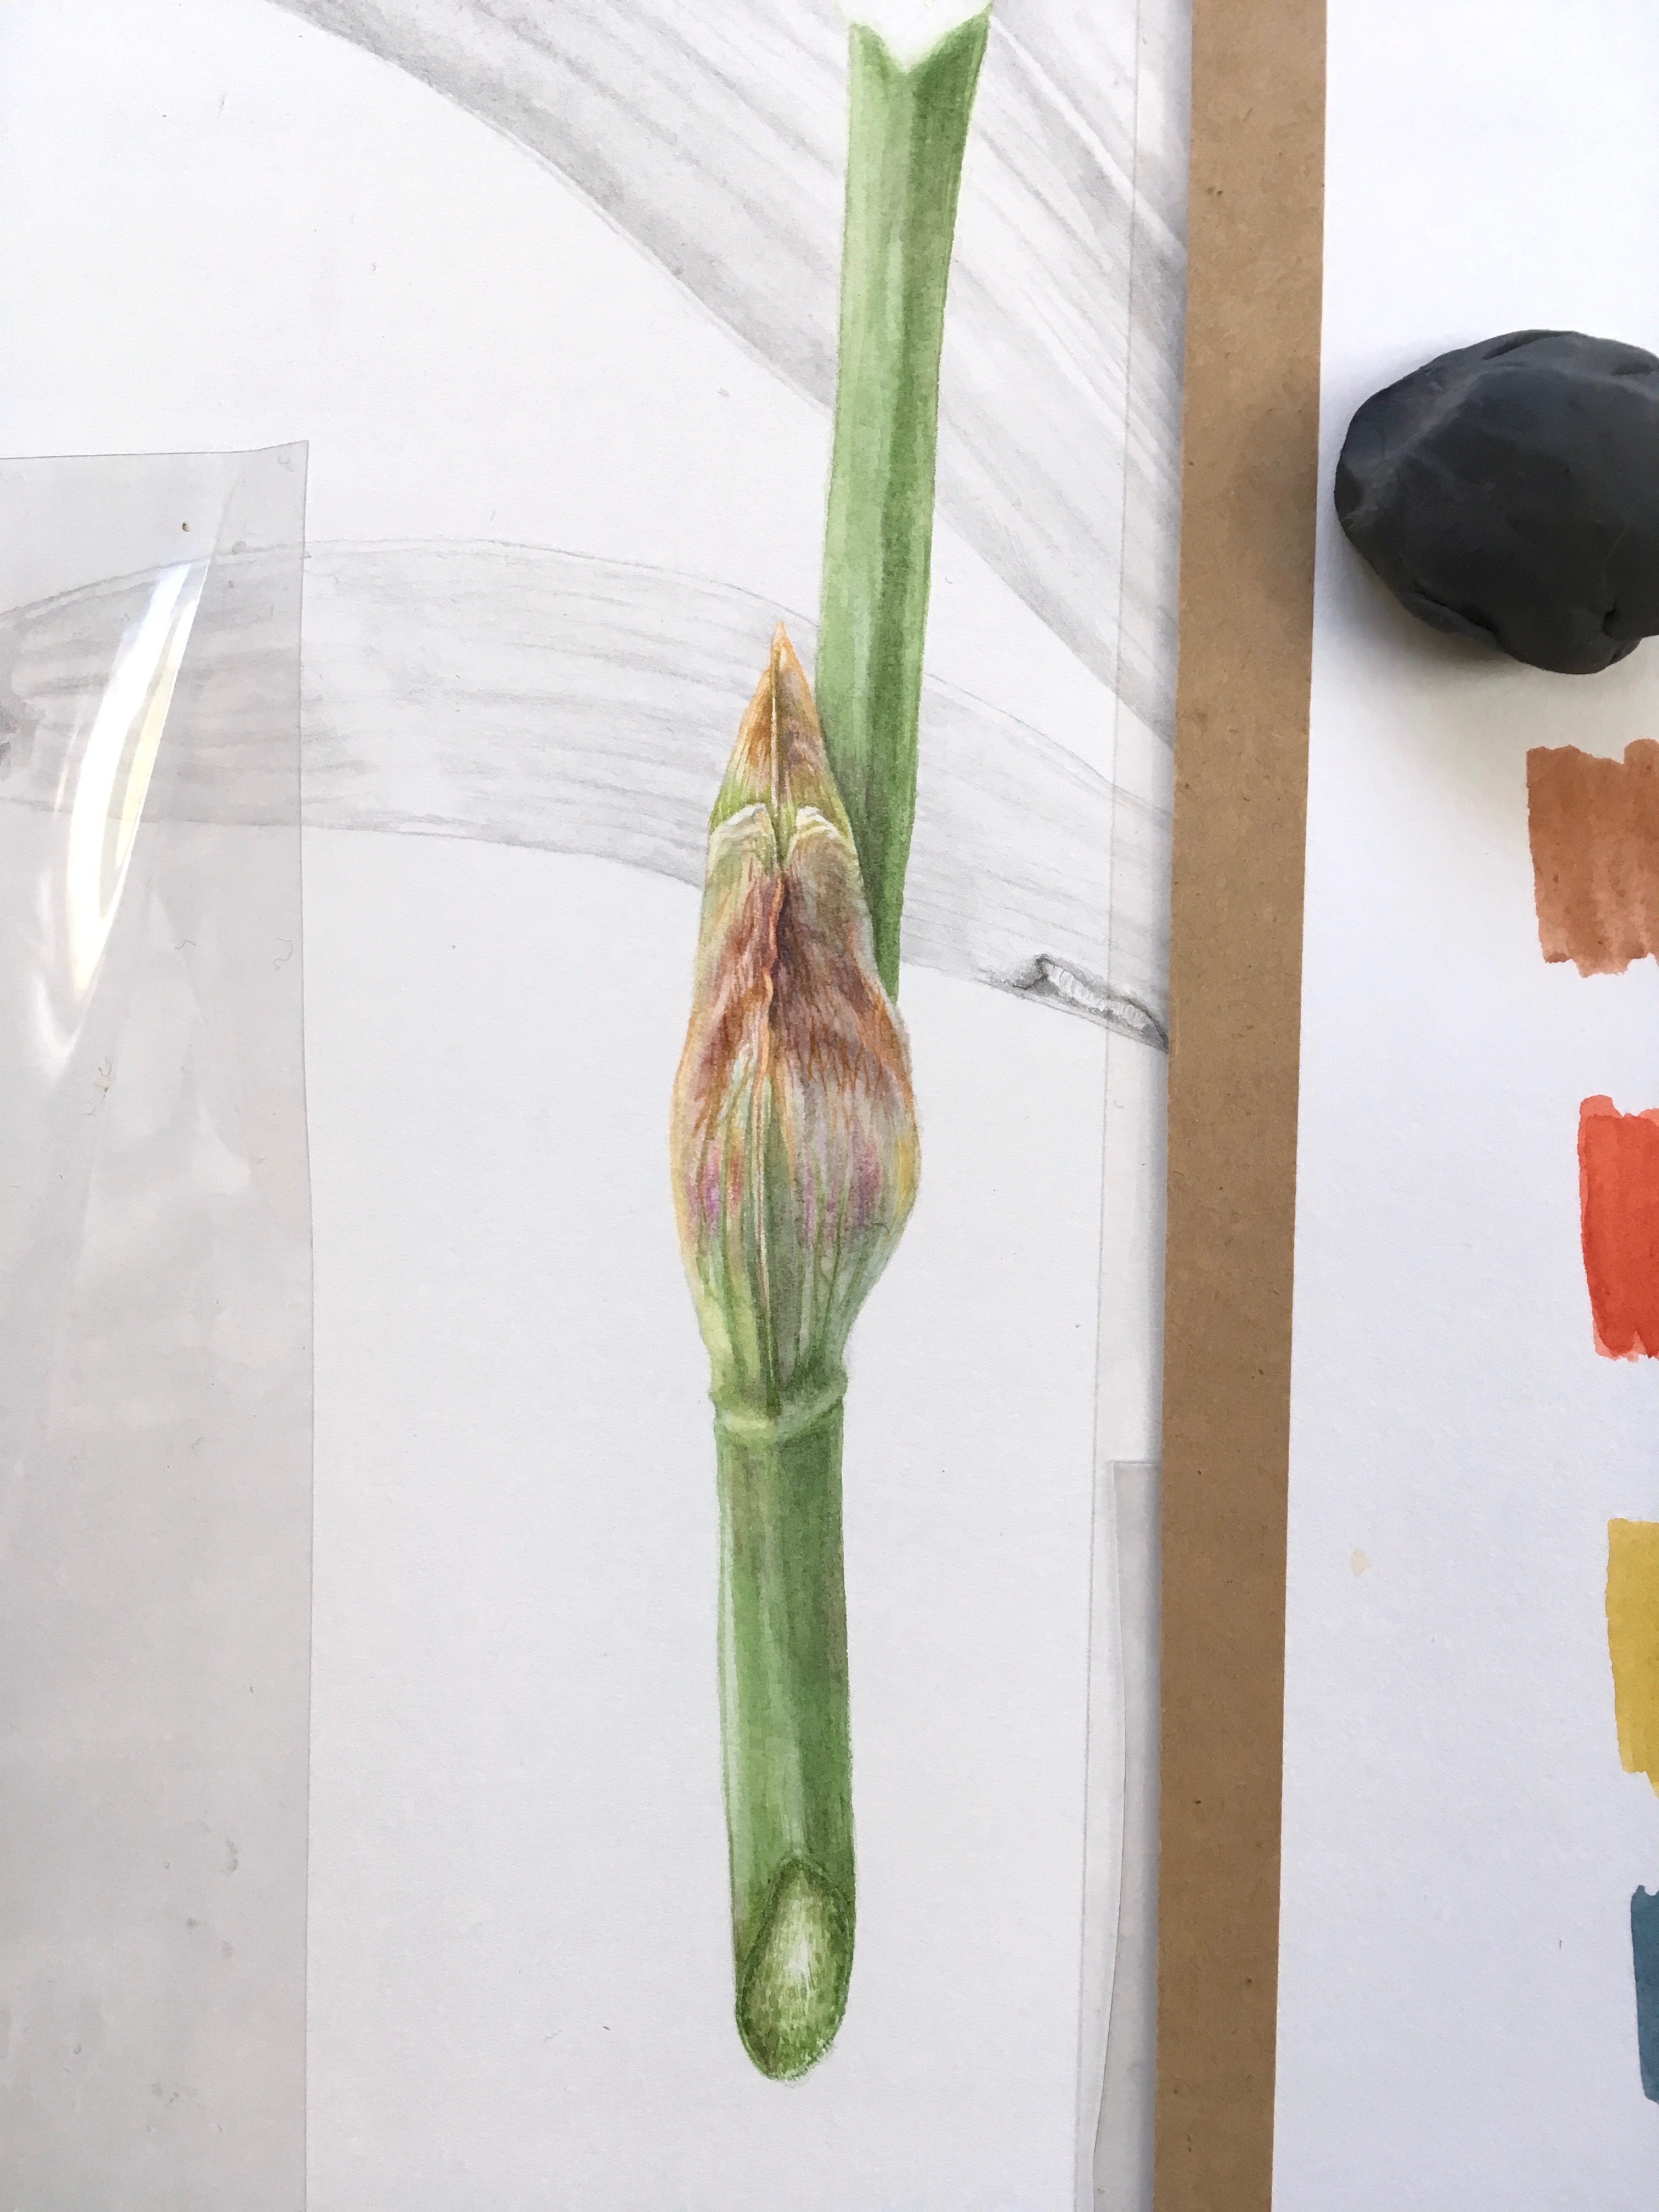
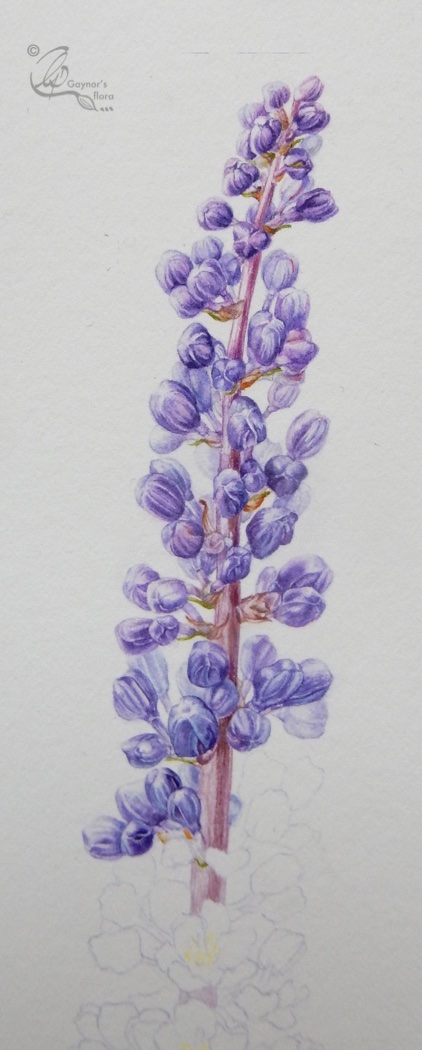
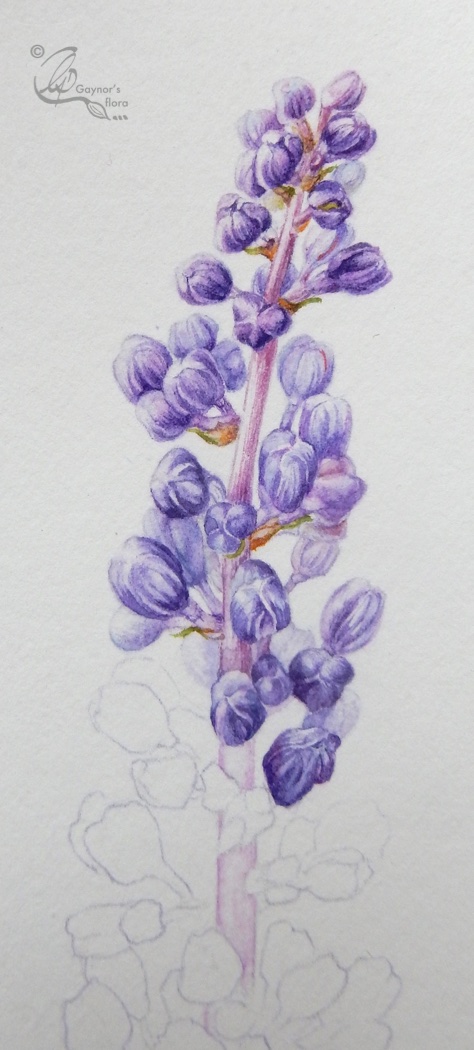
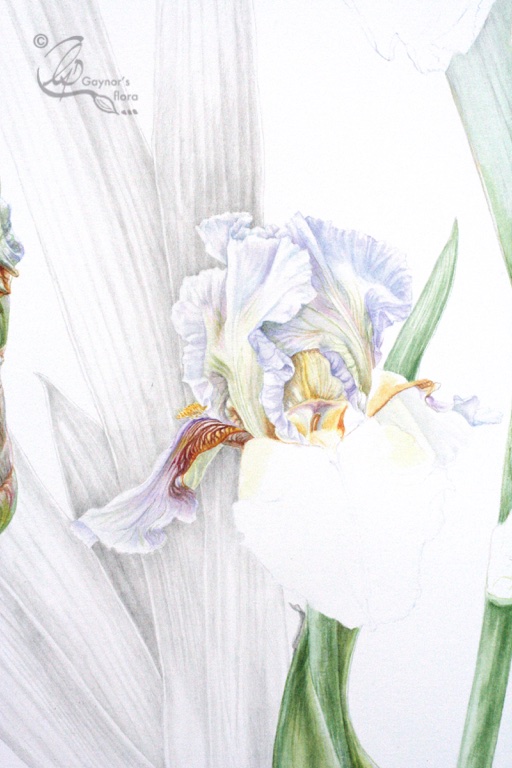
I finished off last time with the bud spike on the left hand side of the artwork. Now I will show you the start of the main flower spike, which needed to be divided in two because of the height of it.


This is customary in botanical art when painting correctly.


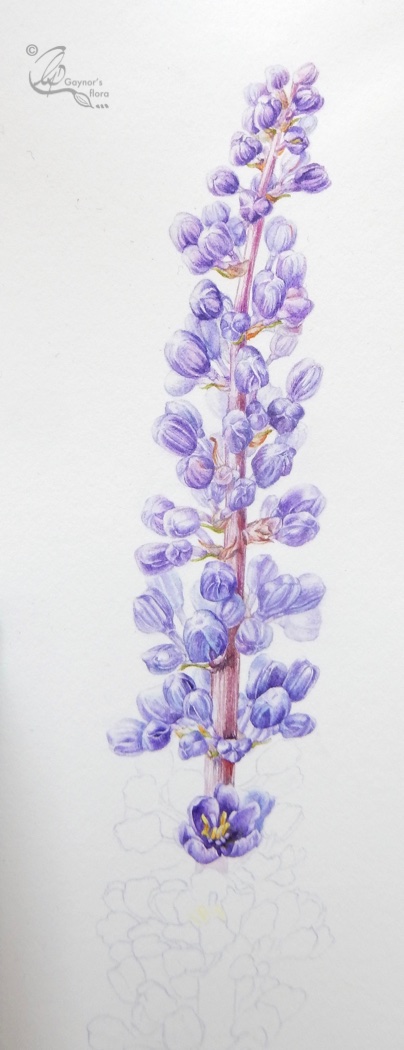
It is important to give an indication of the habit of the plant if painting life-size and the plant is very tall; try to include as much of it as possible in the same painting. I have divided the flower spike in two and have shown the cut ends with the same profile at the cut edge.

On this stem you can clearly see the flowers and buds spiralling off.

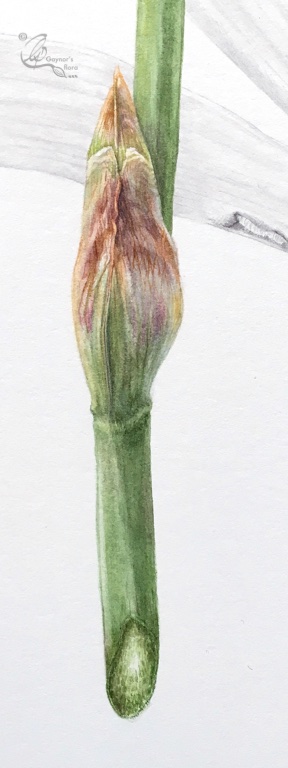
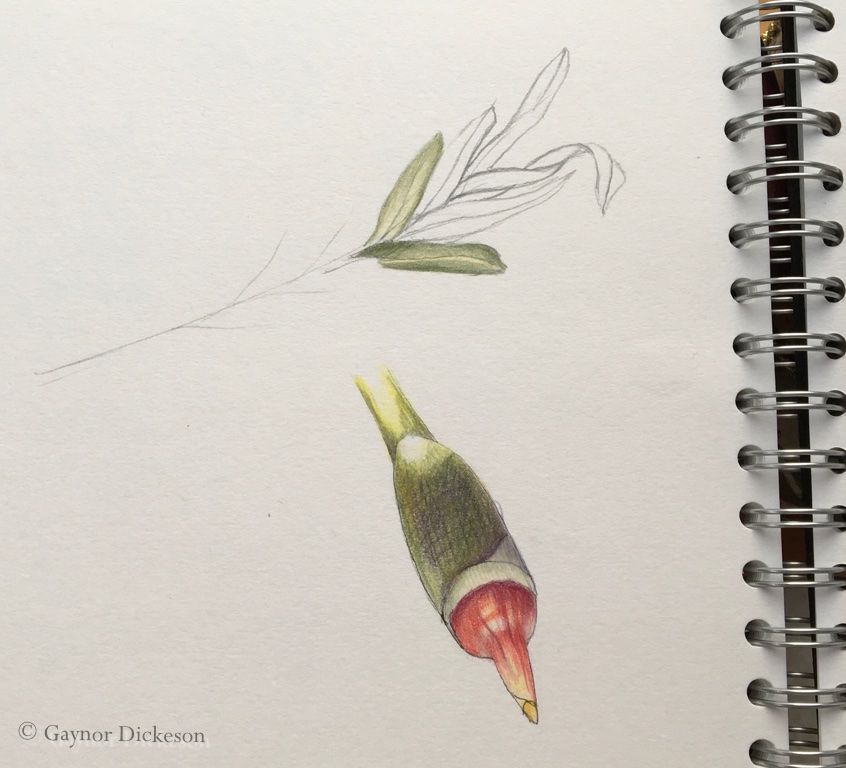
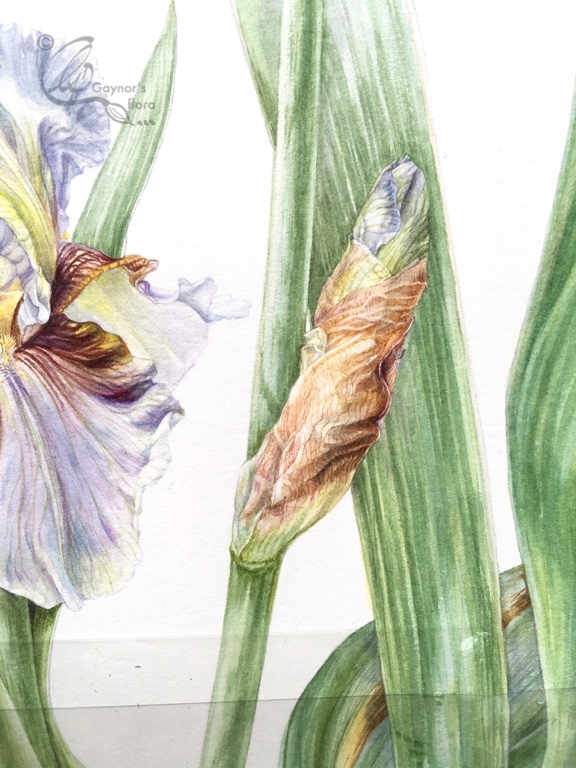
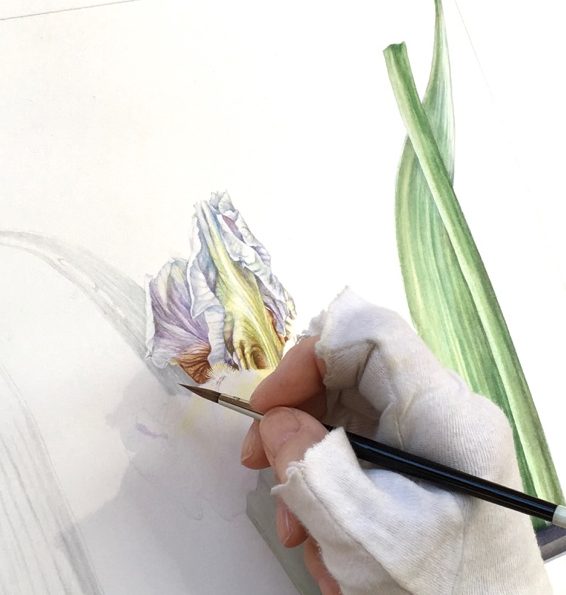
I have started off with a pale wash for the bud leading up to the main flower before completing the detail with a dry brush technique.

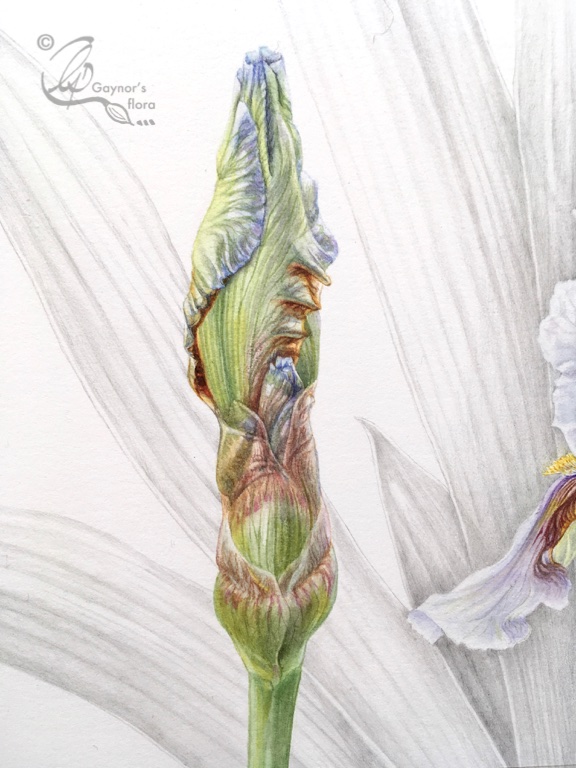
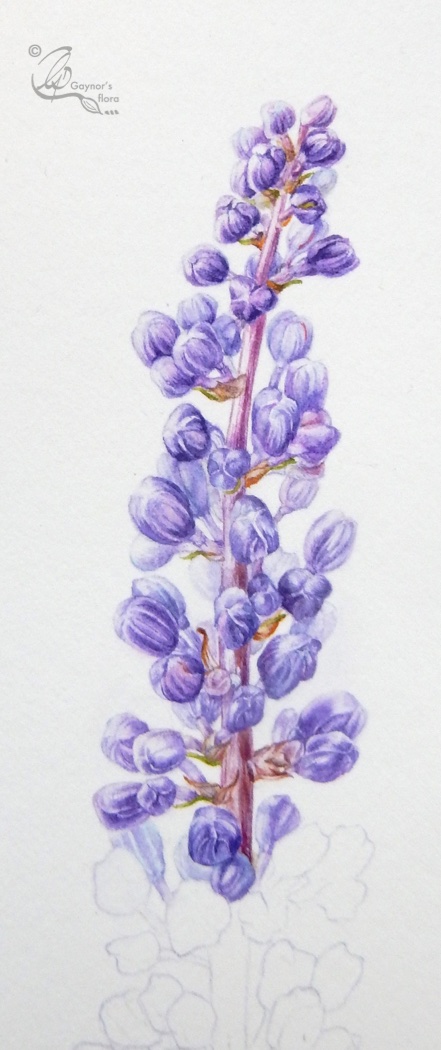
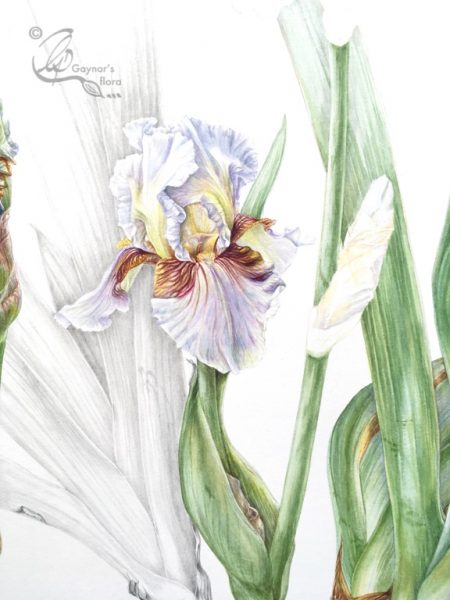
Now the start of the top flower and he developing bud just underneath. This was actually quite difficult to get right.


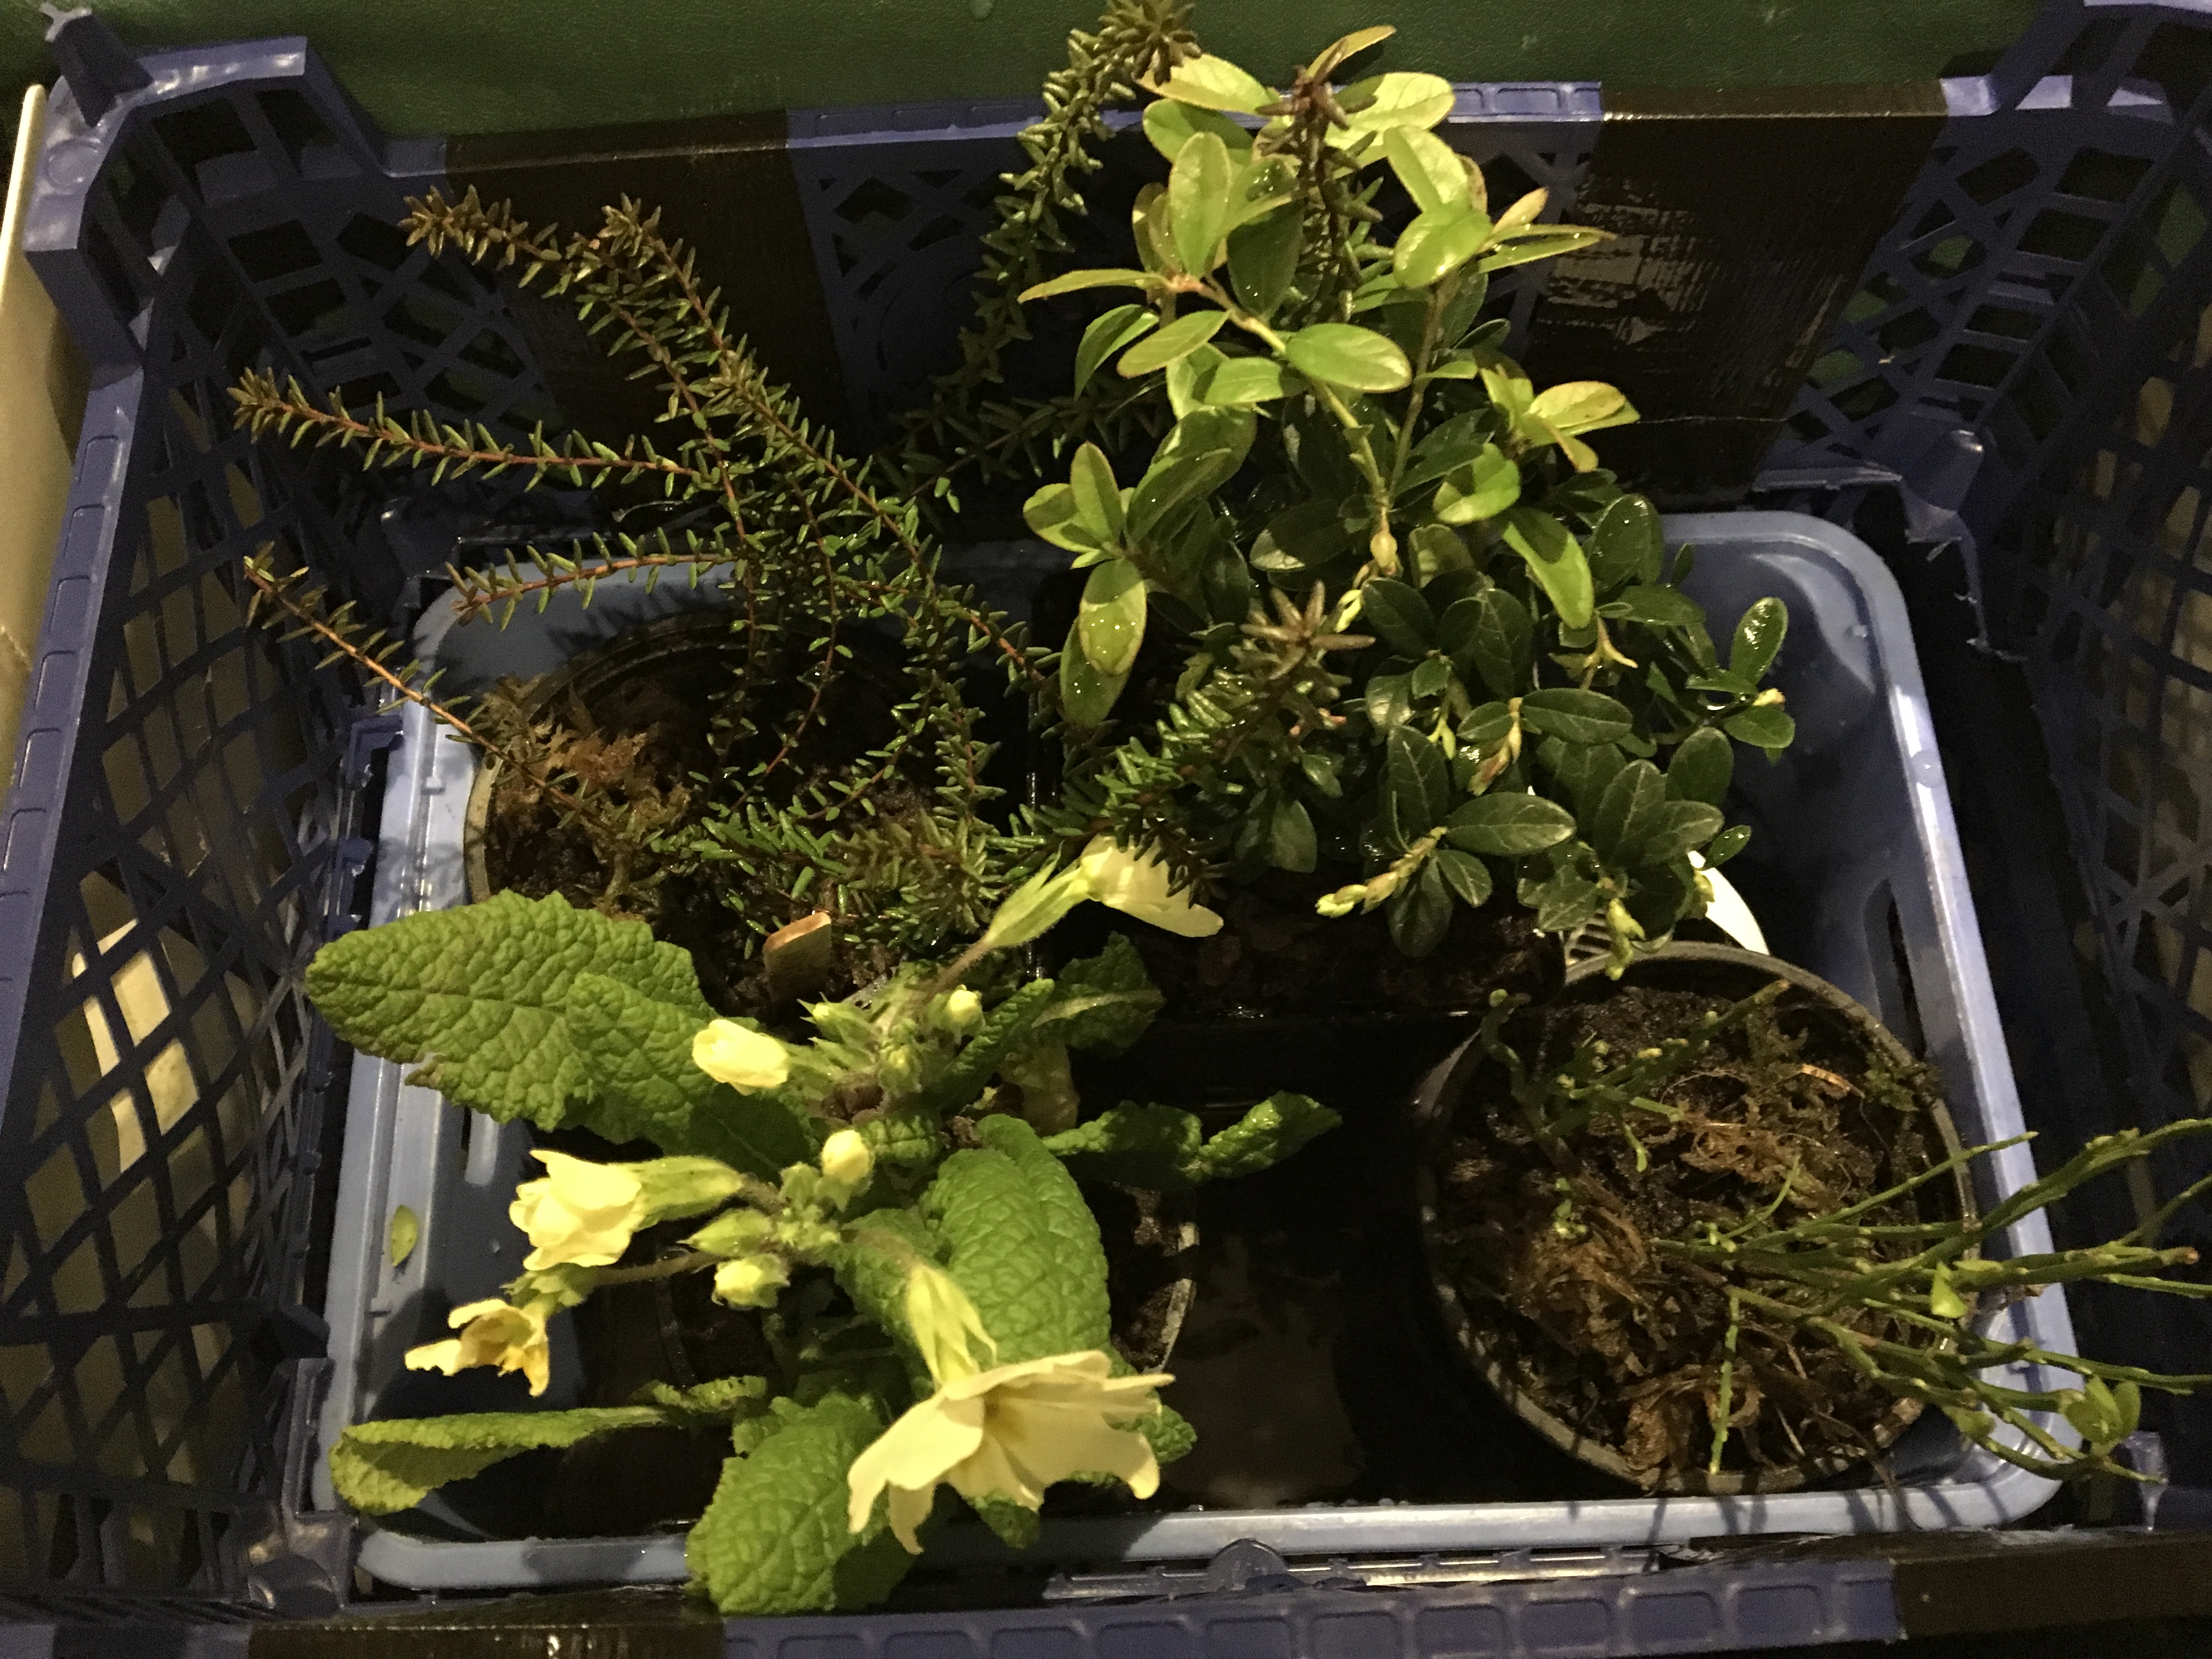
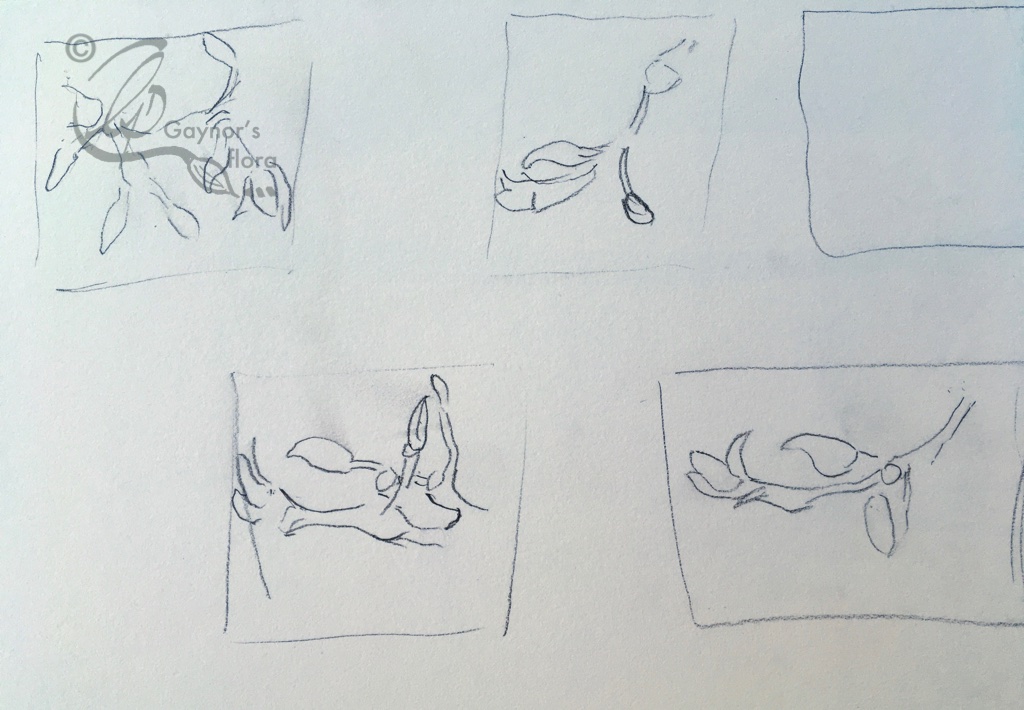
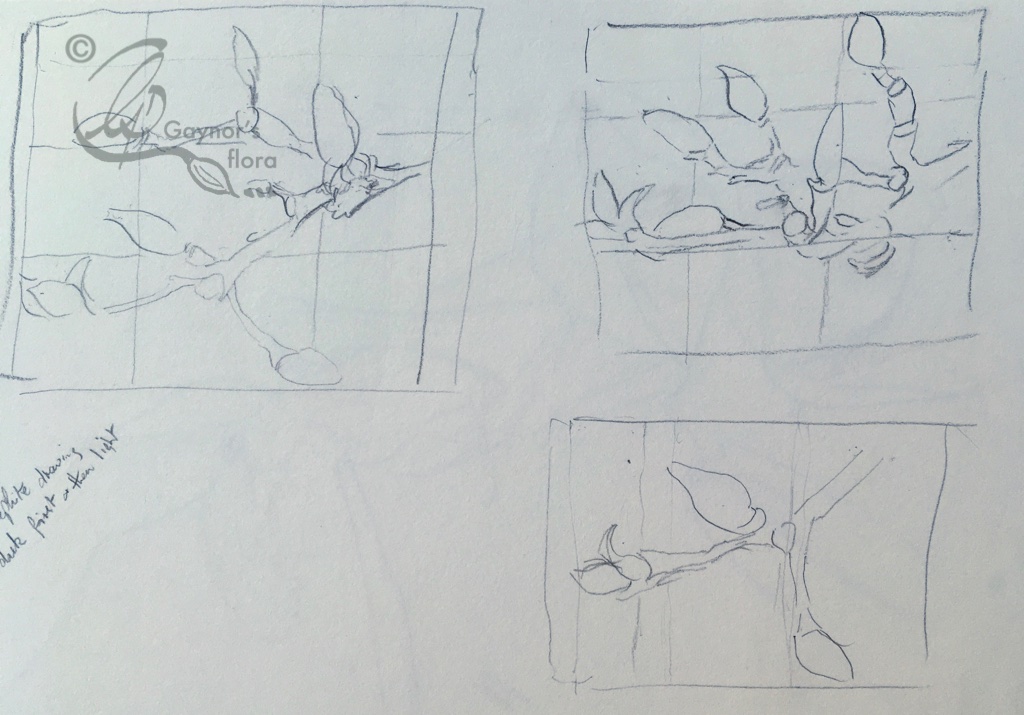
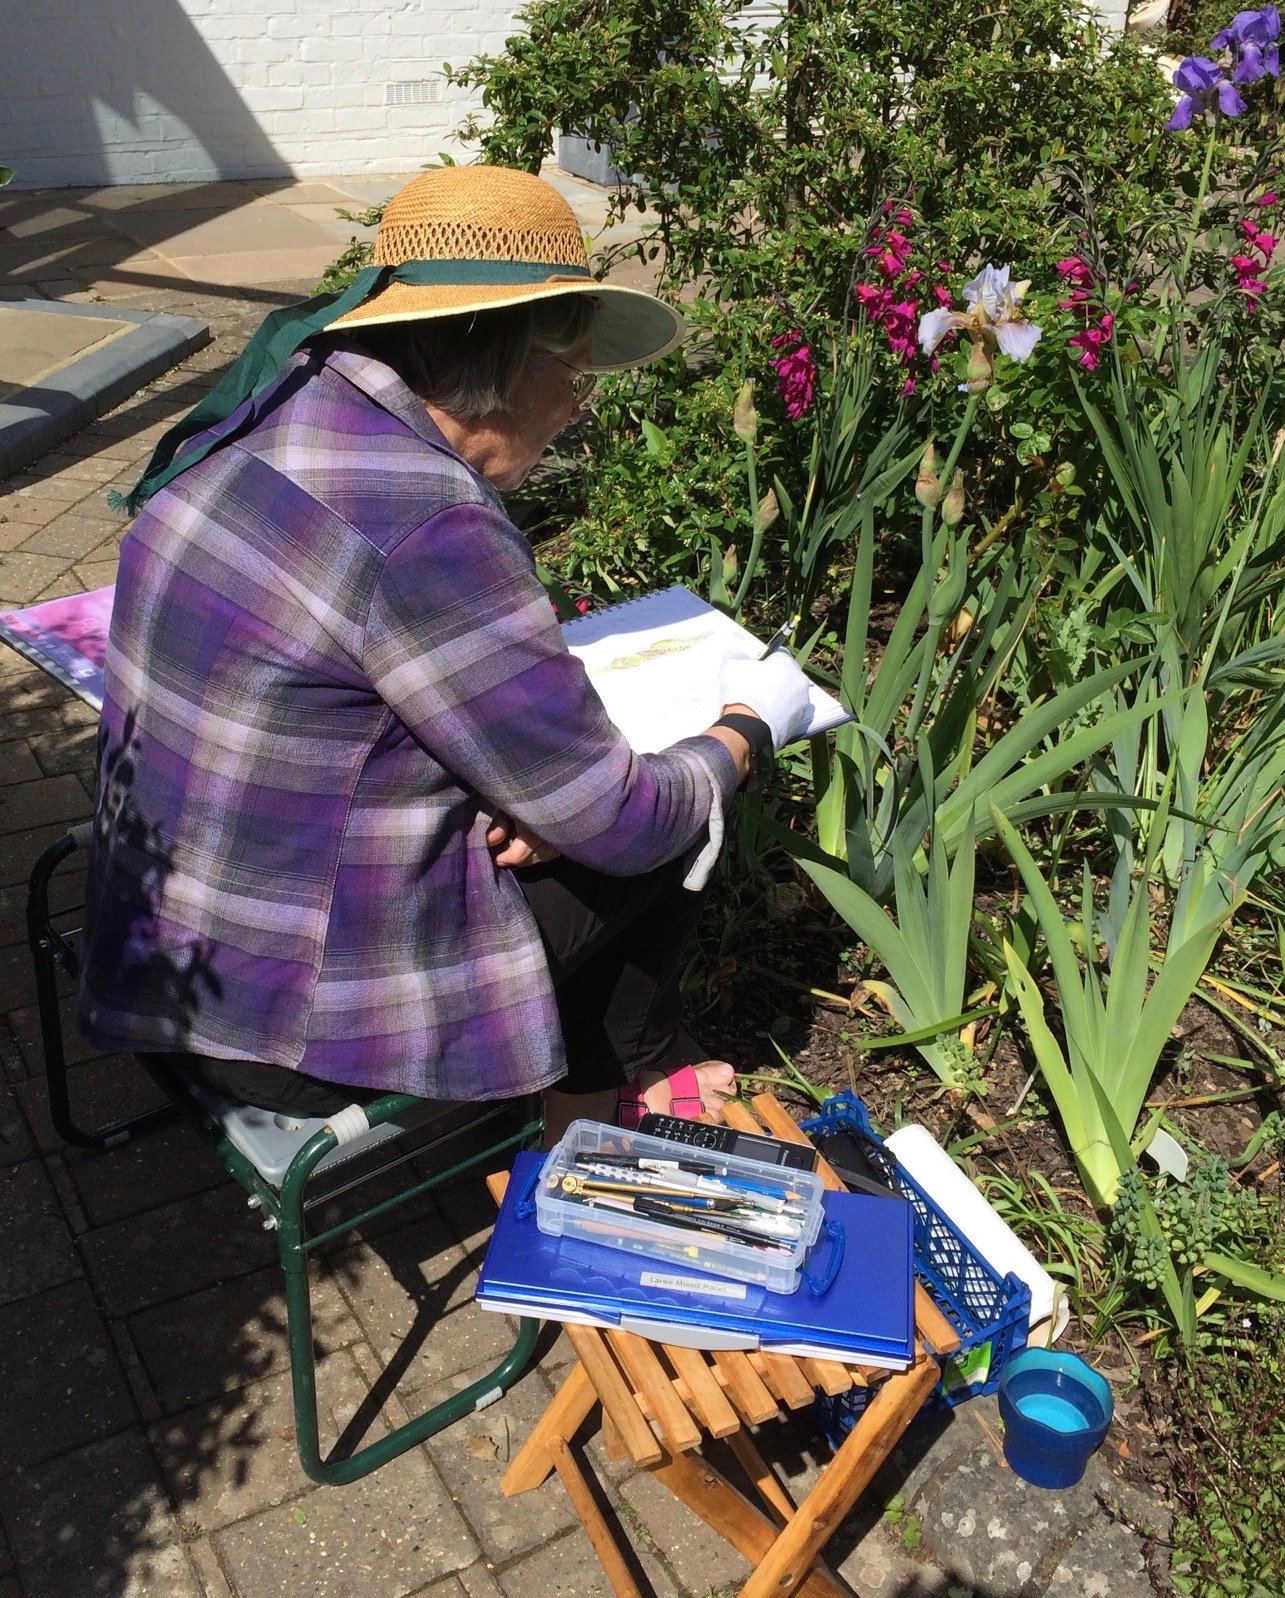
All my sketches were done outside in the garden last year and if you don’t keep your head still while drawing, the detail visible will change.

If you are enjoying following the stages in the development of the Benton Iris ‘Farewell’, you might like to come to my next workshop March 23-24th, where this time we will be concentrating on a line drawing and tonal sketch. Normal, good preparation for any botanical art painting. Get in touch with me via the contact form below if you would like to join us. The details are on the Workshop page of my website.

Look at the last blog of 2017 to remind you about how I started off this Iris. https://gaynorsflora.com/2017/12/30/last-gaynors-flora-blog-of-2017/.

Although botanical art is fairly strict in what is ideally included in a picture, it is quite wide ranging and much wider than for pure botanical illustration. But it is important to remember that what I show you in my blog is my style of working. There are many different styles and none are wrong; It is the result that counts!


Last but not least the link to the Association of British Botanical Art website: www.britishbotanicalartists.com/2018exhibition

Go back

Your message has been sent

Warning
Warning
Warning
Warning

Warning.

A little bit further with the Benton Iris ‘Farewell’

The Botanical Art Worldwide Exhibition; “In Ruskin’s Footsteps”, which is the English and Welsh contribution to the global exhibition happening 18 May 2018, is taking all my time these days, in addition to marking some really interesting assignments. Attracting people to look at botanical art and perhaps trying it is always an exciting prospect. For the exhibition, go to the Association of British Botanical Artists (ABBA) website: www.britishbotanicalartists.com. Here you will find all the updated information.

For my online botanical art course go to:gaynorsflora.com/tuition-2/online-botanical-art-course/

But I have done some more of my painting the Benton Iris ‘Farewell’. Last time I had done some of the leaves and told you that I was going to use graphite for some of them. I have decided that to show the habit of the Iris to the best advantage with the fan-shaped leaves, I would do these solely in graphite. In this way the overall effect of the picture will not be too heavy and the flowers will come to the for.

It was not easy doing so much graphite on the heavy Fabriano paper (640gsm) and I will need to adjust the strength of this as I add the flowers.

Below you get an idea of the overall layout of the picture with the flower spike with buds on the left side of the picture.


To the right is the bottom bud on the flower spike. After finishing this section I needed to adjust it because it came directly below and in line with the top bud. But as in so many plants the buds spiral round the stem and of course this is an important part of correct botanical observation.

The ideal would have been to get it right first time during the line drawing and not after having painted it! The image below is the corrected version. Here you can see the centre line at the bottom of the bud, has been moved slightly to the left.


And so the voluptuous terminal bud, with another one developing at its base. The bud of the Iris Farewell has a very typical shape to it and in my garden where I have different Irises, I can see the Farewell straight away. The tip is almost squared off rather than pointed. I think this is part of its attraction.
You will notice that I have started the flower to the right, but I will come back to that in my next blog. Whilst painting each section of my composition I am constantly looking at the rest of my picture and adjusting as I go along. I added a little more shadow to the right of the bud after I had started the flower. The image is from that stage.

I hope to get back to you soon with more images from the development of this picture.

I have another workshop in just over a week’s time. 23 – 24 February is a workshop on Composition and Perspective. If you want to improve on these particular topics in your own practice, sign up for the workshop as soon as you can.

Last Gaynor’s Flora blog of 2017

First of all I hope that everyone able to follow my blog had a very peaceful Christmas. Thank you for your interest in my work over recent months. I hope that it has encouraged your own botanical art involvement.

I have been quiet for a while as I have been so completely engaged in the UK preparations of the Botanical Art Worldwide Exhibition  opening 18 May 2018. But during relatively quiet moments I have been working on my next painting for the Benton Irises Florilegium.

Today, has been one such day. Although we have family visiting over Christmas and more due over the New Year Period, I managed to work a little on the composition of the Benton Iris Farewell.

This is an absolutely stunning Iris which at first glance is white with reddy-brown falls. But when taking a second look, white does not describe it. The Iris seems to pick up all the colours of the rainbow!

I now have several plants in my garden and in the spring made full use of all the days I could sit out in the sun and sketch it. These are some of my preparatory sketches.

This slideshow requires JavaScript.

Today I worked on the composition and it is completely different to that which I had anticipated. I had already scanned my sketches and moved the different parts around on my computer screen after having worked out where my Golden section and area of focus was likely to be. From this exercise I thought I had a rough idea of what I wanted to do, so started sketching it.

This is my rough layout. Where do you think the area of focus is? Is it in a Golden section? Is the eye lead around the composition?

Colours will also influence the final composition as will weight of the various elements.

I hope to keep you up to date with how the painting develops, but that is dependent upon the amount of work with the Worldwide exhibition. Do look at www.britishbotanicalartists.com.

HAPPY NEW YEAR

2018


Thymus vulgaris – a botanical art project.

Have you ever really looked at Thyme when you are using it in cooking? I bet you haven’t!

I have been asked to paint a botanical picture of Thymus vulgaris. Note the correct way of writing a binomial scientific name correctly; all in italics but with the capital letter at the beginning of the first word only.

My heart sank when I got the email asking me to do this particular plant. Imagine, all that ‘tiny-ness’! How on earth was I going to create a beautiful picture from this subject, one in which the viewer wanted to take a second look. The picture still isn’t painted yet, so the result will not magically appear at the end of this blog. However, I thought you might be interested in both my thought processes and my work progress.

I eventually got a plant that said it was Thymus vulgaris.

Thymus vulgaris

In actual fact, I got three – all of them different. I knew that the leaf had to have a furled edge; two of them had furled edges. When the flowers eventually started to appear I knew that the stamens would be protruding from the tube created by the four petals. One of them did not have protruding stamens as they remained just under the fused lip of the petals. The last one did all the things I expected it to do. Or did it?

When the last plant had flowered for a while, some of the flowers didn’t have visible stamens. After much research I discovered that in fact the same plant can have flowers with all the reproductive systems in place, but some flowers are sterile as they only have a style and stigma. Whew, what a relief. I now had a suitable subject. Do you like it? But where to start!

A quick look at the leaves

As you now realise I had to do quite a bit of investigating in relation to this plant. It helped me get to know it so that as I observed, researched and sketched, thoughts for my final composition began to be a little clearer. I also found that although it was a challenging subject (apparently I like challenges). I also really began to appreciate the plant and wanted to include things in my picture that would tell others about the plant. However, one of the challenges is that there were to be no dissections! That is often how I show others of what a plant is comprised.

Botanical art is an exciting subject and it really helps you to observe things around you. So we start off with the leaves. Have you noticed anything strange about them. Have a look at a real one, rather than my pictures.

Trichomes on the leaf

You will notice the appearance of little dents in the surface of the leaves. This is the same ones under a microscope. Do you see the little dents are in fact Trichomes, a special type of hair that produces aromatic oils. The oil is the part that smells so good when you crush the leaves before adding them to your cooking. But see if you can see where else the hairs are and the oil is:

Trichomes on the flower bud
Trichomes on the flower

Every part of the plant can be used in your cooking as every part produces the aromatic oils. Exciting isn’t it?

But what about the parts that need to be included in my picture? Although I found this particularly interesting and wished I could include this information in my picture, this depth of detail was not needed by the client.

However for me, Thymus vulgaris had moved up in my regard from being a plant with lots of tiny bits that smell nice, to being a complex and interesting plant. I hope I do it justice.

A Flower spike


I decided to do a whole lot of sketches in my sketch book. This helps hands to get to know the painting of the plant, the size at which I am showing it, the colours and hopefully an idea for the composition.


Me painting away with a magnifier on my head.

To see the plant I needed to use a magnifier, which lead me to enlarging the flower spike for everyone to marvel at the detail of the individual flowers.I did three spikes before deciding which one to use for my final composition. You can see by my clothes that the weather was a lot colder when I started this project!

<a


I now had a better idea of which sketches I wanted to include in my final picture. I wanted to show the flower spike enlarged so that the flowers with their magnificent coloured anthers were clear. I also knew that I needed to give a suggestion of the surface texture of the leaves, front and back as well as the growth habit of the plant.

A trial composition,
Final composition
The final painting started.

UK native plants packed for RHS botanical art exhibition

Packed and ready to go.

Tomorrow two of us are travelling up to London to set up the ABBA table in the RHS Lindley Hall, Vincent Square near Victoria Station. It will be the RHS botanical art show with the best of International botanical artists showing their work. Neither of us are exhibiting our own work this time, but we will be demonstrating different techniques.

The main reason for having the table at the exhibition is to talk about the plans for the Worldwide Botanical art day in May 2018 and to encourage British botanical artists to take part. A new Association of British Botanical Artists (ABBA) formed to do this has put an initial ‘call for entries’ on it

Www.abba2018.wordpress.com

On  Friday and Saturday this week, I have chosen to demonstrate a sketch book or study page in graphite and watercolour from  one of the native plants I have packed to take with me. Come along and see how I do this.

Apart from the Primrose, do you know what these plants are called?

The one on the right, with hardly any leaves just yet, is a Bilberry. This is a small wild blue berry. It doesn’ look very interesting at the moment, but if you are going to paint the portrait of a plant, including something from various stages in its life cycle, makes the resulting picture more interesting.

The plant above  the Bilberry with the small oval leaves is Cowberry and has small red berries. You might know it as Lignonberry and has smaller and sharper tasting berries than cranberries. This plant has the beginnings of tiny flower buds.

The one above the Primrose is a Crowberry and will eventually have small, almost black berries. Again the plant doesn’t seem so interesting in this stage of its life, but I think might offer some challenges whilst painting its portrait.

Common for for all three species ( not the Primrose) is that they all produce fruit that is edible.

I am lucky enough to be able to do some sketches now, while the plants are only just coming out of their winter state. This will be particularly useful for me and for future work I have planned.

Do come and see us at the RHS, Lindley Hall, Vincent Square, Friday and Saturday.

Does anyone know what this is and is it native?

I hope you now have an idea as to why I have been focusing on native plants recently?

For those who are still not aware, we have formed a new organisation for all UK botanical artists whether they belong to an organisation or not. It is called ABBA, the Association of British Botanical Artists, although slightly a misnomer as this also includes Norther Ireland.

Why was this started? Well, the American Society of Botanical Artists (ASBA) initiated a worldwide botanical art day for May 2018, inviting all nations to to join them in organising a botanical art exhibition in each country. Some of us felt it particularly important that the UK was represented because we have some brilliant botanical artists here. Some of them remain independent and have no allegiance to any organisation. Therefore having an association inviting everyone, was the answer.

For more information about the exhibition, please look on the ABBA website:

abba2018.wordpress.com

But, today during my latest workshop, I was looking through my sketchbook and found the following drawing. I know that I did it through a microscope at an Institute of Analytical Plant Illustrators (IAPI) meeting, about mosses and liverworts. The problem is I was stupid enough not to write what it was. Can anyone help me, and is it native to the UK?

? Bryophyte capsule
? Bryophyte capsule

I have a strong suspicion that this is a Bryophyte capsule, but of course it doesn’t tell me which one and therefore I don’t know if it native.

My next sketch is native and is Deadly Nightshade (Atropa belladonna). I think this is a really beautiful plant, although, if walking past it the colours of the flowers are rather dull. But of course the plant is often seen with flowers and large, shiny black berries at the same time. One day I hope to paint it, but I will have to be careful with it.

Atropa Belladonna - Deadly Nightshade.
Atropa Belladonna – Deadly Nightshade.

Next week, 24 and 25 February, ABBA will have a table at the RHS botanical art exhibition in the Lindley Hall, Vincent Square, London. We are there to tell you about the exhibition in May 2018 and how you can take part. Additionally, over the two days, Sarah Morrish will be demonstrating on Vellum, Lucy Smith in pen and ink, and I will be doing a graphite and watercolour worksheet.

Please make yourself known when you visit us.

I am sooo-o chuffed after this weekend’s workshop!

Yesterday and today was the first botanical art workshop of the year in Bosham. What do you paint in the wintery months? There are loads of interesting subjects in the hedgerows. The title of this workshop was textures and as usual I tried to make suggestions as to what these may be.

My workshops have a limited number of participants so that everyone gets help where they need it. This time people brought catkins, bark, ash keys, pine cones, algae and magnolia buds. I also brought in some lambs ears (leaves) and sticky buds (horse chestnut).  There was an ample supply of everything and people worked in coloured pencil, or watercolour, or graphite.

My workshops always begin with a little about composition; a subject everyone seems to be scared of, and drawing. Everyone always wants to jump straight into the painting, but of course the final painting is never better than the planning that has gone into it.

This time, as I knew everyone from previous workshops (normally there is at least one new person), they felt it was OK for me to concentrate more than usual on the compositional aspect of botanical art.  They duly did their thumbnails and decided which one they would focus on to create their line drawing. I am going to show you the progress of one student from thumbnails to where she got to today.

Magnolia soulageant buds

Version 2

We talked a lot about the Golden section, rule of thirds, diagonals and ignoring the lot!

Of course we mustn’t forget that the workshop was also about textures, so I demonstrated different techniques in all three media. Of course they found that the furry buds were the most difficult, but everyone persevered and got some amazing results.

This slideshow requires JavaScript.

So finally, why am I so chuffed? Well, those who chose to do the Magnolia buds in watercolour, actually mastered the dry-ish brush technique that I use. Many do give up on this because the issue is the water/pigment mix, and taking care of brushes and picture at the same time. But I think the part giving me the biggest thrill were the compositions. I have superimposed two of the pictures with the three-by-three golden section divisions that help to find where the focal point is best placed. The eye was drawn in particular to these two pictures in main because of their composition, but also their fluffy buds. Remember they are half finished, but they just show how a well planned composition can have a good effect on completing a picture. Do you agree?

Magnolia x soulageana terminal buds in graphite.
Magnolia x soulageana terminal buds in watercolour.

Thank you and the Liriope mascara

Thank you to all the lovely people who have visited us over the weekend during the Open Studio event. It was good to meet new faces, put faces to names and of course see those who come regularly. It was a lovely weekend and the weather also put on a smiling face.

We still have a lot to put away, but this is Robin hard at it!

Robin doing the heavy work after Open Studio

I have continued to work on the Liriope muscari picture. But continuing on from the last photos, these are days 5 and 6.

Day 5
Day 5
Day 6
Day 6

Liriope & Open Studio

What a busy life, but who would have it any other way! This is both a progress report on the Liriope picture. Two days worth again, although I didn’t get anything done yesterday as we were preparing to welcome all those wise people who have decided to come and visit our home this weekend.

We are now ready and waiting for your visit during the Open Studio event – or at any time. Welcome!

Robin and I welcome you!

But what you are really wanting to see is the Liriope muscari. Come and see me working on it this weekend.

Day 3
Day 3
Day 4
Day 4